Tools and tips
Overview
This page contains useful tips for working at GitLab and for various tools we use.
Sub-pages
- 1Password and Environment Variables
- Editors and IDEs
- emacs
- GitLab Web IDE
- Jetbrains IDEs
- Code Inspection
- Common Jetbrains Setup and Configuration
- Individual IDEs
- Licenses
- Tracked Jetbrains Issues
- Sublime Text
- vim
- Visual Studio Code (VS Code)
- git
- How to create a directory
- Linux tools and tips
- macOS tools and tips
- Mermaid Layouts
- Other apps
- Personal VPN
- RuboCop
- Searching GitLab like a pro
- Slack
- Zoom
GitLab tips
Change your username at GitLab.com
- Starting point: let’s say your username is
old-maryand you want it to be justmary. - Note: each GitLab account is tracked by an userID, which is a number stored in a database. If we change the username, the userID does not change. And all the permissions, issues, MRs, and relevant stuff within GitLab are related to your userID, not with your username.
- Note: if you are not a GitLab Team member, the same process applies except your e-mail (STEP 2), which will be different (will not be @gitlab.com email), so you can replace it with your own email account.
STEP 1: Request your new username
- Access the username you want to request via
https://gitlab.com/mary. - Check its activity and projects to see if they are an inactive user according to the name squatting policy.
- There’s no guarantee that the username will be available for you.
STEP 2: Create a new account with your new username
- If support replies to you telling that the username is free to use, create a new GitLab.com account with it. Use a personal email to register your new account and choose one that has not been used with your old GitLab account.
- Navigate to your Profile Settings > Emails, and add a new email.
⭐️ Trick ⭐️ If your email at GitLab is
mary@gitlab.com, add the new email asmary+something@gitlab.com: this is a Gmail trick! All your emails sent to this alias will end up in your GitLab email account 😃 - Navigate to https://gitlab.com/-/profile/notifications and choose the notifications email:
mary+something@gitlab.com. - Open your old account in one browser and the new one in another browser (e.g., Chrome and Firefox, or Chrome and Safari) - log in to both accounts at the same time.
STEP 3: Let’s have some fun (kidding, this is critical!)
- Navigate to https://gitlab.com/-/profile/account in both your accounts.
- Look for your username. This operation has to be done quickly, otherwise you are risking to lose your awesome new username to someone else quicker than you. We need to swap the usernames between both accounts, so you’ll keep all your history, your privileges, issues, and MRs assigned to you, etc.
- If you work with 2 monitors, open each browser on one monitor. If you don’t, open them side by side, so that you can keep an eye on both at the same time.
- Rename your new username
maryto something likemary-1and DO NOT click update username yet. Rename your old usernameold-maryto your new usernamemaryand DO NOT update that either. Just leave them typed into the boxes. - Make sure you did the previous step right!
- ⚠️ CRITICAL ⚠️ Update the first one (
marytomary-1). Immediately, click update on the other one (old-marytomary). - Immediately, rename the
mary-1to your old oneold-maryand click update username again. - Ta-Da! 🙌
STEP 4: Move your projects (or not)
- Now, if you have any personal projects, you might want to import them to your new account (the one that has your old username now).
To do that, in your new account (the one with the old username), click Create a New Project, give it the very same name as the original one, click Git - add repo by url, and paste the
https://URL of your project there. To make things easier, make sure all the projects you want to import are set topublicview. You can make them private afterwards. - If you have GitLab Pages projects with the default GitLab.io url, you will need to import them to you new account, then make a change to trigger a build and redeploy your site.
They will be affected only if you’re using a CNAME with a subdomain instead of an A record.
This won’t affect Pages projects that use custom domains, as they all point to the same Pages server IP via
Arecord. Your groups won’t be affected either, as they operate under their own namespace. Add both users as members of your groups and nothing changes.
That’s it! Don’t forget to update your username in the following places:
- team page
- Marketing Handbook, in case you’re a Marketing Team member.
- Workday - GitLab Username under ‘Additional Data’ > ‘View all’ in your profile actions
STEP 5: Set up your notifications
Team members choose to manage their GitLab activities in different ways. Setup your notifications in a way that works best for you.
- To-do list: all team members will see a to-do list within their GitLab account. This will track different action items. Items can be marked as done as they are completed.
- Email: team members can choose which, if any, notifications show up in their Gmail accounts by using filters.
- Slack notifications: team members can choose to enable Slack notifications. Please note that GitLab slack expires after 90 days, so this is not a tool for longer-term activity management.
GitLab team members’ resources
The GitLab team-member resources project has a wiki for sharing among GitLab team-members.
It’s for topics like parenting where people may want to share knowledge, but the handbook is not the best fit.
GitLab team members’ setups
@tipyn’s home office equipment and macOS setup
Linking Gravatar photo
Link your GitLab email address to an easily recognizable photo of yourself on GitLab, Slack, and Gravatar. It is company policy to use a photo, and not an avatar, a stock photo, or something with sunglasses for any of your GitLab accounts, as we have a lot of GitLab team-members and our brains are comfortable with recognizing people; let’s use them.
Note: If you upload your photo to Gravatar associated with your gitlab.com email, then you can simply not set an image in your GitLab and Slack profiles and they will automatically use your Gravatar photo. If you already uploaded individual photos to your GitLab and Slack profiles, simply removing them will cause your avatar to use the Gravatar photo by default.
Using Mermaid
Mermaid is a tool that allows us to create flowcharts, graphs, diagrams, Gantt charts, etc. within GitLab! Check out the examples in the GitLab docs on how to use Mermaid.
A few additional resources that can be helpful when working with Mermaid are:
- The live mermaid editor to check your work!
- GitHub’s Mermaid overview
- A CSS color bank to add color to your charts.
- You can see an example of how to add images to Mermaid charts here.
- Examples of Mermaid charts that have been created by GitLab team members:
- Talent Development Program Chart by Cassiana Gudgenov, People Compliance Partner
- CEO Year at a Glance
- Data Infrastructure System Diagram
- Advanced layout demos for Mermaid diagrams
Note: When creating Mermaid charts in the GitLab handbook, you need to type three back tick symbols followed by the word mermaid before the chart, and three back tick symbols at the end of the chart. This will enable Markdown to distinguish between .md and Mermaid. Please reference the example Mermaid charts linked above to see how this looks live.
Visual help to differentiate between GitLab servers
If you are working on multiple GitLab instances and want to have a visual differentiation, you can change the default Navigation theme to a different color.
Calculating the GitLab handbook page count
Page counts are determined through a simple two-step process:
- Count the number of words in the handbook.
This can be done by running
find source/handbook -type f | xargs wc -wfrom the root directory of the repository. - Submit the word count to WordCounter for conversion to a page count.
Trainee maintainer issue upkeep
Part of the maintainer training process is to keep track of Merge Request that have been reviewed and writing down an assessment on the review in the maintainer training issue. Manual upkeep of the maintainer training issue can be time consuming. There are tools that others have built to help with this task:
- https://gitlab.com/nolith/review-tanuki
- https://gitlab.com/splattael/traintainer
- https://gitlab.com/arturoherrero/trainee
- https://gitlab.com/alberts-gitlab/review-tanuki
- https://gitlab.com/gitlab-org/gitlab-dev-cli#maintainer-trainee-helper
Note: When using these tools, avoid adding mentions to maintainers in existing comments. There is a known issue where users are not notified by email when mentioned in an edited comment. It only generates a TODO which a maintainer may not use.
handbook Tips
The https://handbook.gitlab.com site lives in the content-sites/handbook repo on GitLab. The site is mostly a collection of Markdown documents and converted in to HTML by Hugo. In addition to the handbooks content there is a theme repo which is shared between the Handbook and the Internal Handbook. This holds the docs and shared content for both sites as well shortcodes and other functional Hugo for producing the site.
The documentation for the handbook site lives in the README.md at the root of the repository or in the /docs section of the Handbook.
Local development on the handbook
Its easy to start local development of the handbook site. You just need to clone the repo and either Install Hugo Extended locally or use Docker. In addition to Hugo you may also want to install Markdownlint CLI as we use this in our pipelines.
If you have Hugo Extended installed then to run the Handbook site locally just do this:
|
|
Alternatively using Docker you can do the following:
|
|
You can then open your web browser to http://localhost:1313
www-gitlab-com Tips
The https://about.gitlab.com site lives in the www-gitlab.com repo.
The documentation for the site itself is in markdown documents under the
doc folder in the repo.
We have decided, for various reasons, not to include this documentation in the handbook itself.
Local development on www-gitlab-com
If you are looking to do local development on the site, doc/development.md is probably the best place to start.
Cloud development on www-gitlab-com with gitpod.io
If you don’t want to configure your local machine, there is now a new alternative option to use gitpod.io for “local” development in a cloud based environment. See doc/gitpod.md for more details.
Image and gif tips
Many of the tips shown in this section require ImageMagick, an image manipulation tool. The installation is described in the ImageMagick section.
ImageMagick
ImageMagick provides the convert CLI command which can be used to resize images, add drop shadows, edit gifs, etc.
On macOS, install ImageMagick with Homebrew:
|
|
On Linux, use your package manager:
|
|
Creating gifs
We have a dedicated section for that in the handbook.
Resizing images
ImageMagick provides the convert CLI command which can be used to resize images. Our blog images do not need resolutions higher than 1920x1080. This saves bandwidth and makes the website load faster.
This example converts an existing image to 1920x1080 resolution and replaces it inline:
|
|
You can also use percentage values for the -resize parameter. The convert CLI command can do more things explained in the documentation.
If you need to convert multiple images, combine the convert command with find. Note that this replaces the images inline.
|
|
Add drop shadow to images
Install ImageMagick and use the convert CLI command to add a drop shadow. The -shadow parameter may need adjustments on the dimension.
|
|
Troubleshooting
2FA debugging
If 2FA stops working unexpectedly (no new phone or computer) it’s usually because of improperly configured date & time on either device. Make sure that “Automatic Date & Time” is enabled on both devices. If they’re already enabled try toggling them off and on again to force an update. If this doesn’t work, request that ITOps reset your 2FA setting.
Links for finding the settings:
- iOS: Get help with the date and time on your iPhone, iPad, and iPod touch - Apple Support
- macOS: If the date or time is wrong on your Mac - Apple Support
- Linux (using systemd): systemd-timesyncd - ArchWiki
For Android there’s no definitive link, since most vendors have different UIs for their settings. But in the Settings-app, look for “Date & Time” and there should be a “Automatic Date & Time” toggle.
Check which process occupies a given port
Using Netstat
Netstat is a command line tool which can be useful to print network connections, routing tables, interface statistics, etc. One of the most common uses for netstat during troubleshooting is to display a list of open ports listening for connections.
sudo netstat -tulpn | grep -i listen
|
|
If you find a port already in use, you won’t be able to successfully start up a service or program that utilizes that same port. Options to resolve are:
- Stop the service currently running on the needed port and confirm the port is no longer in use
- Review documentation to determine whether it is possible to specify an alternate port for either process (the existing one or your new service)
Known Port Conflicts
When the GitLab Development Kit cannot start using the ./run command and Unicorn terminates because port 3000 is already in use, you will have to check what process is using it.
Running sudo lsof -iTCP:3000 -sTCP:LISTEN -n -P will yield the offender so this process can be killed.
It might be wise to alias this command in your .bash_profile or equivalent for your shell.
You may also wish to add a function in your .bash_profile (or equivalent file for your shell) like this:
|
|
which you can use like so:
|
|
and it will kill whatever process is currently using port 3000.
Terminal
Display current git branch in the console
By adding this small configuration you will be able to view the git branch that you are using currently. If you are not inside a git repository, it only displays the username and the current directory.
For Bash:
Add the following lines in your .bash_profile
|
|
Doing the following, makes the changes to get reflected in you current terminal:
|
|
For Zsh:
On macOS Catalina, ZSH is the default shell. By installing Oh My ZSH!, the git plugin is automatically loaded and shows the current git branch.
Another option would be:
Add the following lines in your ~/.zshrc
|
|
The changes will show on the next terminal or immediately by running.
|
|
Shell aliases
Use command aliases in your shell to speed up your workflow.
Take a look at these aliases and others in Sid’s dotfiles project.
For example, by adding the following to your .bash_profile or equivalent for your shell, you can just typesto checkout the master branch of this website, pull the latest changes, and open the repository in Sublime Text:
|
|
After editing, you can just typegcato commit all of your changes, followed bygpto push them to the remote branch.
If you are using Oh My ZSH!, you can add custom aliases shown below. You can freely define the file name, only the suffix .zsh is important.
|
|
An example can be found in Michael Friedrich’s dotfiles project.
Delete local Git branches where remote branch was deleted
In order to delete local Git branches which are deleted on the remote server, you’ll need to combine the --prune pull/fetch command with more commands. git branch -vv lists all details of local branches, the followed grep filters for all marked gone in the default remote origin and prints the results with awk. This argument is passed into git branch -d, and executed for all matching results. Note that -d does not delete unmerged branches. -D has more impact but can accidentally delete branches.
|
|
Run the command without the final deletion command to see the potential affected branches. Note that \$1 is shell escaped in the alias and needs to be executed as $1.
|
|
Dotfiles
You can use dotfiles to customize your system, and keep all configuration in a central place. The name dot file is derived from Linux/Unix where all configuration files started with a dot, hiding them from the default list view ls.
Team member dotfiles projects:
- Sid Sijbrandij’s dotfiles
- Michael Friedrich’s dotfiles, more details in this blog post
- Brendan O’Leary’s dotfiles
Travelling
Long haul flights
Note: you have to pay for these items yourself.
- Quiet comfort 35 Bose over ear noise canceling headphones (so it doesn’t touch your dried out eyes)
- Custom molded ear plugs (can be up to $200 hearing aid store but are usable in many situations, there are also DYI kits but Sid has not tried that)
- Melatonin (possible unsafe during pregnancy and breast-feeding)
- Sleeping pills (over the counter is fine)
WorkFrom
WorkFrom is a crowd-sourced resource of coffee shops and other such places that are remote-work friendly.
Wi-fi usage
When using unsecured Wi-Fi, consider a personal VPN. We don’t have a corporate VPN but consider purchasing a personal VPN if you travel for GitLab or use unknown networks often.
Remember that if your job has restrictions based upon geolocation (for example supporting customers with specific data restrictions and country-based access), a personal VPN may not be the best choice as often the VPN vendor routes traffic through other countries. If this restriction applies to you, consider tethering. Tethering is when you set up your mobile phone as a hotspot and connect your laptop up to it via Wi-Fi, avoiding the unsecured Wi-Fi network. There is more information here on the subject, and as long as your data plan supports it, you should be good to go. Double check before international travel, as it may be supported but have hidden costs.
When connecting to a network with a captive portal, most websites will not load as modern sites use HTTPS, and captive portals interrupt that process. Your device will try and compensate for this, but it can be tough to manage manually. If you have trouble, try connecting to http://captive.apple.com/ first, which is intentionally only HTTP and will load the captive portal.
FIDO2 / WebAuthn
FIDO2 is a cryptographically strong 2FA (2-factor authentication) method. It is hardware-based, and is typically deployed via a USB, NFC, or built into a device such as a MacBook’s Touch ID or iPhone’s Face ID. The standard is open and is maintained by the FIDO Alliance. WebAuthn is a component of FIDO2 that supports verification by web applications using public key cryptography. FIDO2/WebAuthn is the preferred method of 2FA and is highly recommended by GitLab’s Security Department. One of the points of 2FA is that while you are authenticating with a username and password for the first factor, a secondary factor should use a separate - or “out of band (OOB)” - communication channel for the authentication. FIDO2/WebAuthn devices certainly meet that criteria, better than all other methods. There are other 2FA methods outlined below.
How it works
During the authentication process, you enter in your username and your password. On systems with 2FA enabled and using FIDO2/WebAuthn, the hardware token is queried. By pressing a button or tapping a sensor on the FIDO2 device, the FIDO2 device completes the authentication process in a cryptographically strong way. It is generally considered the most secure form of 2FA. It is also more convenient than manually entering codes generated by a TOTP application.
During the registration of the FIDO2/WebAuthn device, a public/private key pair is generated, with the public key being registered with the service you will be authenticating with, and the private key is stored on a secure chip in the device. When authenticating, after you’ve entered in your username and password, the device is queried via an encrypted message that can only be authenticated by the private key, so a button or sensor is pressed on the device to allow the query to be completed, and the user is then granted access to the system.
FIDO2/WebAuthn devices
YubiKey: The most popular FIDO2/WebAuthn device is Yubico’s YubiKey. There are a wide variety of sizes and styles of YubiKeys. Yubico (along with Google) helped develop the predecessor to FIDO2 standard (U2F) before it was moved to the FIDO Alliance. Most GitLab team members that have WebAuthn devices have a YubiKey. It should be noted that for a long time Yubico’s source code for its firmware was open source, but some of the newer versions of firmware are closed source. This has caused some concern in the security community, particularly those that prefer to use open source whenever possible.
Are They Secure?
YubiKey has been examined by the security industry at large, third party audits and by the Security Team. YubiKey’s are more than suitable for use within GitLab and work fine with FIDO2/WebAuthn-compatible systems.
YubiKey has had a number of security issues which are typically resolved quickly. They have a dedicated page for security advisories. In rare cases, a security issue involving a hardware token arises that requires the hardware token to be replaced as a firmware update will not mitigate the issue. This happened with Yubico in 2017.
Most of the attack models that impact the FIDO2/WebAuthn tokens require physical access to the token itself. That is, the security advisories involve coding issues that can only be exploited via access to the token or the computer that the token is plugged into. This in itself makes the devices more secure.
Recommendations
While there are other hardware tokens that are also decent and will function with GitLab, some have limitations. The recommended solution for team members is Yubico’s YubiKeys.
- Please fill out this form before ordering a YubiKey, as we may be able to provide a YubiKey via our group buy subscription.
- Recommended YubiKey models include the YubiKey 5Ci (for iPhone users) and YubiKey 5 NFC (for Android users).
What GitLab team members need to keep in mind is that if you travel with your company laptop - either on a business trip, a trip to visit family and friends in another location but you intend to keep working, or just a trip to the local coffee shop - treat the token with the same level of care as a credit card. Do not leave it where it could be stolen.
If you are concerned about potentially losing your hardware token, be sure to add Touch ID and potentially a mobile device as an accepted authentication token. Sites following the FIDO2/WebAuthn standard should support multiple tokens. That way if one is lost or stolen, you can still login use another method. Currently YubiKey’s are limited to one per user, in the case of lost or damaged, please reach out in the #it_security_help Slack channel and we’ll assist you with a replacement.
Usage of 2FA is mandatory for GitLab team members.
Other 2FA Methods
In addition to FIDO2/WebAuthn, there are additional protocols used for 2FA. There is “cryptographic push”, TOTP, and SMS-based authentication (text message). Pluses and minuses to each are listed below.
Cryptographic Push
This is usually shortened to simply “push technology”. It is called “push” because during the authentication process, after you’ve entered your username and password, the service you are authenticating with automatically “pushes” a secondary authentication via a separate communications channel to a device you possess. This is usually your phone, and it is facilitated via a phone app that is specific to that process. During the registration process a cryptographically-secure key pair is generated, and the app uses that key pair to uniquely identify the Push as coming from the service you are authenticating to. Typically the app then either directly notifies you or you access the app, which will pop up a message asking if you were in fact trying to authenticate. Answer yes and the authentication process is complete. GitLab team members may be familiar with this Push method as it is used by Okta Verify.
Push Caveats
This method is not quite as secure as a hardware token, as typically those devices stores data securely on the secure chip on the device itself. It is possible that the Push phone app is also storing secret data on the local secure chip on the phone, however the entire process is dependent on the service’s servers being up, and WebAuthn is more self-contained. But note that Push technology is still considered extremely secure, and once configured it is fairly convenient to use.
TOTP
Timed-based One-Time Password is fairly secure. This method involves a rotating value based off of a cryptographic seed that is used to uniquely identify communication between the service and the end user authenticating. The value is (usually) a six digit number that changes every 30 seconds, and during the authentication process after you’ve successfully entered in your username and password, you are asked to enter in the value. GitLab team members should use 1Password to manage TOTP codes.
TOTP Caveats
The main problem with TOTP is that during this 2FA process it typically involves the end user entering in all values through a single communications channel (usually a web browser). As this is the case, it is possible that an attacker could send you a fake web page for you to enter in your credentials, including your TOTP value. Granted, the attacker would have to be reading your replies and sending in all of your credential information extremely quickly and get the entire process completed with 30 seconds so the risk is greatly reduced, but it still exists. Both WebAuthn and Push are preferred over TOTP, but as long as you are the one initiating the communication and you are not clicking on a link in email, you should be okay.
SMS
One of the more popular (and most common) methods of 2FA is SMS-based text messaging. It is similar to TOTP, but instead of using a locally-stored application to calculate the six digit number, the service you are authenticating to sends the six digits to you via an SMS text message. When you set up your account, you provide the service with your cell phone number so they know which phone number to send the six digits to.
SMS Caveats
Due to the number of caveats, SMS is only recommended if there is no other 2FA option available. Here are the main problems with SMS messaging.
- SMS is subject to the same phish-style attack as TOTP. The main difference is that some SMS-based authentication schemes time out after 60 seconds instead of 30, making the phish-style attack slightly easier for the attacker.
- The information regarding your phone number is stored on a SIM card in your phone. If an attacker with physical access to your phone were to steal the SIM, they could impersonate you from their own phone. Of course they could do the same thing with your hardware token, however they would still need your username and password to use the hardware token. Unfortunately, calling up the service and asking for your password to be reset is often confirmed using SMS messaging, so with the possession of the SIM card, the attacker could pose as you. Again, if you treat your phone the same way you treat your credit card or cash, then this type of attack is minimized.
- An attacker could contact your phone carrier, impersonate you and state you lost your phone, and set up a new SIM card. Unfortunately many times your account is protected with a security question such as “mother’s maiden name”, “favorite restaurant”, or some other simple question - all information that could be determined from a website that does family trees or via social media where you post pictures of your dinner.
- An older attack known as “SIMJacker” allowed an attacker to send your phone an SMS message with a malicious payload that allows for direct manipulation of the SIM card itself. This attack still works on older SIM cards, although more modern SIMs are no longer vulnerable to this. Most of the known attacks using SIMJacker involved Latin and South America, the Middle East, Northern Africa, parts of Eastern Europe, and parts of Southeast Asia.
If You Must Use SMS
There may be services that only offer SMS as their 2FA solution, so in those cases it is better than nothing. If this is the case, there are a few things you can do to secure things ever so slightly.
- If you have an old phone (5+ years old) you might want to consider upgrading the SIM to a recent one, as these are not susceptible to the SIMJacker issues.
- Contact your phone carrier and ask if there are additional security measures to protect your account besides security questions, such as a PIN. In lieu of that, you could also try setting your mother’s maiden name or family pet security questions to something more, shall we say, unique (e.g.
Hdyla86kajDF64asdlui). - Set a SIM PIN. For iOS devices, follow these instructions from Apple. For Android devices, start with these instructions but contact your phone’s manufacturer website if the instructions do not fit your particular model.
- Complain to the service to offer more than just SMS for 2FA! The more complaints they get, the more likely they might be to offer more secure options.
Additional 2FA Concerns
Remember the purpose of 2FA - it is a secondary authentication method, invoked after the primary authentication method has succeeded. You should only acknowledge a 2FA request if you personally have just successfully completed the primary authentication. An unsolicited 2FA request means someone has your password, and is in the process of trying to log in as you. This is why 2FA exists, to help protect your user account from attacks involving your password.
If you experience any such irregularities, please bring it to the attention of the Security Team. For more information, review the handbook regarding Security Awareness
Slack
There is a lot of information pertaining to Slack, as it is a critical part of GitLab’s communication. See the Slack handbook page.
Zoom
There is a lot of information pertaining to Zoom, as it is a critical part of GitLab’s communication. See the Zoom handbook page.
The Google Calendar invite is the single source of truth for the Zoom link. Avoid linking the Zoom link in Google Document agendas since those may quickly become out of date. If the zoom link changed around the start of the meeting it is OK to have it in there temporarily.
Need a new document or new slide deck quickly? Use shortcuts like http://doc.new or http://slide.new. The full list (not even restricted to Google products) is available at https://whats.new/shortcuts/.
Google Docs
Google Docs Pro Tips
- Quickly create a new Google Doc in chrome: type “docs.new” in the chrome address bar. Likewise “sheets.new” for a Google Sheet etc…
- While in a document with many other editors, click on the image or icon of any user at the top of the document to move focus to their cursor and what they are typing in the document. This is great when someone is speaking about something they are typing on a video call and you are not sure where they are in the document.
- Quickly find all action items assigned to you with a search for
followup:actionitems. - To add additional rows to a numbered list in a Google Document, press
Returnto add additional spaces under the existing numbered list in the document, highlight those spaces, and click the numbered list icon in the formatting bar (or pressCommand ⌘ + Shift + 7on a Mac) to create a numbered list from the spaces. See video on how to add more rows to a numbered list for a quick tutorial. - Type the
@character to quickly embed today’s date, other document titles, references to people, and more; without clicking anything (a menu will pop up). See details in the Smart Canvas blog post and the Add items with the @ menu support doc.- Emoji live-search can be accessed by typing
@:, or shorter using the:character. Start typing to search for an emoji and press enter to insert.
- Emoji live-search can be accessed by typing
- Pageless docs are great for documents you don’t intend to print, and is the preferred format at GitLab. You can switch in File > Page setup.
See also Live Doc Meetings for more Google Doc tips.
Google Analytics
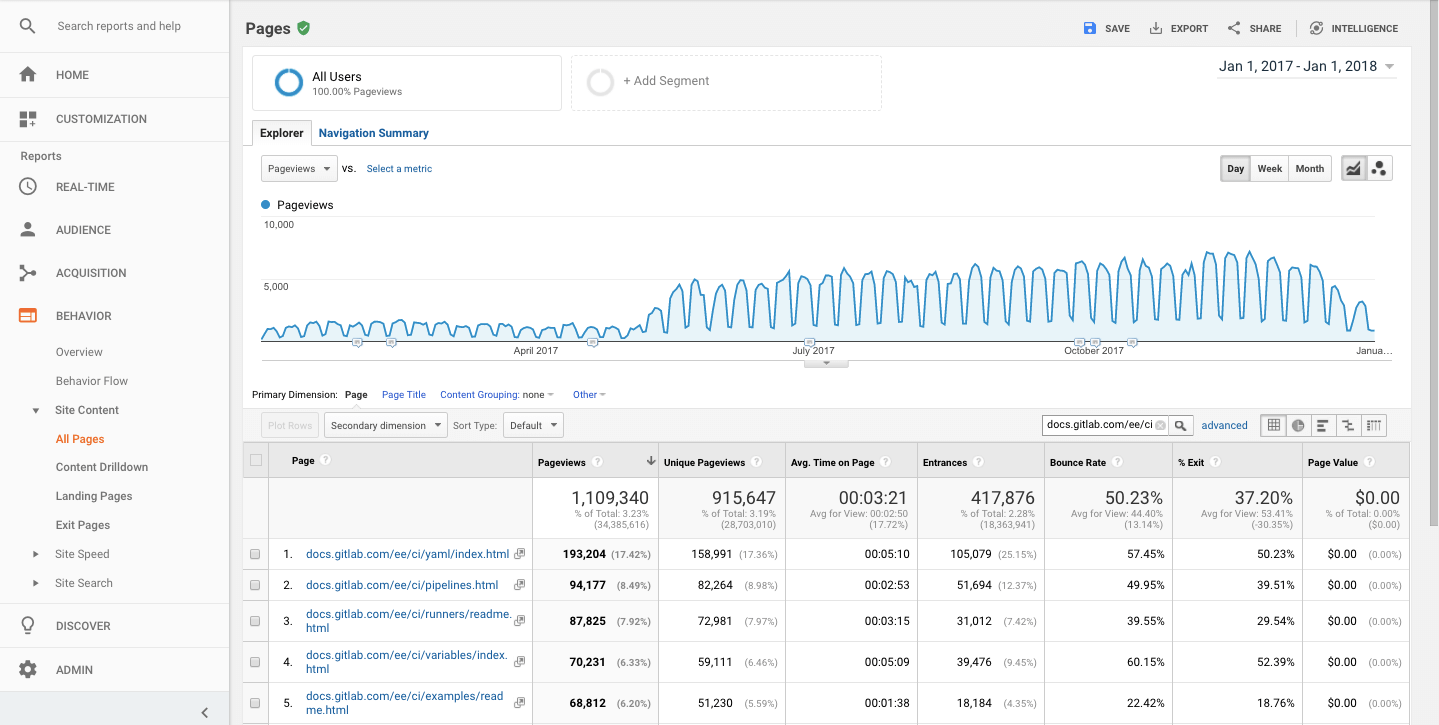
Google Analytics (GA) is an essential tool for making data-driven decisions. It receives data from both about.gitlab.com and docs.gitlab.com websites. Read through the Inbound Marketing Handbook for more information on GA.
For example, you can look at the GA data to analyze how visited is a certain page, in a period of your choice. You can also look at the GA referrals data to understand where the users are coming from and where they go when they leave a certain page.
To see the data for a specific page:
- Open GA, and expand Behavior on the sidebar
- Click Site content > All pages
- On the top-right, adjust the period of time you’d like to analyze
- On the middle of the page, look for a search bar and paste the URL you’d like to analyze (without
https://) and click on the magnifier button to search: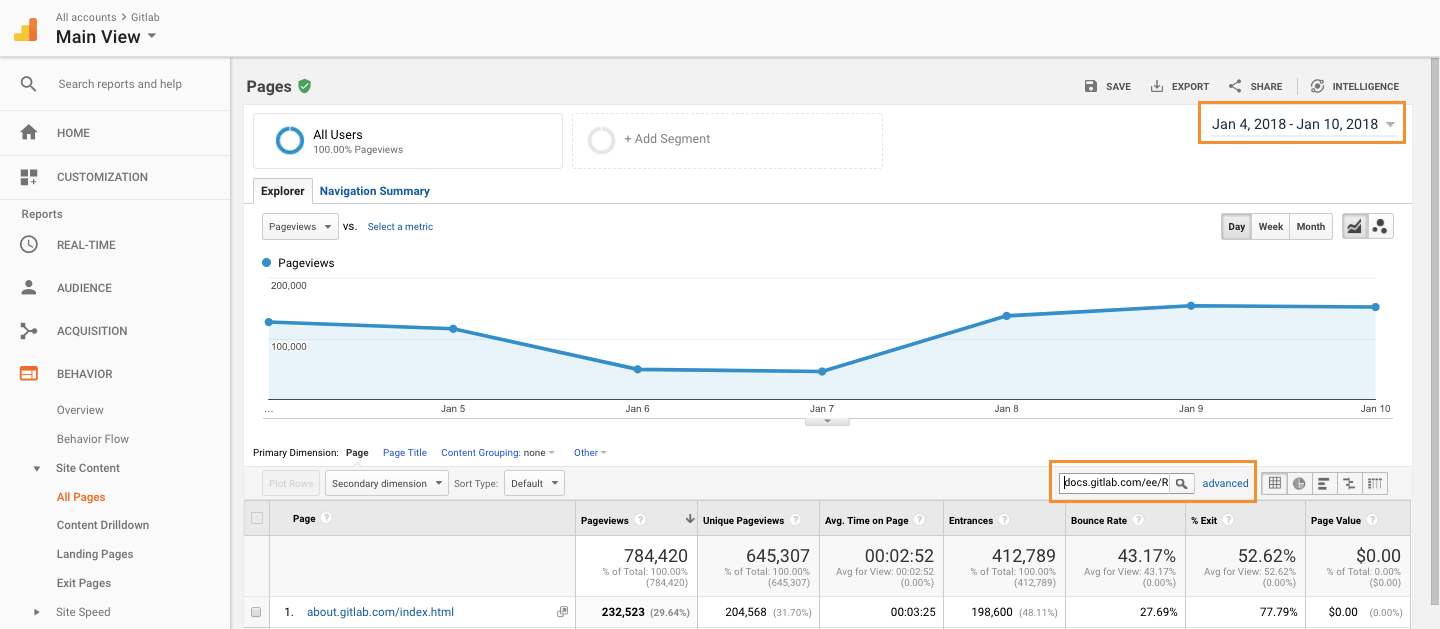 Note that you can use the search tool with:
- A full URL, which will return results for that specific URL
- Part of an URL, e.g.,
/2017/, which will return the results for all the blog posts published on 2017 - The higher directory on the file tree, which will return the results for a range of URLs in that tree.
E.g.,
docs.gitlab.com/ee/ci/will return the results for all the range of pages contained in the/ci/directory
- GA will output the data about the page (or range of pages) you searched for, including pageviews, unique pageviews, and other data:
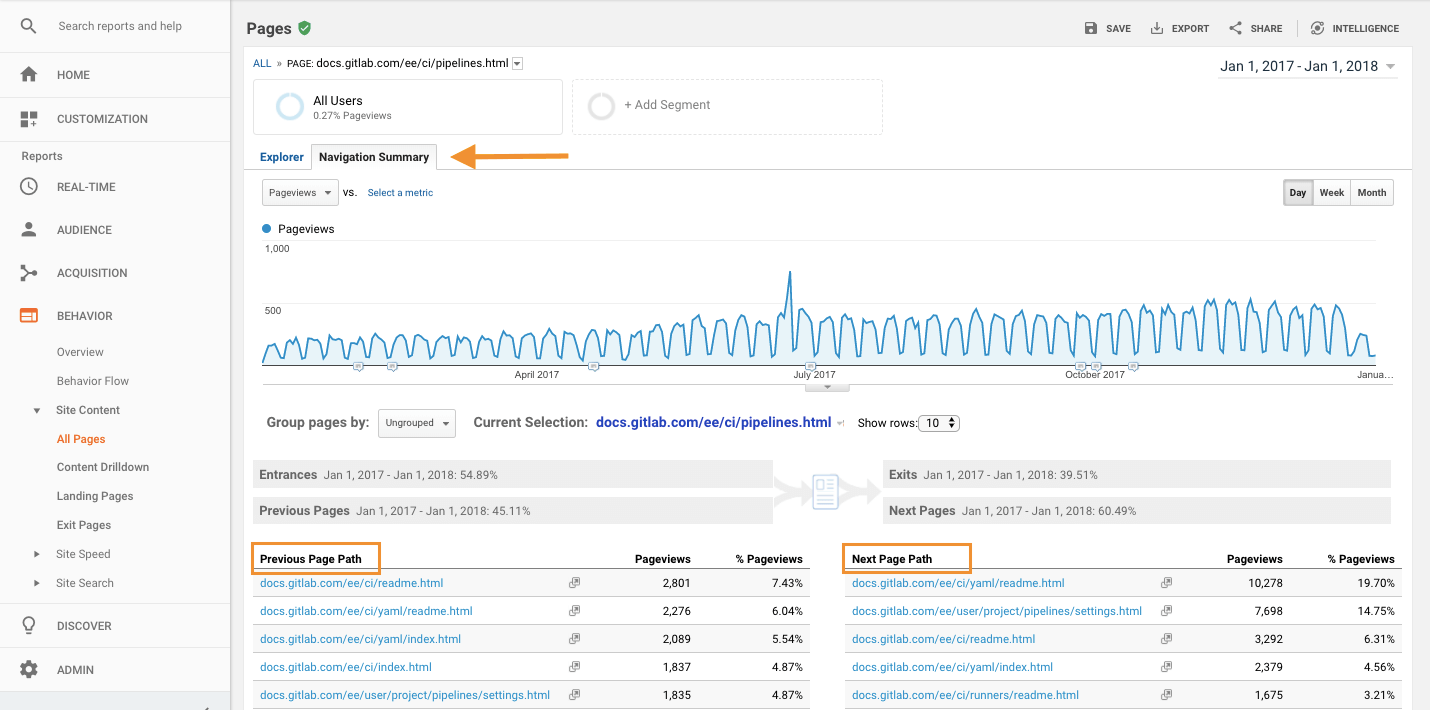
To find the referrals for a certain page, continue from the steps above.
- Click on one of the website links to look at the data for a page of your choice
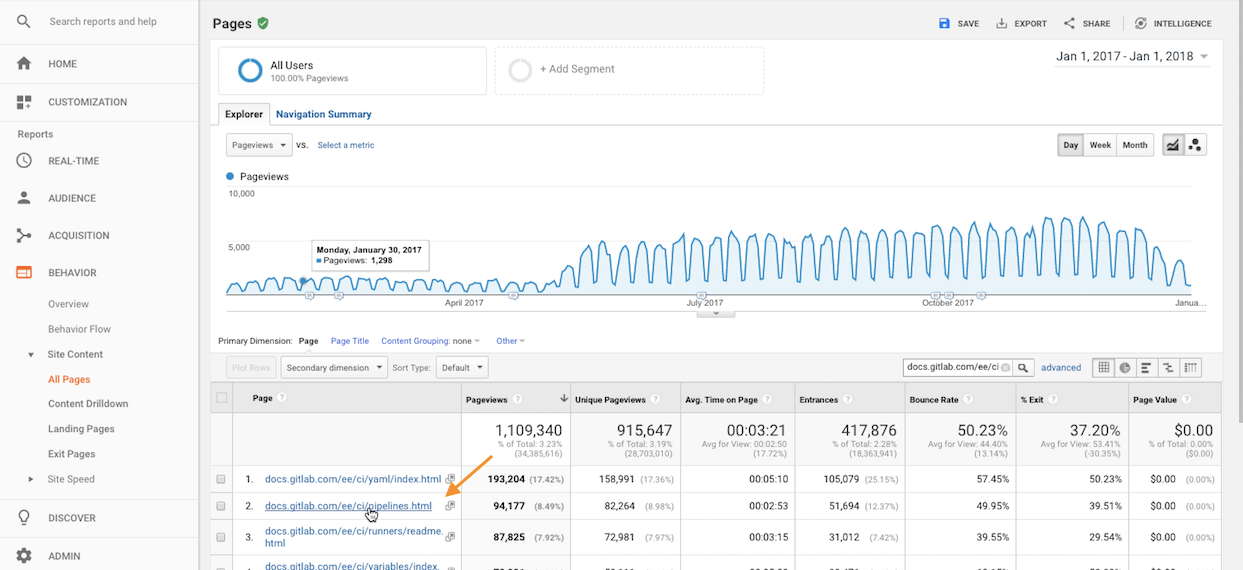
- Just above the graph, click Navigation summary
- GA will output the referrals, including Previous Page Path and Next Page Path:
Set your picture in Google
Optional: Set your picture in Google so that your picture will show where you are in a Google document (vs showing just your first intial). This will allow others to more easily follow a discussion when meeting attendees move around in a document.
Google Calendar
Finding a time
Please make use of the Find a Time tab in Google Calendar, especially when scheduling events with teammates in other parts of the world:
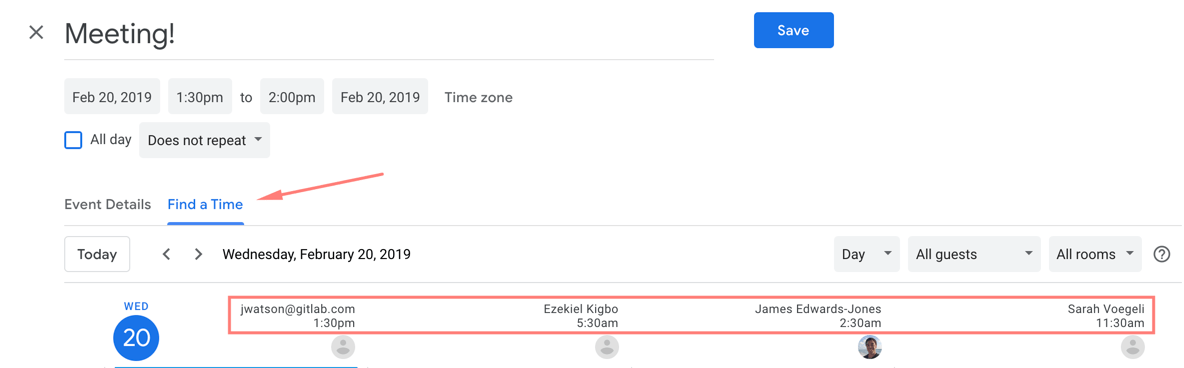
Find a Time presents a new or existing event’s time for all participants, adjusting for time zones as appropriate. To use Find a Time:
- Create a new event or modify an existing event.
- Click the “Find a Time” tab. Invited guests will be presented in the availability table and represented by a column.
- Areas outside of someone’s working hours (9:00 AM - 5:00 PM by default) are represented in light grey.
- Guests who are optional will not appear in the availability table by default. You can add them by checking their name in the “Guests” area on the right hand side.
For meetings spanning across multiple time zones and with external parties, Time & Date Calculator can help determine the best time to schedule.
GitLab availability calendar
The GitLab Availability Calendar has been deprecated to allow for GitLab to scale effectively. We have created tools and tips for managing your time off.
Setting working hours & location
To help other team members to schedule meetings with you, you can set your normal working hours & location in Google Calendar. The preferred times will show up when someone tries to schedule a meeting with you.
To set your working hours, go to Settings -> General -> Working Hours & Location. Working location can be set here or on your calendar directly by clicking on the pill in the All day row. In Settings there’s a helpful Copy to all option as well.
Since all GitLab Team Members work remotely Home can be an ambiguous choice as folks may travel and it doesn’t provide any context on timezones. If you’d like, you can choose Somewhere else (in Settings) or Edit pencil -> + -> Another location (from the pill) to set this to something such as City, State, Country (GMT-#) and keep it up to date when traveling or timezones shift, which can help folks with planning and understanding timezones.
GitLab Team Meetings calendar
The GitLab Team Meetings Calendar is available to all team members and can be found in your calendars list after it’s added. To add the GitLab Team Meetings Calendar to your list of calendars:
- Go to your calendar
- Scroll the left sidebar down to
Other calendars - Press on
+ - Select
Subscribe to calendar - Enter in the search field
gitlab.com_6ekbk8ffqnkus3qpj9o26rqejg@group.calendar.google.comand then press enter on your keyboard
Please reach out to a People Connect Team member if you have any questions. NOTE: Please do NOT remove any meetings from this calendar or any other shared calendars, as it removes the event from everyone’s calendar.
You can find the details for the Company Calls, Group Conversations, 101s, and other teams’ meetings here, so you can attend a different teams’ meeting and ask questions, learn about what they’re working on, and get to know the rest of the GitLab Departments and teams.
These meetings are open to everyone in GitLab.
If you are creating a new team meeting, please add it to the GitLab Team Meetings calendar
Please reach out to the People Connect Team in the #people-connect Slack channel with any questions, requests or changes to the GitLab Team Meetings calendar.
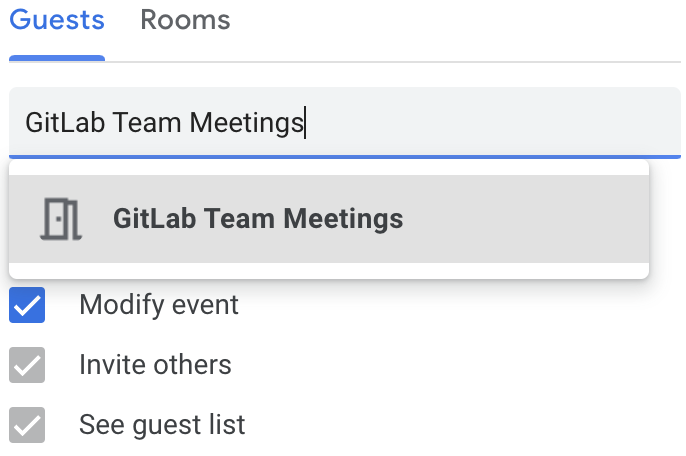
Adding an event to the GitLab Team Meetings calendar
-
Create your calendar invite
-
Add your Zoom link
-
Add an agenda or relevant content
-
Under Add Guests, add
GitLab Team Meetingsin addition to anyone else you want invited (if you want the entire company invited please use everyone@).Note: This will appear like adding a room, which is expected {: .note}
Managing invite responses
If you are familiar with queries in Gmail, add a filter to remove invites responses from your inbox with the following query:
*.ics subject:("invitation" OR "accepted" OR "rejected" OR "updated" OR "canceled event" OR "declined") when where calendar who organizer
You can also create a filter to remove ALL invite responses from your inbox with the following search terms:
- Subject: “invitation” OR “accepted” OR “rejected” OR “updated” OR “canceled event” OR “declined”
- Has the words: *.ics
Then click Create filter:
- Skip the Inbox
- Apply the label (of your choosing)
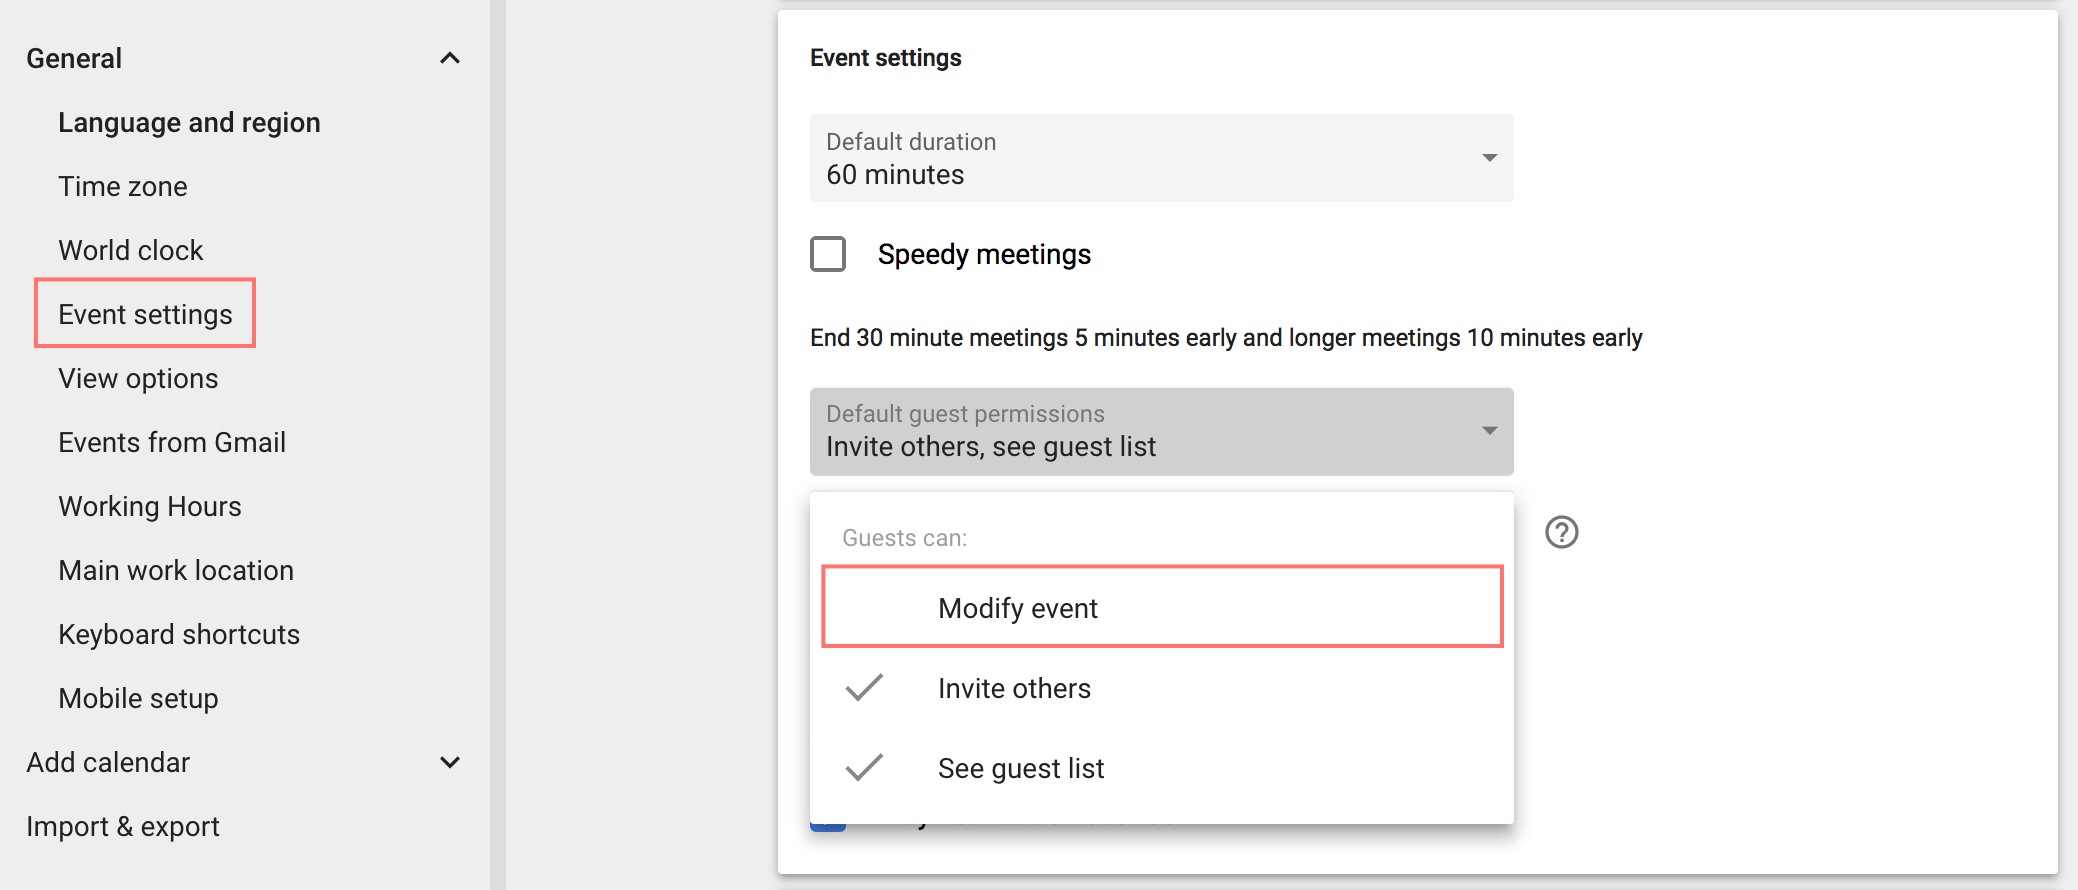
Modifying events
Please click ‘Guests can modify event’ so people can update the time in the calendar instead of having to reach out via other channels. You can configure this to be checked by default under Event Settings.
Notifications
You can change the default notification settings by calendar (add or remove notifications for all-day events, add a second default notification to all events…). This is accessible through Settings -> Settings for my calendars -> pick the calendar -> Event notifications and All-day event notifications.
If you change the default notifications, all existing events will inherit that as well (unless their notifications have been customized).
Restore deleted calendar items
(This assumes you are using Google’s new Calendar).
When you have accidentally deleted something from the Team Meetings calendar, you can recover it by:
- Go to Google Calendar and click the gear icon at the top left of your screen.
- Choose the Trash.
- Make sure you are on the correct calendar, by clicking on the name of the calendar in the left sidebar.
- Hover over the item you’d like to restore and click the arrow to “Restore”.
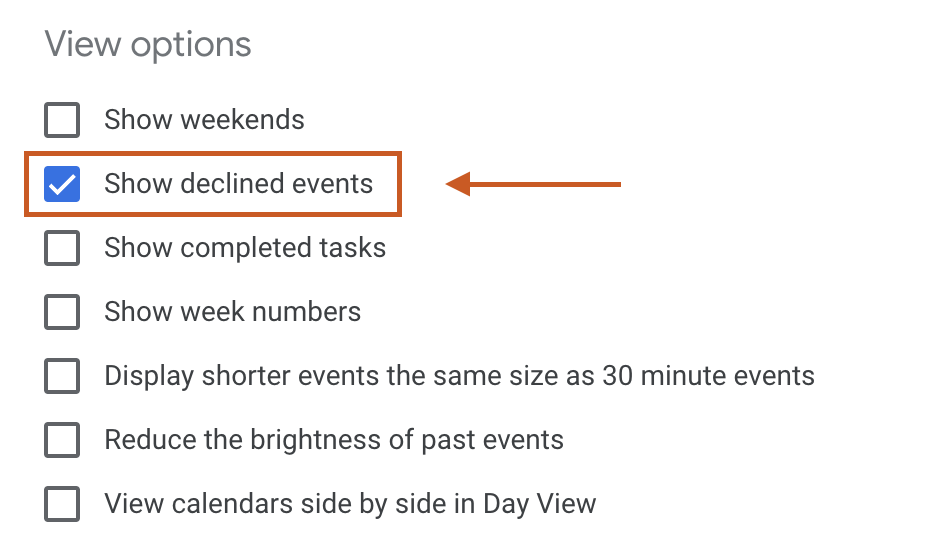
Show declined events
We recommend enabling the ‘Show declined events’ setting if you are unable to attend a meeting but will still contribute to the agenda or attendance list asynchronously. Use this setting if it’s helpful for you to see declined meetings in your calendar view for any other reason.
- Navigate to Event settings
- Check the box for ‘Show declined events’ under ‘View options’
Sharing
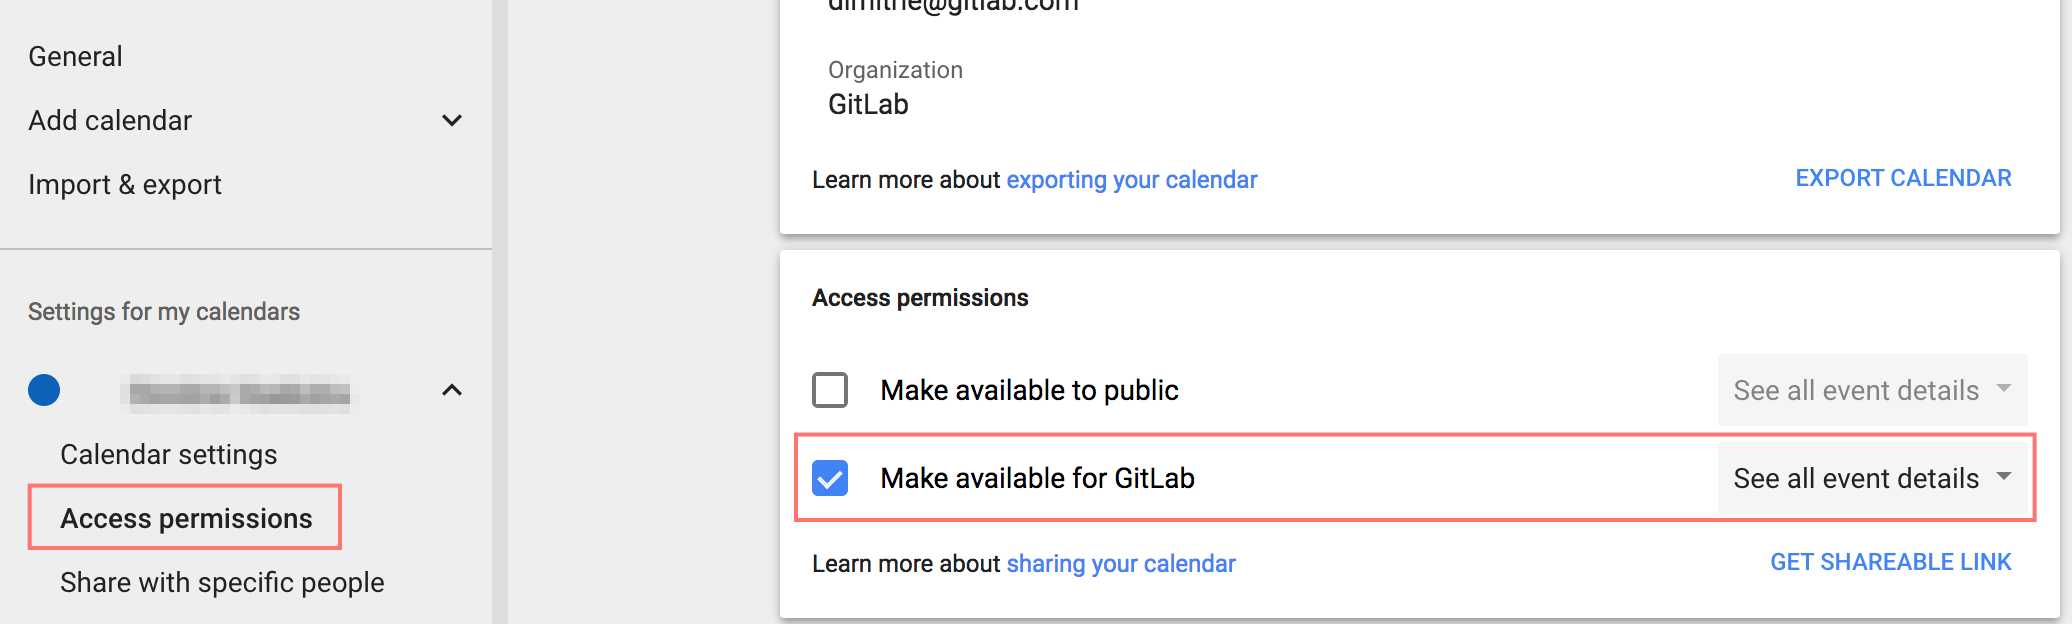
We recommend you set your Google Calendar access permissions to ‘Make available for GitLab - See all event details’. Team member calendars should not have access permissions set to ‘Make available to public’ due to the risk of sensitive data exposure and zoombombing.
Consider marking the following appointments as ‘Private’:
- Personal appointments
- Confidential & sensitive meetings with third-parties outside of GitLab
- 1-1 performance or evaluation meetings
- Meetings on organizational changes
There are several benefits and reasons to sharing your calendar with everyone at GitLab:
- Transparency is one of our values and sharing what you work on is in line with our message of “be open about as many things as possible”.
- Due to our timezone differences, there are small windows of time when our availabilities overlap. If other members need to schedule a new meeting, seeing the details of recurring meetings (such as 1-1s) will allow for more flexibility in scheduling without needing to wait for a confirmation from the team member. This speaks to our value to be more efficient.
When setting up your Google Calendar be sure to set your working hours.
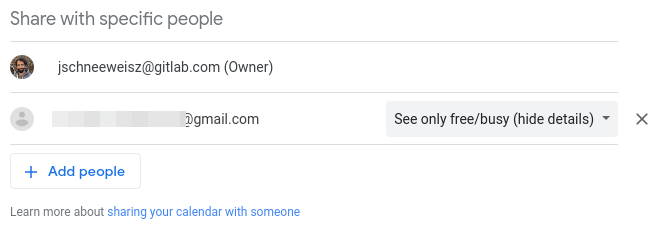
If you’d like to share your calendar with e.g. your partner you can use the ‘Share with specific people’ feature and set the permissions to ‘See only free/busy (hide details)’:
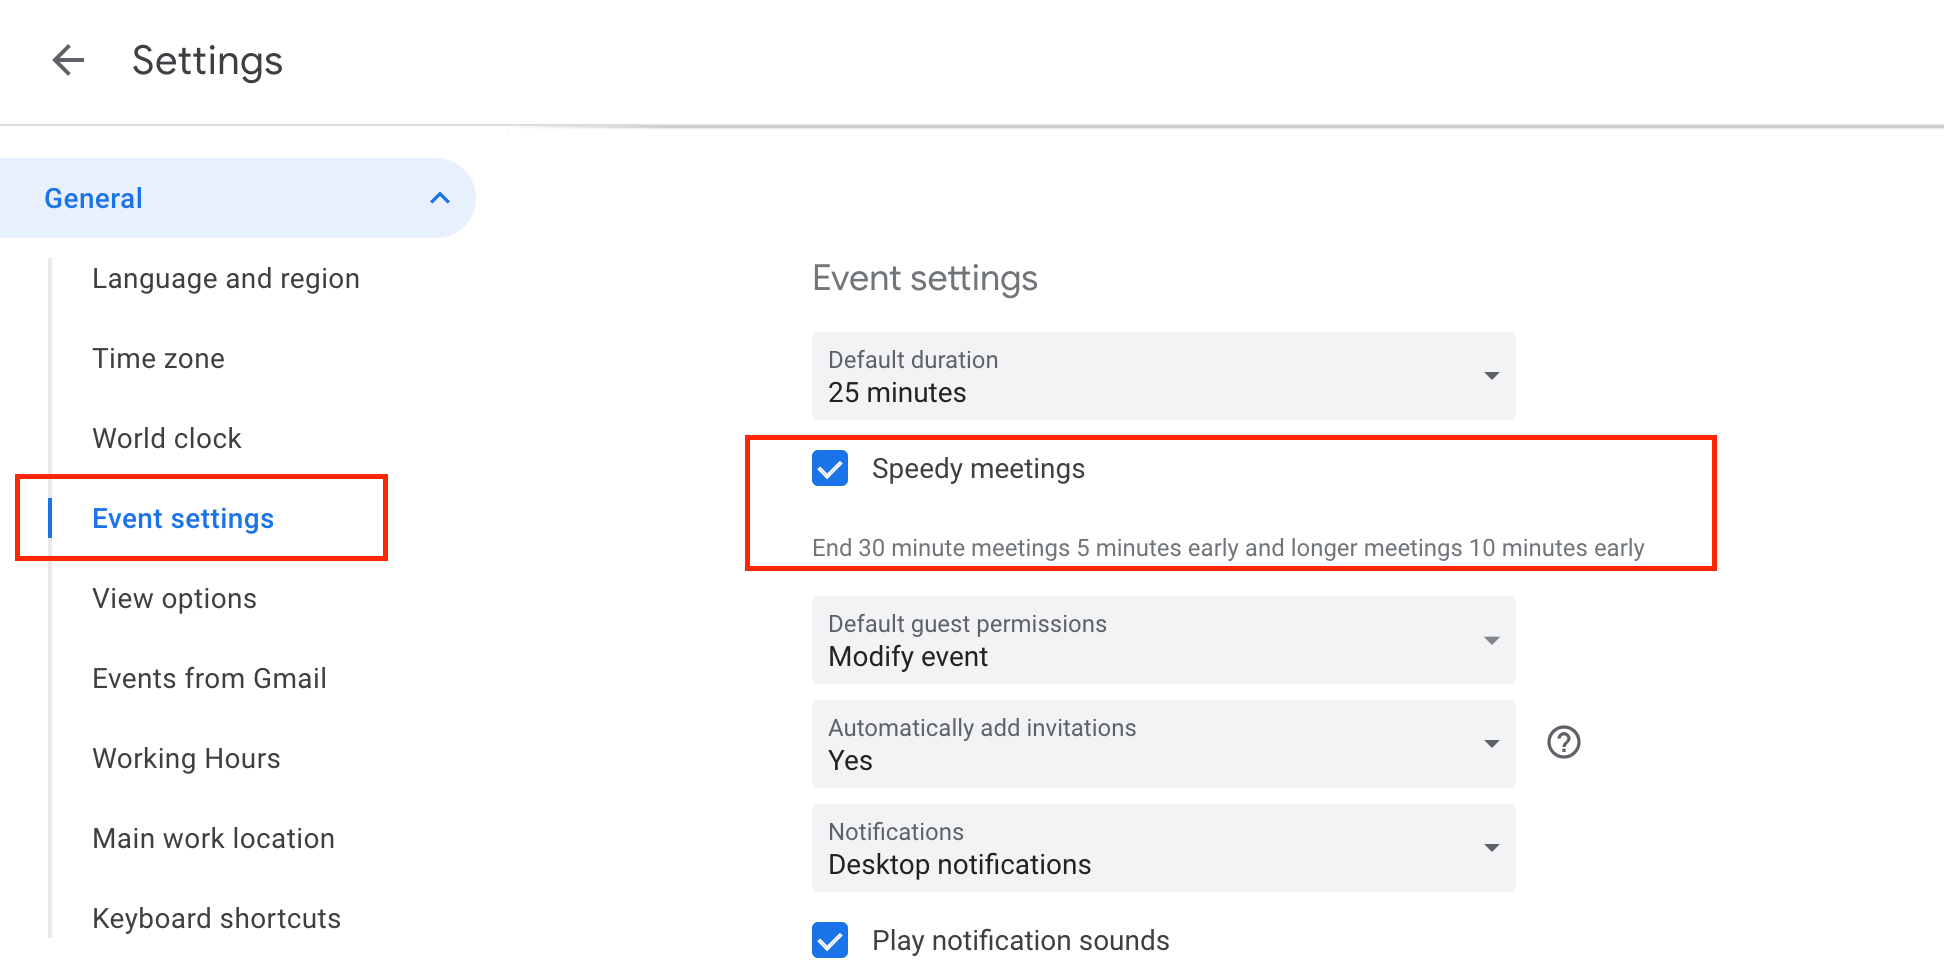
Speedy meetings
Enable speedy meetings to automatically provide a buffer at the end of events you schedule. This thoughtfully allows participants with back-to-back events the opportunity to use the restroom or grab a cup of coffee without being late to their next function.
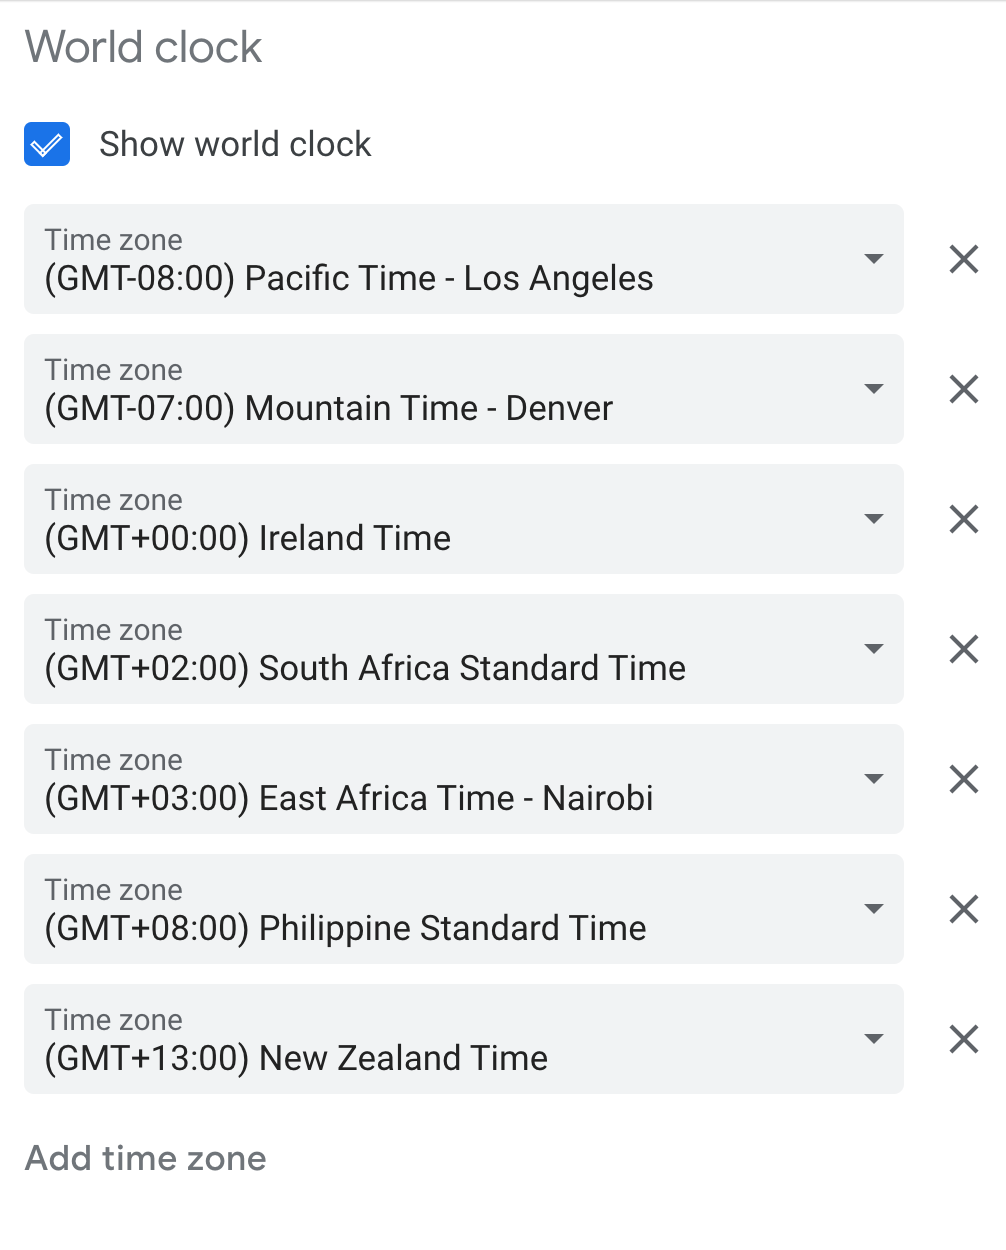
World clock
Add as many time zone world clocks as you wish by, in Google Calendar, going to Settings -> World Clock in order to see team members’ local times.
You can also use sites like TimeAndDate to convert times to/from UTC for example.
Time zone
Check Display secondary time zone and select (GMT+00:00) Coordinated Universal Time (UTC). This enables team members to standardize on a single time zone in communicating when meetings take place.

Google Cloud Platform
See the Sandbox Cloud page for a listing of cloud resources and how to gain access to them.
Google Drive
First, an important message - Don’t use Google Drive/Apps (unless you have to)
We would be remiss if we didn’t start this section off with this IMPORTANT message: Your default storage place for information that needs to persist and be available to others in the company should be ON THE WEBSITE/IN THE COMPANY HANDBOOK and not in Google Drive and Google Apps files!! This is from the top. This is how we operate, because Google Docs/Apps can only be found and contributed to by team members, and not by users, customers, advocates, future employees, Google handbook searches, or developers.
Do not link directly to Google Drive/Apps
Having said that, there is content which doesn’t make sense to be created on the website directly (e.g. large collections of data in tables, spreadsheets for calculations, etc) or for which Google Drive storage makes sense.
When directing folks to these files in Google Drive please include name of the file in the handbook so that team members can search for it in Google Drive. If you link directly to the URL, people from outside the organization can request access, creating workload and the potential for mistakes.
Keeping it organized
It is important that we not just throw files into random or general places in the shared Google Drives. Doing so makes it harder for others to find and work with the content. Here are some guidelines to organizing the Google Drive content:
- First by department (e.g. strategic marketing)
- then by subject (e.g. analysts relations)
- then by sub-subjects as deep as necessary (e.g. Gartner -> 2018 ARO MQ)
Using Google Drive
For starters, when your GitLab Google company account is created you automatically get a Google Drive with unlimited storage allocation in your own “home” directory (called My Drive). You can get to it by:
- (optional) Login to your GitLab account in your browser (if you are using Chrome)
- Open your web browser to https://drive.google.com
- If you’re not already logged in as your GitLab account (Chrome users should be) then login to Google using your GitLab account
- This will take you to your Google Drive (called My Drive) which is like your home directory. If you create Google files using Google Apps and don’t specify where to store them, they will be put in this home directory.
This is great for storing your own working files. As already stated, this should never be the final resting place for shared files that are meant to be used by the rest of the company (or beyond).
Existing GitLab Google Drive repositories
There are a few Google Drive repositories of GitLab shared files (there might be more, please add if not listed here):
- UX Research Drive - This houses all findings from Customer Discovery Meetings and raw, confidential materials from customers shared with Design, UX Research, Product and Customer Success. Distilled findings from User Research are stored in the UXR_Insights repository.
- GitLab Marketing Drive - This houses all shared files from the entire Marketing organization. The best practice is for sub-organizations to have their own directory inside this space (e.g. Strategic Marketing).
- Sales Drive - This houses all the shared files from the Sales organization. The best practice is for some sub-organizations to have their own directory inside this space (e.g. Customer Success).
- GitLab Alliance Drive - This houses all shared files from the entire Alliance organization. The best practice is for sub-organizations to have their own directory inside this space (e.g. Partner Discussions).
How do you use these? You don’t have to remember these URL’s. To add these links to your Google Drive My Drive directory, do the following:
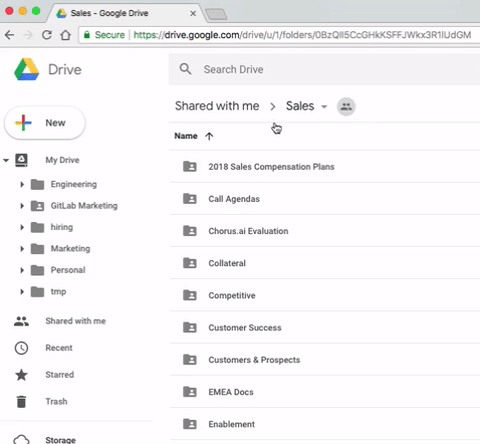
- Make sure you are logged into your GitLab account in Google Drive in your browser
- Open the link of interest (from above) to go to that directory
- Find the directory path across the top (under the “Search Drive” field)
- Find the name of directory in that path that you want to add to your drive (e.g. Sales)
- Click on the down arrow next to it
- From the resulting pop-up menu, select “Add to My Drive”
- From now on you can get to that directory by first going to your drive (https://drive.google.com) and then opening that link
Adding Google Drive to your Mac
To really make your Google Drive easier to access, you can have your Google Drive show up on your Mac Finder as a regular drive. With this it is easier to store and view files such as videos, analyst reports (PDFs), etc.
Here’s how to do this:
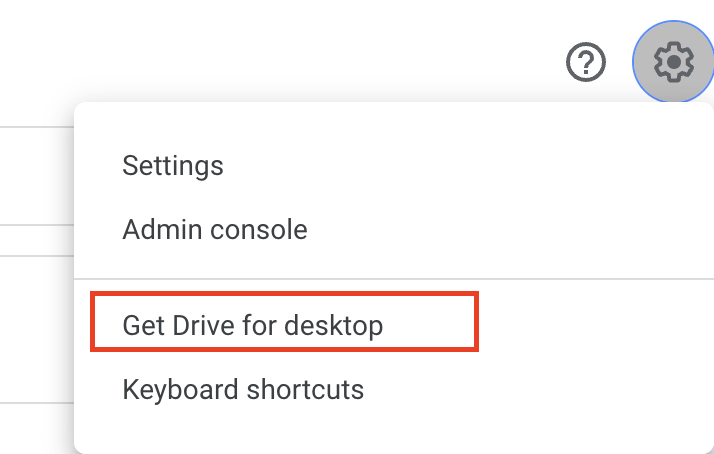
- Make sure you are logged into your GitLab account in Google Drive in your browser
- Go to your Google Drive (https://drive.google.com)
- Click on the “Settings” icon (Gear) to the right of the search field
- From the resulting menu, select “Get Drive for desktop”
- It might pull up a new page/tab and use your personal login. If it does this you won’t see “Download & install Drive for desktop” on the page. Switch to your GitLab account.
- Download and install
Google Forms
Use these GitLab branded form templates when creating internal or external surveys or forms. Make a copy of the form and only edit the copy; do not edit the template itself.
Review what data privacy means at GitLab. Help participants make informed decisions by applying the following guidelines:
- For external forms: State that any Personal Data collected will be processed in accordance with the GitLab Privacy Statement.
- For internal forms: Ensure that the purpose for collecting data is stated under our Team Member Privacy Policy and that this purpose is made clear to Team Members.
- Don’t make Personal Data form fields mandatory unless they’re absolutely necessary to achieve the processing; any inessential Personal Data collected should be through a voluntary form field.
- Only process Personal Data for the reason in which it was initially collected e.g., if the Google Form collected traveler information, don’t then use that Personal Data to create a marketing list.
Google Mail (Gmail)
Auto-advance
If you use the archive function, you normally return to your overview. With Auto-advance you can select whether to advance to the next or previous message. “Auto-advance” can be enabled from the Advanced section under Settings. This reveals the Auto-advance settings in the General section under Settings. The default setting of showing the previous (older) message is usually preferred.
Email signature
Set up an email signature which includes your full name and job title so people can quickly know what you do.
Example
Note: You can copy and paste the template below to use it in your own signature.
John Doe Frontend Engineer | GitLab
Email signature if employed by our German entity
If you are employed by our German entity GitLab GmbH, you will need to include some additional company related details after your own signature in emails (along with other forms of communication listed on the German entity Handbook page) as follows:
John Doe Frontend Engineer | GitLab
GitLab GmbH | Sitz: München | Registergericht: Amtsgericht München, HRB 237630 | Geschäftsführer: James John Gladen und Craig Adam Mestel
Add company details to certain company communications if employed by our German entity
Certain company details are required to be added as a signature to the forms of communication listed below, where that communication is going from a team member employed by our German entity GitLab GmbH to outside of the company, and relates to GitLab’s business activities:
- order forms
- physical mail
- fax
- postcard
- SMS
- Zendesk
- other electronic communications
If you are sending such a communication, externally, please look at the setting of the relevant application and add the company details below to the end of the communication. If you are in doubt, please do add the details. If you are unable to add this information for any reason, please alert legal-employment@gitlab.com.
If you are employed by our German entity you may have been asked during onboarding to set up your signature wherever it’s required to be used and to include these company details, and if you have not been, please do so now, adding these details to the end of your signature:
GitLab GmbH | Sitz: München | Registergericht: Amtsgericht München, HRB 237630 | Geschäftsführer: James John Gladen und Craig Adam Mestel
Filters
Apply label on mention
It might be useful to add a Gmail filter that adds a label to any GitLab notification email in which you are specifically mentioned, as opposed to a notification that you received simply because you were subscribed to the issue or merge request.
- Search for
from:(gitlab@mg.gitlab.com) "you+have+been+mentioned+on". - Click the down arrow on the right side of the search field.
- Click Create filter with this search.
- Check Apply the label: and select a label to add, or create a new one, such as “Mentioned”.
- Check Also apply filter to matching conversations.
- Click Create filter.
Apply label to all GitLab-generated emails
GitLab issues and merge requests can generate a lot of email notifications depending on your settings and how in-demand your attention is. It can be useful to apply a label to these generated emails and move them out of your immediate inbox.
- Search for
from:gitlab@mg.gitlab.com. - Click the down arrow on the right side of the search field.
- Click Create filter with this search.
- Check Skip the Inbox (Archive it).
- Check Apply the label: and select a label to add, or create a new one, such as “GitLab.com”.
- Check Also apply filter to matching conversations.
- Click Create filter.
You can learn more about how to use Gmail filters to organize your inbox in Productivity Hack video. To import downloaded filter export go to Gmail => Settings => Filters and Blocked Addresses => Import filters.
Keyboard shortcuts
Keyboard shortcuts only work if you’ve turned them on in Gmail Settings.
Steps below:
- In “Settings” scroll down to the “Keyboard shortcuts” section
- Turn Keyboard shortcuts “on”
- Scroll down and Save Changes
Here are some shortcuts you can use
Split screen
List your inbox and preview mails in one view with this configuration change:
- Cog/settings top right of inbox.
- Settings option.
- Inbox tab
- Reading pane: enable
- Select a position for the reading pane, Right of Inbox or Below Inbox
- Save changes
- Reload inbox
Disable Google Meet and Chat in Google Mail
The integration for Google Meet and Google Chat is enabled by default. It can consume too much space in the left menu listing mailbox folders. In order to disable the integration in Google Mail, navigate to Settings at the right top, See all settings, Mail and Chat and select the following:
- Chat:
Off - Meet:
Hide the Meet section in the main menu
Save the changes and wait for Google Mail to reload.
Google Slides
Use this general GitLab Slide Template when creating slide decks for internal and external use.
Make a copy of the slide deck and only edit the copy; please do not edit the template itself. To avoid potentially editing the source deck, you can go to the Template gallery and click on the GitLab Slide Template vYear-Month to quickly make a copy and begin a new deck. Ensure that all pages in the slide deck are numbered, with the title page always being number 1.
Google Jamboard
Jamboard is a collaborative whiteboarding platform, accessible at https://jamboard.google.com/. The results are persisted in Drive and are shareable like any other object.
Google Chrome
- Search and find things by typing words from document/issue/etc page titles into the urlbar (anything that appears in the page title). The search is “best effort” but surprisingly efficient at finding that doc or issue you’ve accessed recently.
- “Search engines” help even more! Typing “drive” and pressing Tab, for example, searches in Google Drive. To discover and customize them, go to
Settings > Search engine. - Practice Chrome keyboard shortcuts. Here are a few common helpful shortcuts:
- Jump to the address bar:
cmd l - Create a new tab
cmd t, close a tabcmd w, undo close tabcmd shift t - Open new incognito window:
cmd shift n(e.g. to reproduce a UI bug, or login problem) - Search all opened tabs:
cmd shift a - Hide the bookmarks bar:
cmd shift b(e.g. for screenshots, or shared screen presentations) - Open the developer tools:
cmd option i(e.g. for debugging website errors)
- Jump to the address bar:
- You can organize tabs into tab groups, assign names and custom colors, and collapse or reorder them. Moving tabs between groups also works across browser windows.
- Logging in to the browser (with your GitLab Workspace account) preserves your profile across installations. This is helpful to migrate bookmarks, extensions, and configuration when refreshing your laptop.
Chrome Performance Settings
- Enable the memory saver. This will pause inactive tabs and reduce memory consumption.
- Enable the energy saver. This can help extend battery life by telling Chrome to reduce background task activities.
7db9c423)
