Zip End Users Guide
What is Zip
Zip is an add-on to Coupa that will streamline the approval process to ensure we are gathering all the right information to manage the associated approvals, and get you the services you need as soon as possible. As a result, you will now have visibility into your purchase requests including the ability to see status and current stage of the approval process.
Note
Check this 2 Minute Zip Overview Video to learn more about Zip and how to submit a purchase request.How to access Zip
To request access to Zip:
-
Open an Access Request for Zip and Coupa using the
Individual_Bulk_Access_Requesttemplate. All users requesting access to Zip also need a Coupa license to manage POs and invoices-
a) In Step 2, in the Justification for this access question, please describe what budget, management approvals, purchase orders and invoices approvals you will manage.
-
b) After the AR is approved, you must review the tech stack and follow the instructions for provisioning (either assign to the provisioner, add the correct labels or both if not clearly stated) to avoid any provisioning delays.
-
c) If you require immediate Zip/Coupa access, please ping in the
#coupa_helpSlack channel.
-
-
Once you are provisioned access, Login to your Okta home page
-
Find the
Ziptile.
- Zip should open in a new tab with your user logged in.
- The Zip main page should look like the one below.

Zip - Getting Started
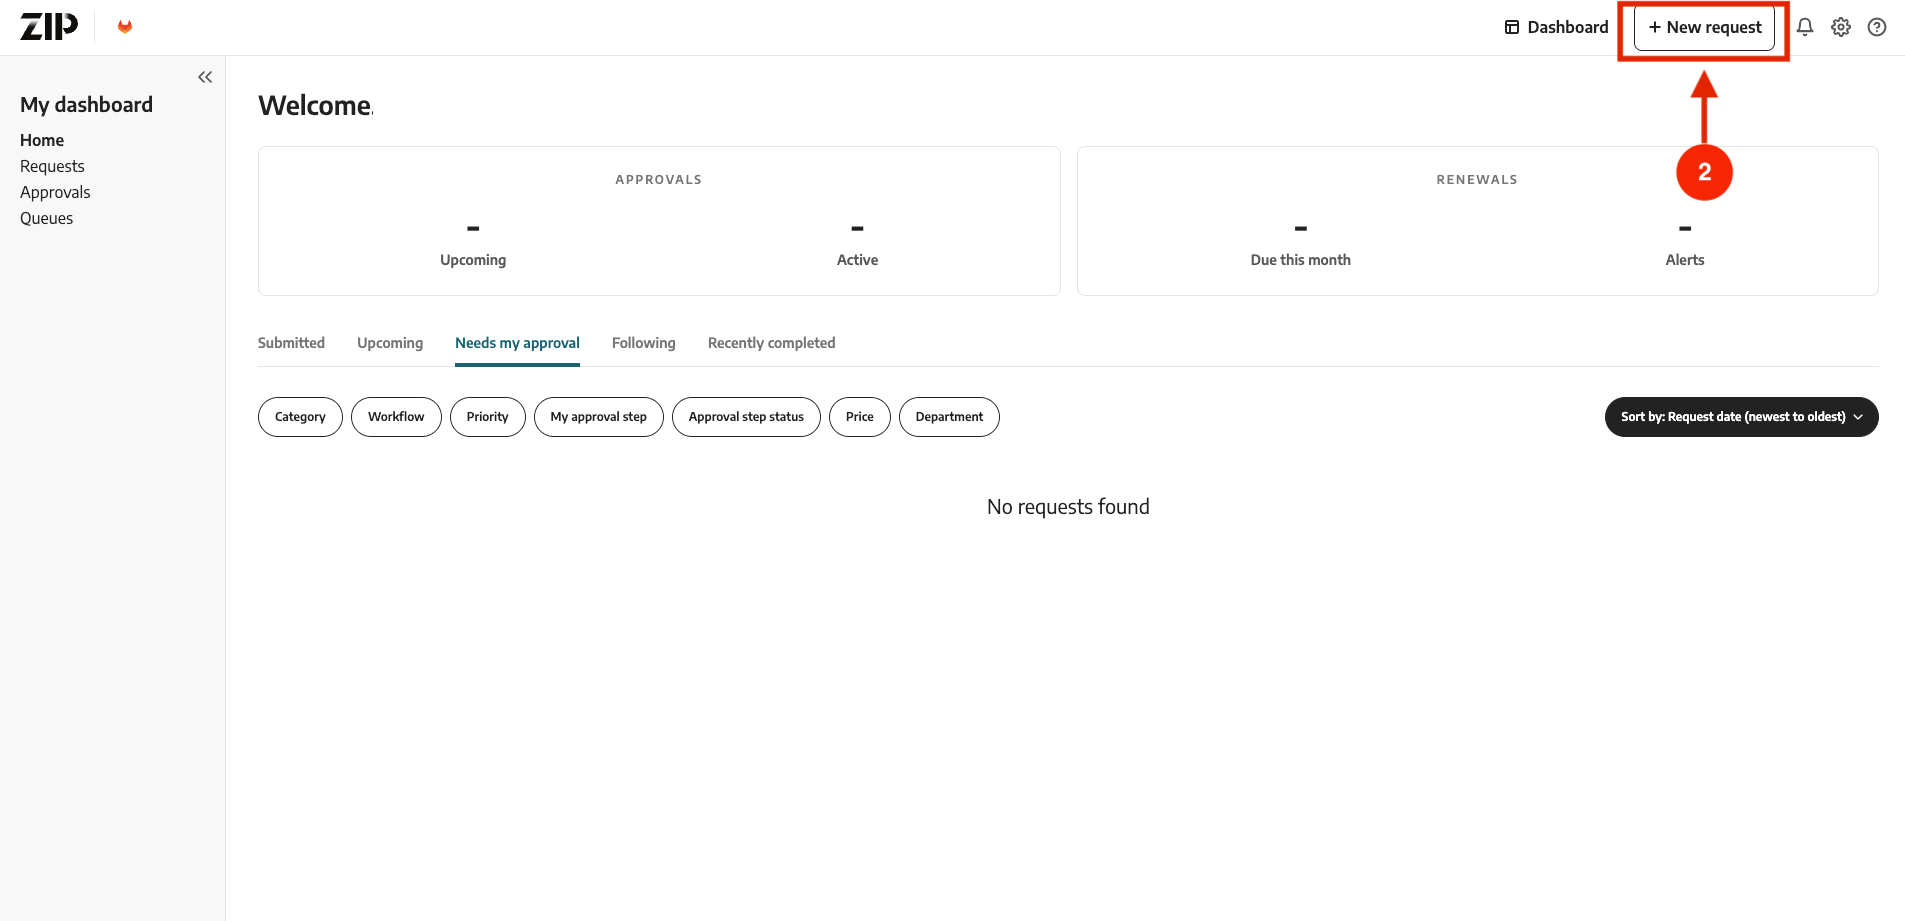
How to initiate a new request?
- Login to your Okta home page.
- Click on
+New Requeston the right side of the top menu. - Select the specific type of request needed.
- Complete the requisition form
- If you are the requestor, then add your name, or behalf of whom you are requesting.
- In the
What are you looking to purchase?question, is asking which commodity you are purchasing. For example: if this purchase is for the Marketing team, then please select Marketing Programs and then the appropriate subcategory that describes your purchase. - Select if the payment is to be made by a Coupa virtual card.

Purchase requests commodity categories and sub-categories
- Consulting, Professional Services & Training
- Consulting Fees
- Professional dues, membership fees
- Revenue Partner Payments
- Finance & Legal
- Accounting
- Insurance - Business
- Legal
- Licenses & Registrations
- Tax Commodities
- General & Admin
- Employee Benefit - Bike to work
- Security Deposits (Greater than 12 months)
- Credit Card Transaction fees
- Gifts & Donations
- Partner Growth Fees
- Postage & Shipping
- Printing & Copying
- Rent or Lease
- Coworking Space
- Hosting
- Hosting Services
- Marketing Programs
- Marketing Site
- Demand Advertising
- Field Events
- Swag
- Brand
- Prospecting
- Channel Partner Rebates
- Office Equipment & Supplies
- Computer & Office Equipment
- Office Supplies
- Computer & Office Equipment (Capitalized)
- People & Recruiting
- Employee Training
- Training & Development
- Software
- Software Subscription
- Telecom
- Internet
- Telephone
- Travel & Entertainment, Company Events
- Airfare
- Business Meals & Entertainment
- Company Functions
- Hotels & Lodging
- Meals - Company Provided
- Parking, Gas, Tolls, Mileage
- Taxis, Car Service, Public Transportation
- IACV Evangelism Dinner Incentive
- Team Building
How to request a new vendor?
The process to set up a new vendor starts in Zip. Simply by creating a new purchase request you have the option to add a new vendor. Once the request has been submitted, the Procurement team would be notified and add the new vendor in Coupa.
How to do a request change?
If there is an existing purchase order (PO) that needs a change, follow the steps below to process a change request:
IMPORTANT Change Request can only be submitted if there is a released Coupa Purchase Order (PO). If you have to update a req that is running through approvals in Coupa/ZIP please contact the Procurement Team.
-
Login to your Okta home page.
-
Open ZIP
-
Click on
+New Requeston the right side of the top menu. -
Select the
Request a Change (amend contracts or PO change) -
Complete the General Information form. Make sure that you enter the existing
Coupapurchase order number (starts with #1000….). -
Complete the Spend Information form:
-
a) What is the new total budget you will need for this purchase:
-
Provide the new final cost, which is the sum of the original purchase order (PO) amount and the additional cost
-
b) Please enter the line item breakdown:
-
In the ‘Line item’ section, specify the new final cost.
If the original PO had more than 1 line items, in the Change Order ZIP request include only line items that should be updated (copy the line item name from the original PO).
-
-
Attach supporting documentation from the supplier for the change. This could be a SOW, Change Request, and/or Order Form based on the purchase type.
-
Submit the Change Request.
Procurementteam will amend the PO inCoupaon your behalf.
NOTE Change Request can NOT be submitted to updated the vendor. If the vendor of PO should be updated please contact the Procurement Team in the #procurement slack.
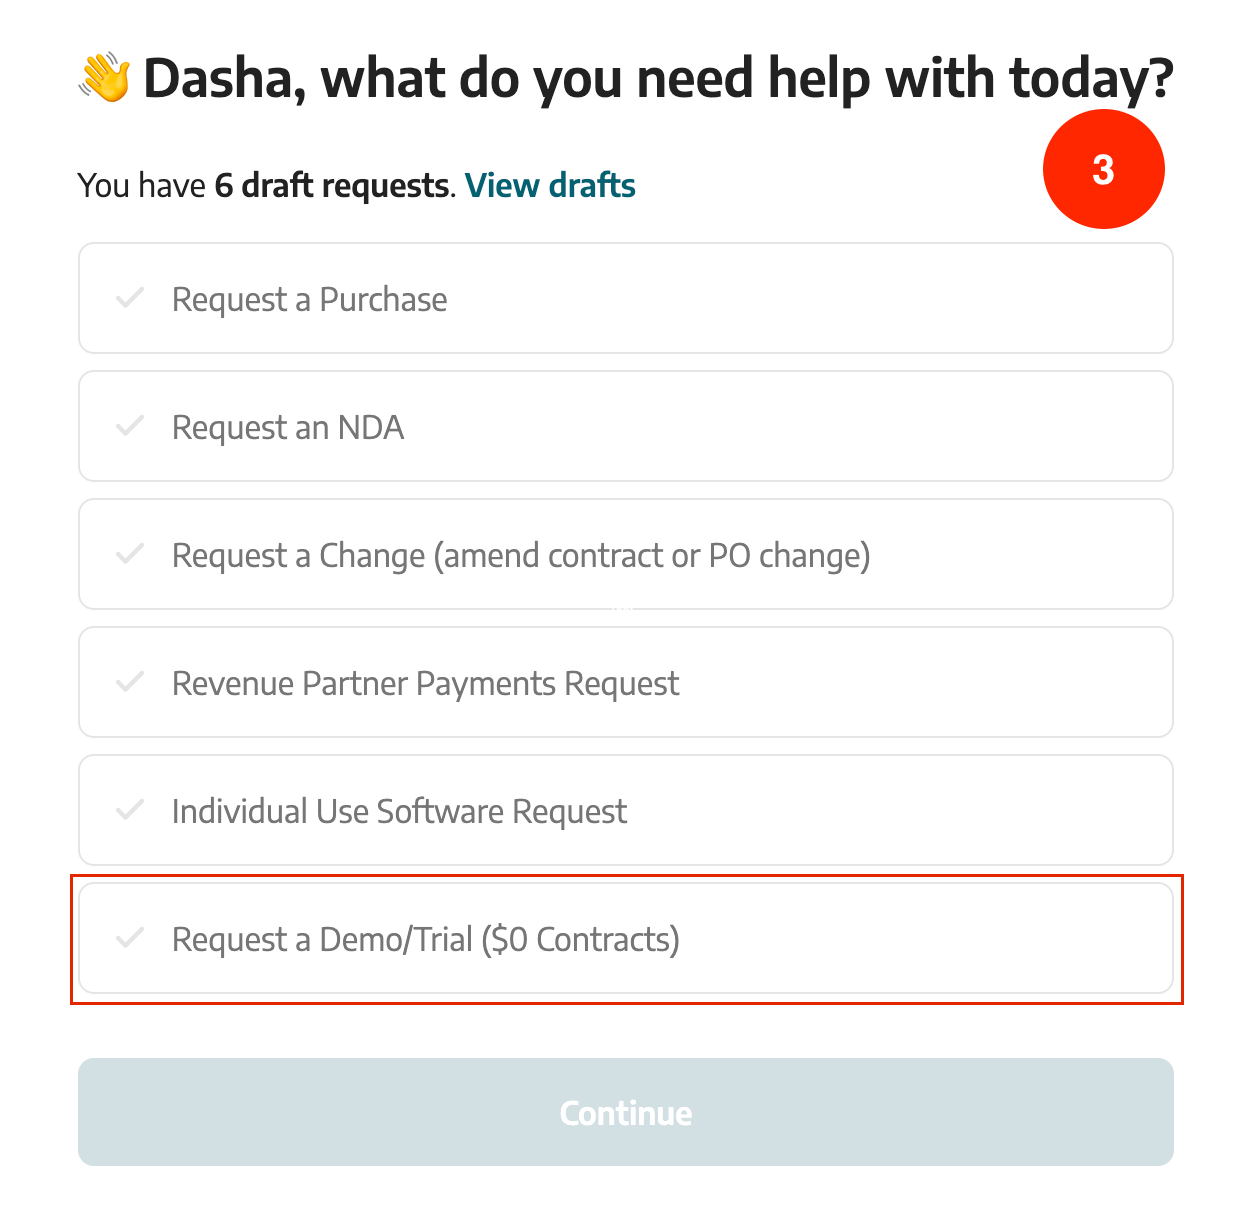
How to request a signature on a POC agreement?
If you are planning to run a POC with a new vendor and have an Agreement with no cost associated, follow the steps below:
- Login to your Okta home page.
- Open ZIP
- Click on
+New Requeston the right side of the top menu. - Select the
Request a Demo/Trial ($0 Contracts) - Complete the requisition form.
- Attach supporting documentation from the supplier for the POC.
- Submit a Request.
- After Legal and Security approvals are collected Procurement Team will proceed with signature process.
How does the virtual card process work?
Virtual card requests will go through Zip as a regular purchase request.
- Select
Yesfor the questionWill a virtual card be used to pay this vendor?and fill in all the relevant information. - Select
American Express- Virtual Cardin the fieldWhat's the name of the vendor? - Once the Zip request is approved and is integrated into Coupa, where financial and management approvals will take place, it will trigger virtual card creation in Coupa.
- You will receive an email once the virtual card is ready, and you can also access it directly in Coupa.
How to keep track of a request?
- Login to your Okta home page.
- Open ZIP
- On the Zip home page click on
Requestson the left side of the page.- A list of all the requests submitted appears.
- There are multiple options to search a submitted request(Purchase name,vendor name,request #,etc).
- Drafted request are also accessible in this page.
- Once the specific request has been selected, the approval workflow appears at the top of the page.
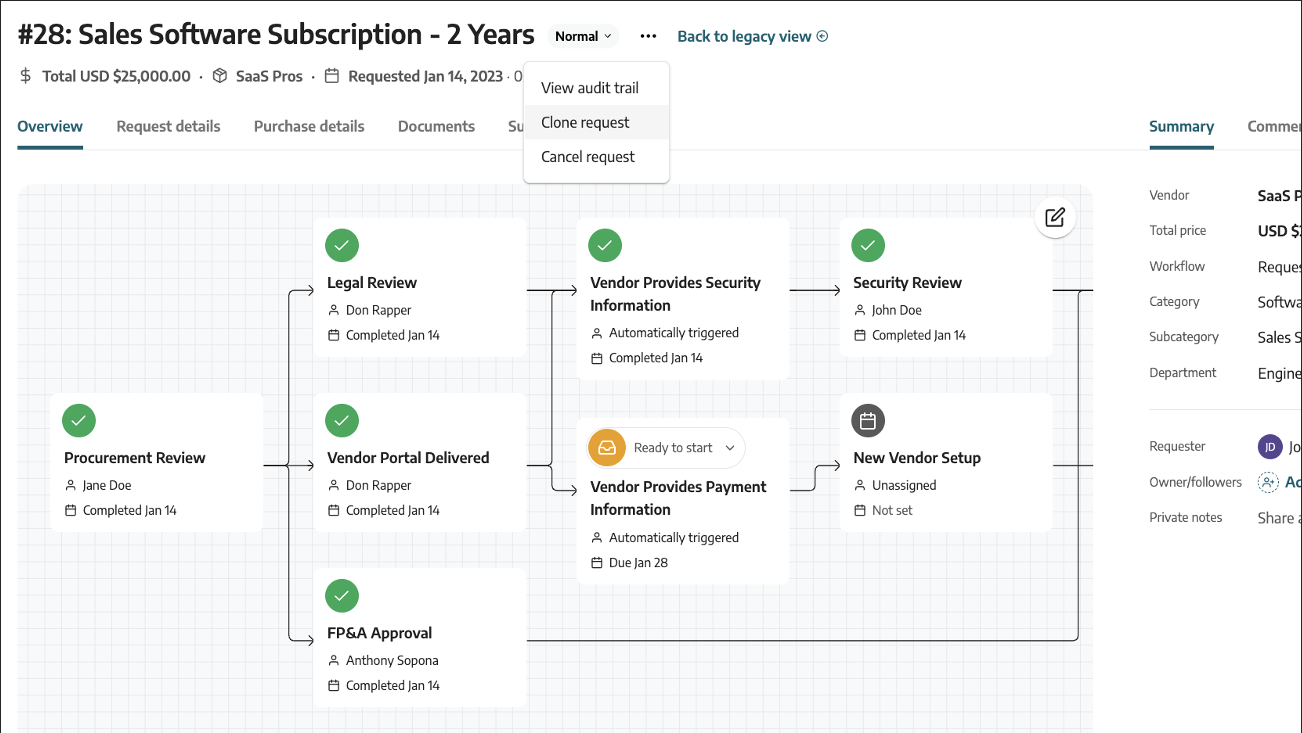
Note
See which approvals are complete and which have yet to be completed. Automatic notifications via Slack and email will go out as the request is approved by different parties.How to check status of a new request?
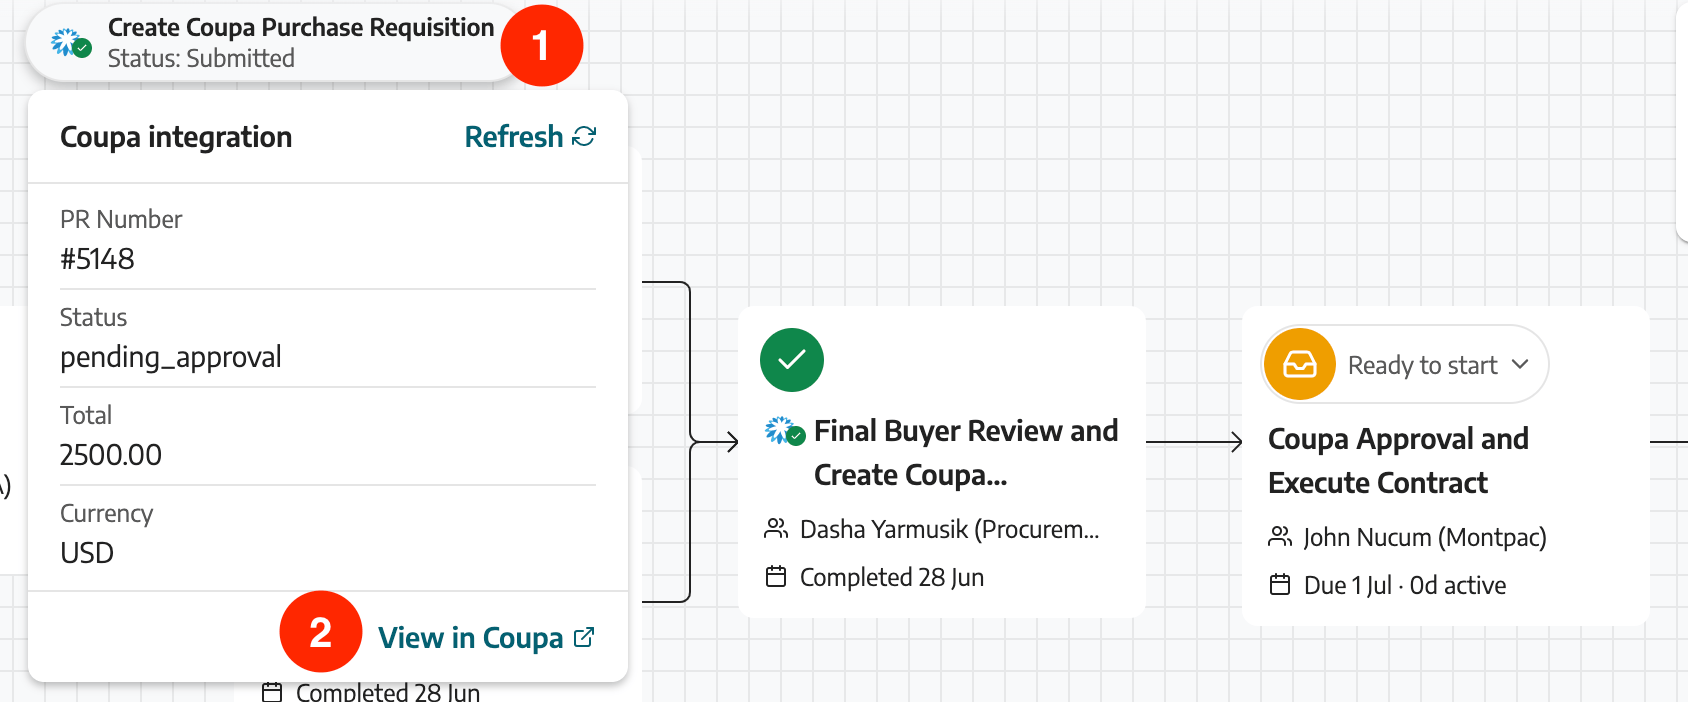
- Login to your Okta home page.
- Open ZIP
- On the Zip home page click on
Requestson the left side of the page. - Select a Request you want to check the status on.
- If the Request in ZIP has reached the
Coupa Approval and Execute Contractnode, you can check the status of a Request in Coupa:- Click on the “Create Purchase Requisition” icon on the top left corner of the approval flow
- Then, click on “View in Coupa”
- You will be redirected to Coupa, where you can check the approval flow and the current approver.
How to check signature status of documents?
- Login to your Okta home page.
- Open ZIP
- On the Zip home page click on
Requestson the left side of the page and find your Request. - On the Request page scroll down to the
Documentssection.
If the contract’s title contains the term “Executable,” this indicates that it has been reviewed and stamped by the Legal team. This implies that the contract is ready to be routed for signatures if all approvals in Coupa were obtained.
- If the contract has been fully signed by all relevant parties, its status will be indicated as
Finaland title will contain the termSigned. - In cases where the contract is pending signatures, the status will display a fraction such as “0/2” or “1/2,” depending on the number of required signatures and the signatures that have already been obtained. For instance, if none of the required signatures have been obtained, the status could be “0/2.” If one signature has been obtained out of the two required, the status could be “1/2.”
Legal approval / redlines
For requests involving new vendors where no agreement on terms has been reached yet, the Legal team may provide edits or redlines to the vendor’s contract to ensure compliance with our company’s policies and legal requirements.
When the Legal team reviews and provides redlines to the vendor’s contract, the following actions should be taken:
-
Stakeholder / Requester’s Role:
The requester is responsible for sending any legal redlines to the vendor via email, unless any of the following apply:
- The Procurement team is already actively in negotiation or communication with the vendor
- The total contract value is > $100k
- Procurement comments that they are specifically sending the redlines themselves for any reason
If the requester sends the redlines to the vendor, it is crucial to copy the Procurement approver on the email for visibility.
-
Procurement Team Support:
The Procurement team can support the stakeholder by routing the Legal notes to the vendor for requests that are actively being negotiated by Procurement or requests that are > $100k. Procurement will leave a comment in the Zip request when redlines have been sent to the vendor and the requester will be copied on the email.
-
Title with ZIP Request Number:
When communicating with the vendor or taking any action related to the redlines, the email subject should include the ZIP request number. This will help in tracking and referencing the specific request throughout the process.
-
Comment in the ZIP Request:
Any team member who reaches out to the vendor regarding the redlines must leave a comment in the ZIP request to indicate that the note has been sent to the vendor. This ensures proper documentation and communication within the team.
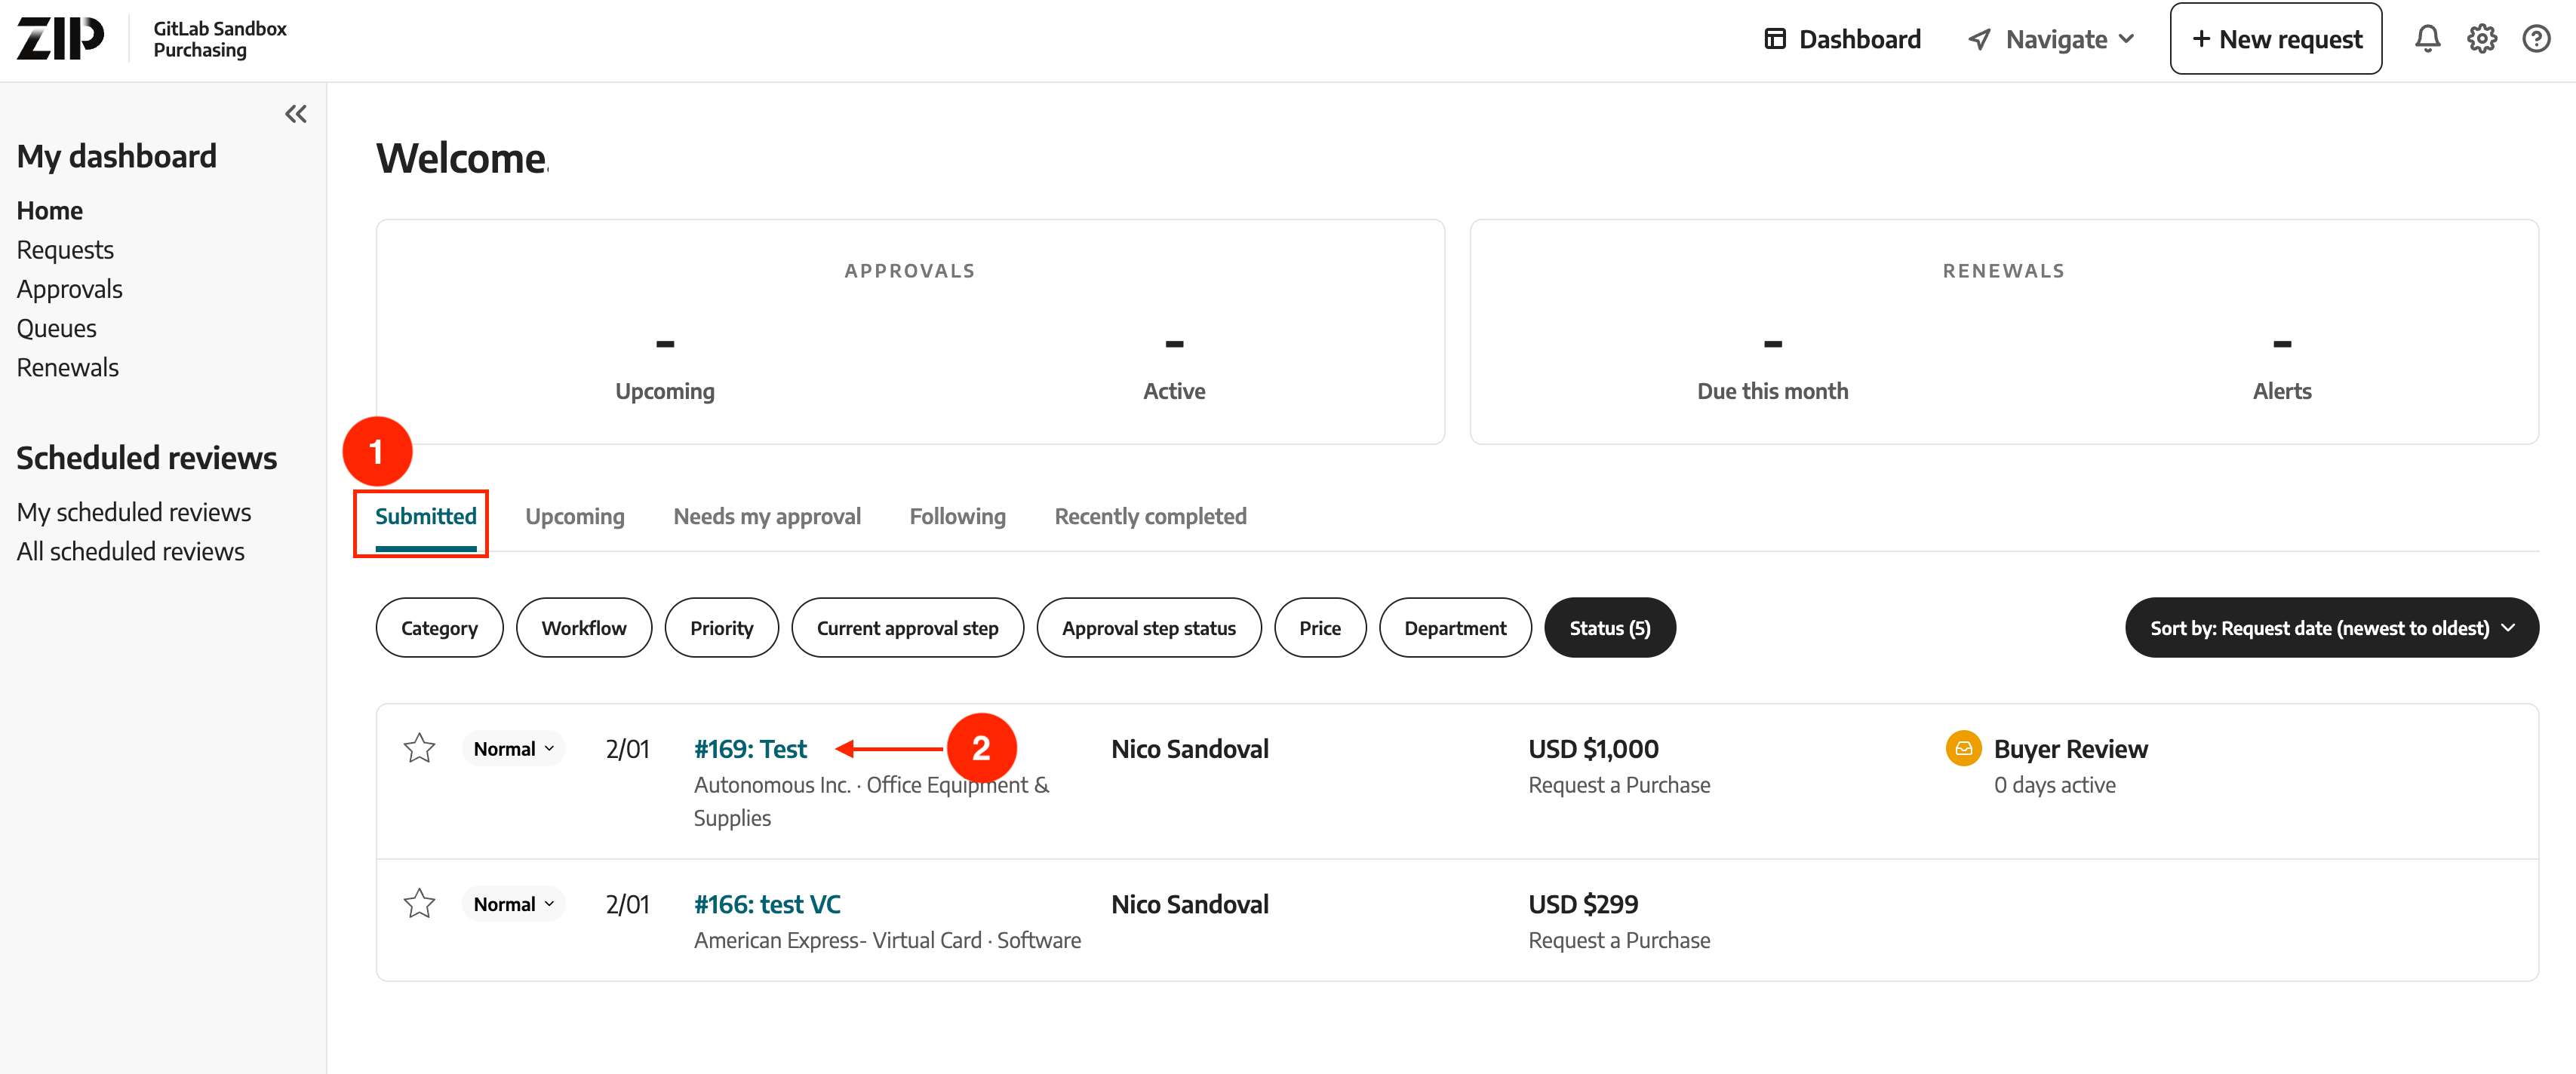
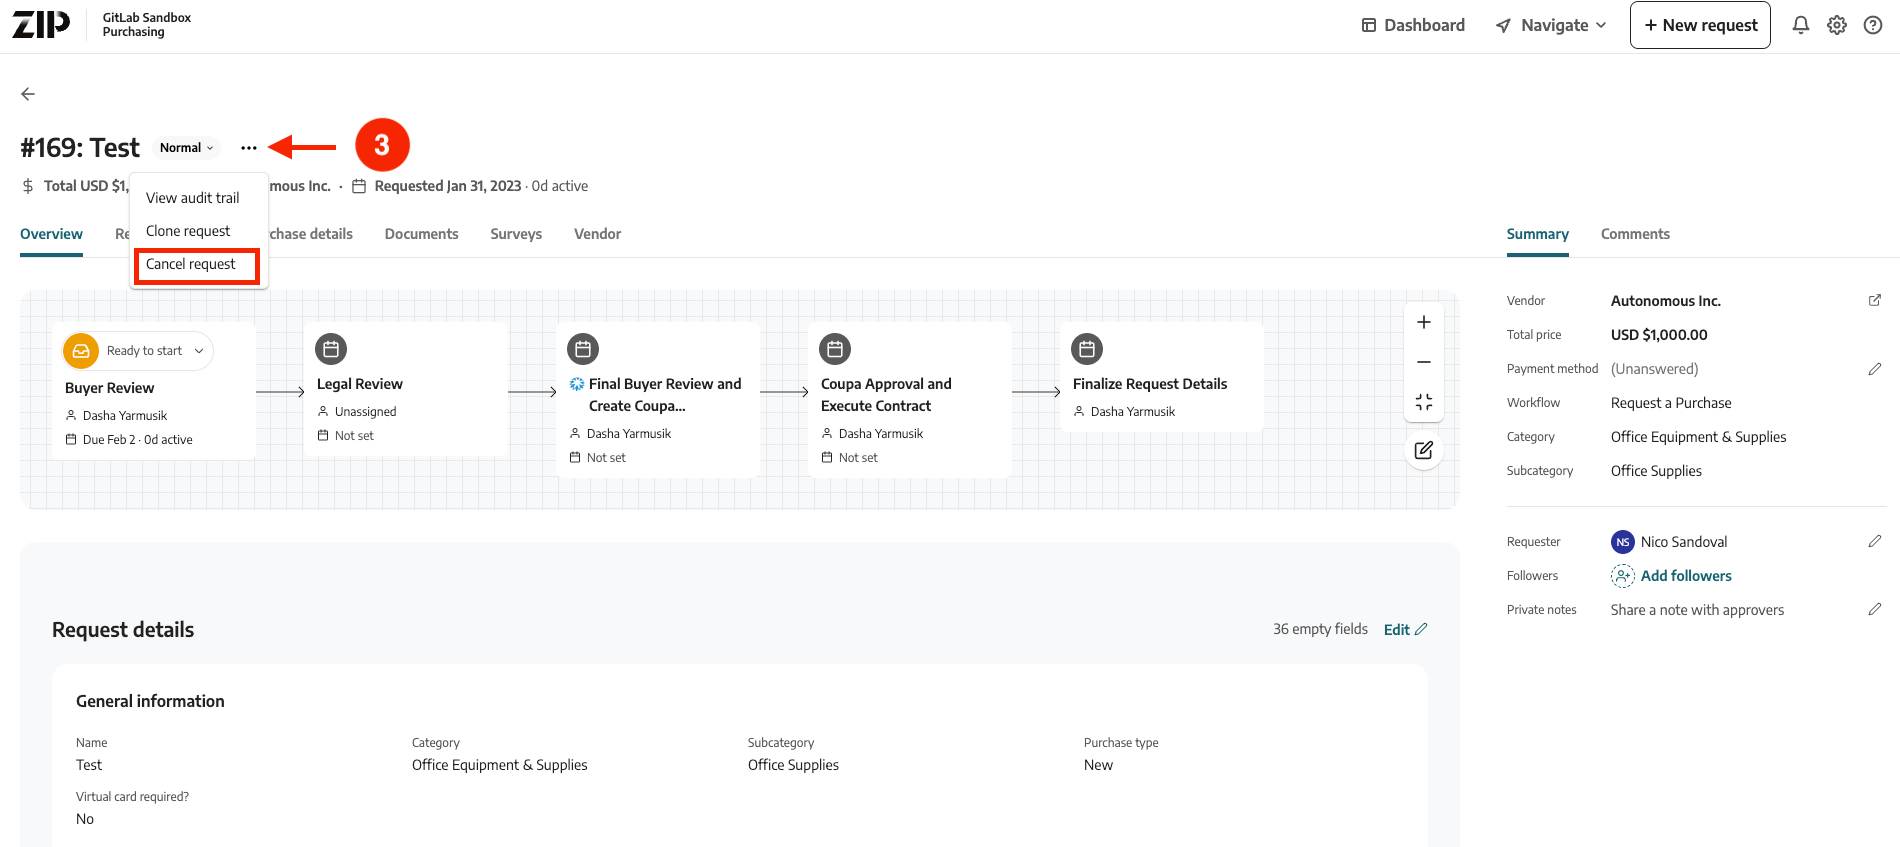
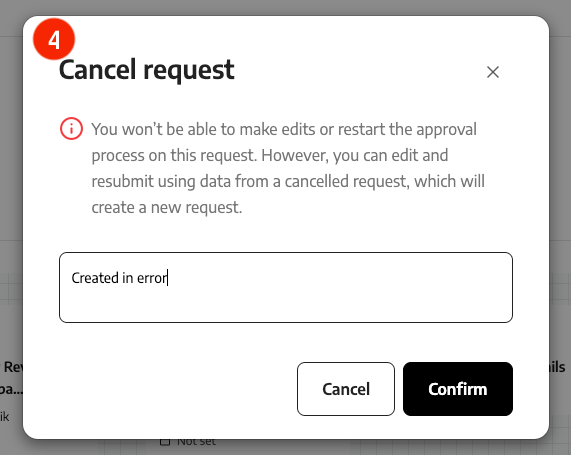
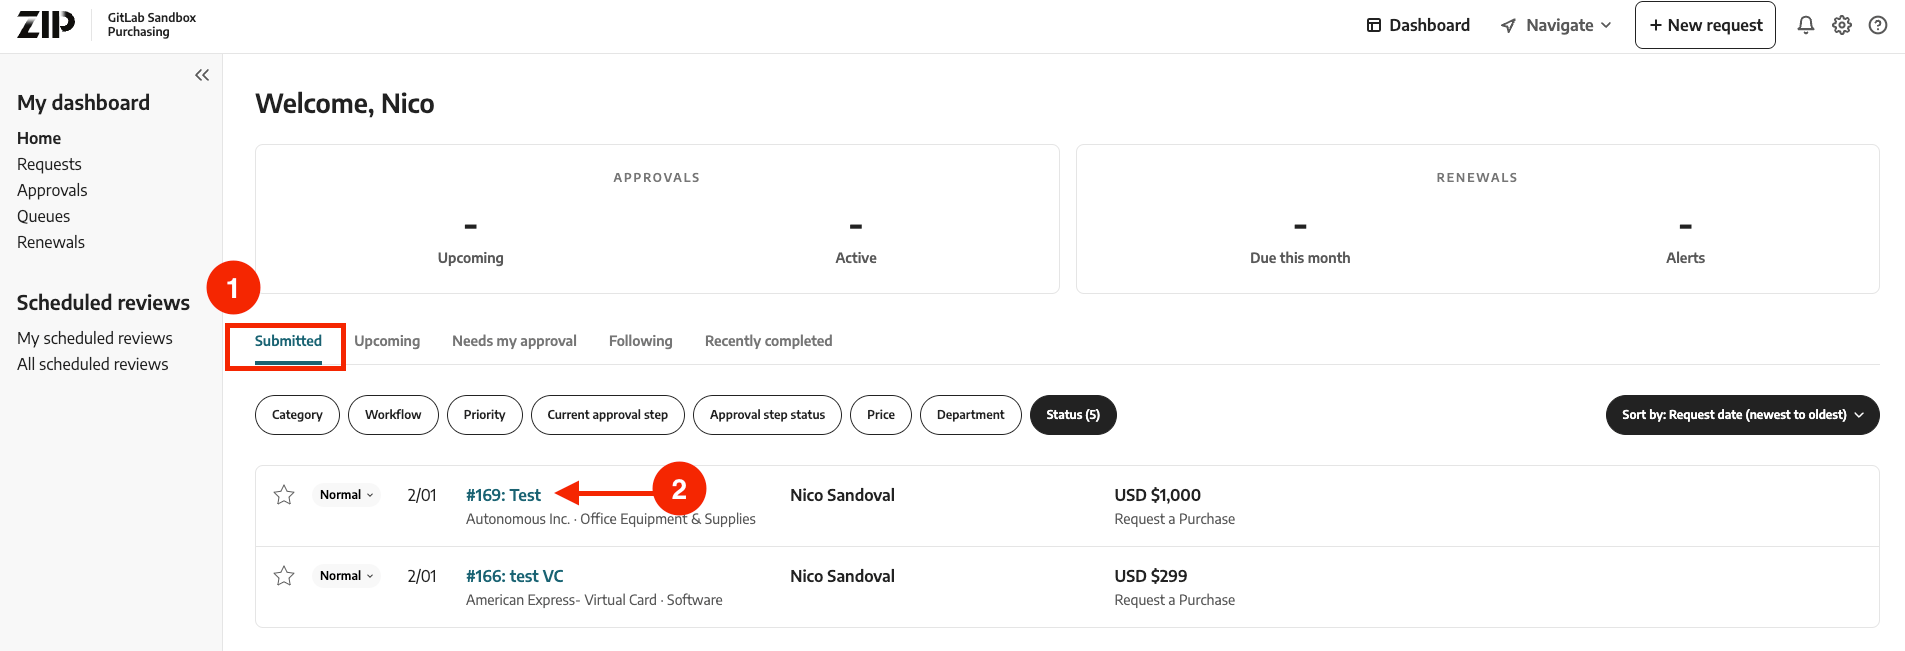
How to cancel a request?
- On the Zip home page click on the
Submittedtab. - Find and select the purchase request you would like to cancel.
- Once you have selected the purchase request, click on the
…logo andCancel Request. - Provide a short cancellation reason and click
Confirm.
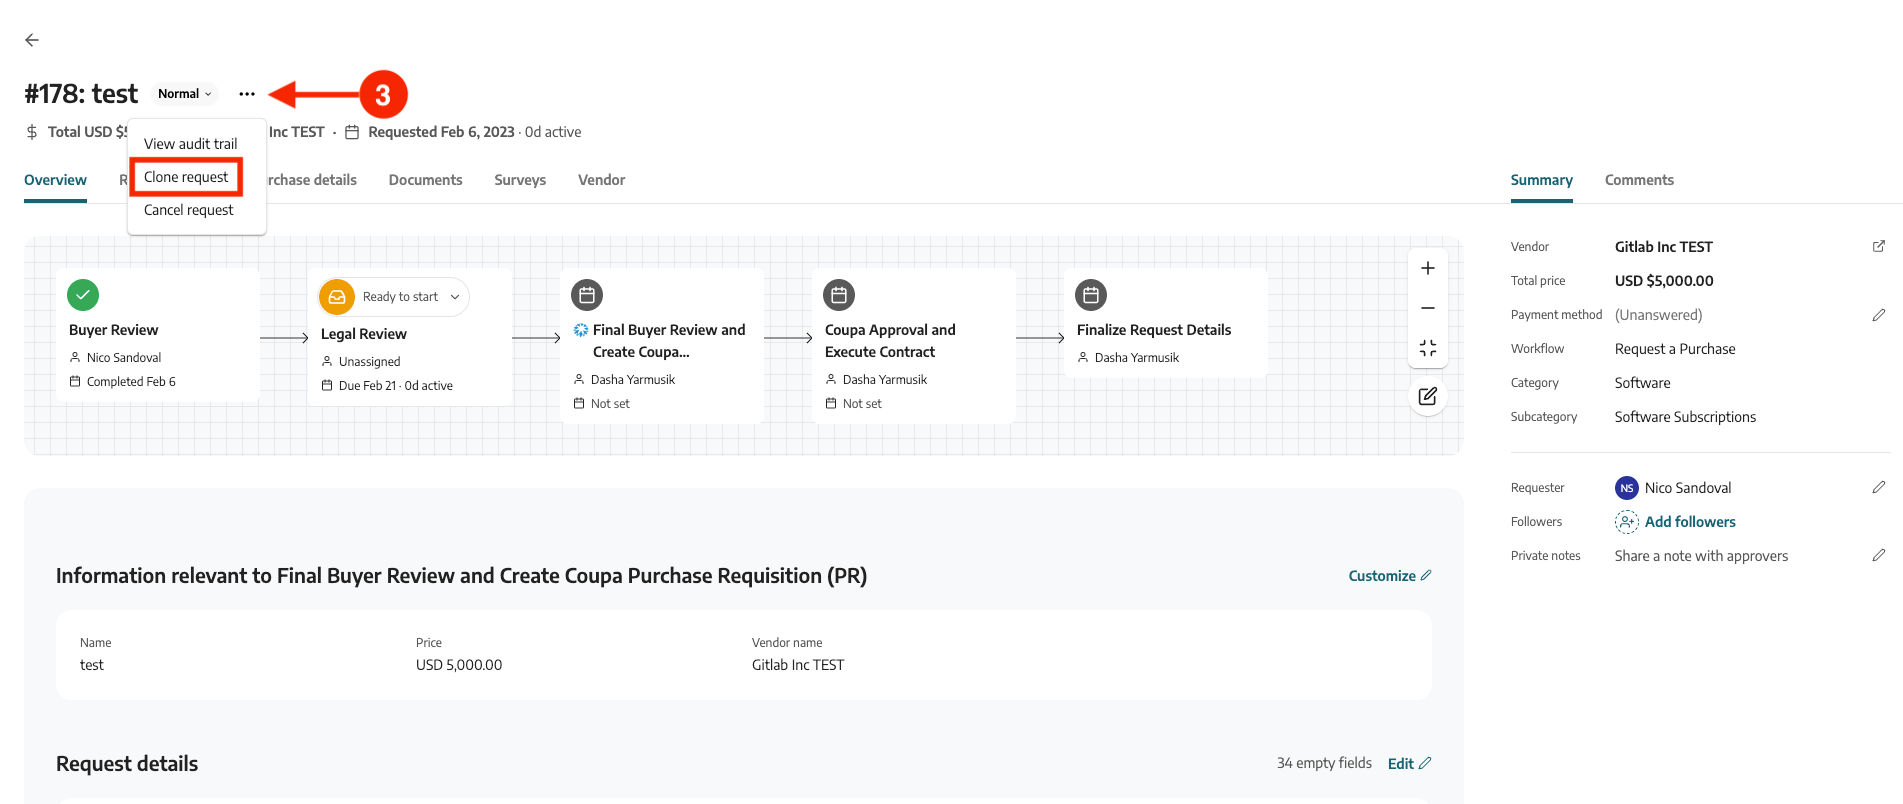
How to clone a request?
- On the Zip home page click on the
Submittedtab. - Find and select the purchase request you would like to clone.
- Once you have selected the purchase request, click on the
…logo andClone request. - Click on
Clone.

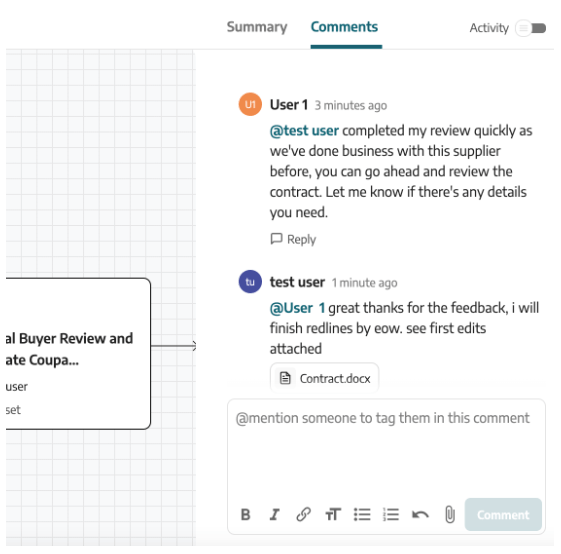
How to comment on a request?
Every request detail page includes a Comments tab that provides a space for communication between all users who can access the request. In addition to comments from members of the organization, this tab provides notifications when comments are left by vendors on the vendor portal.
An user can post a question or comment, and all of the stakeholders in the chain (the requester and all approvers) will be notified to view and then respond, or @ tag a specific person and only that person will get notified.
Zip - Approval Process
Some users identified by Legal, HR, Procurement, Security and Privacy have the option to approve or reject specific purchase request that are assigned to them.
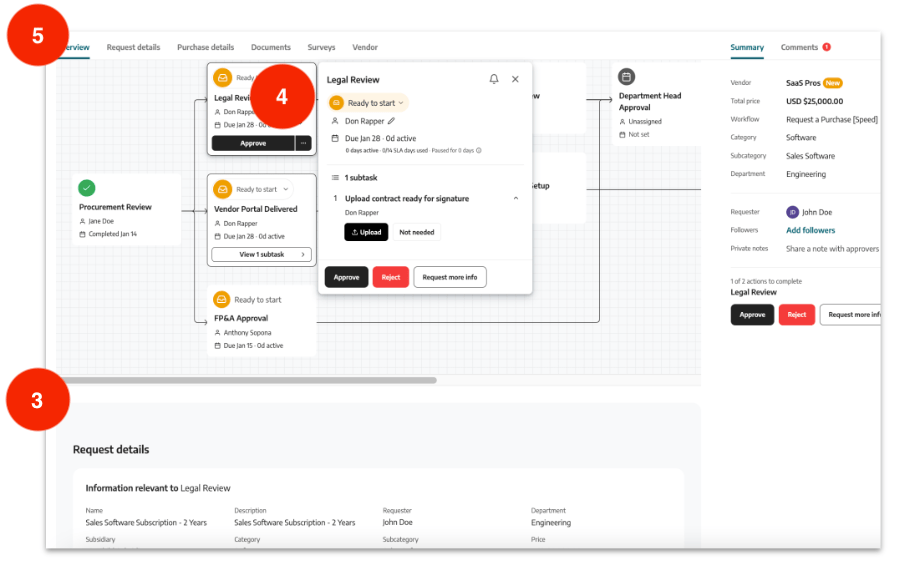
How to Approve a request?
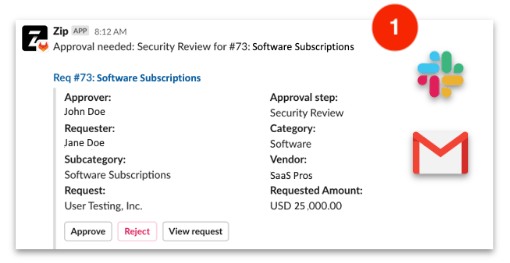
- You will receive an email / Slack alert when a new purchase request requires your approval. Notifications will highlight key information regarding the request, you can approve or reject the request from the notification directly.
- From the notification, click on the View Request link to learn more and to view the request in Zip
- Review the relevant information needed for the approval.
- Click on your approval node in the review chain to view due dates, completed dates, any sub-tasks and integration information built-in.
- Click on the section tabs to jump to the section of the page needed.
Note
You can set your approval notification preferences (Email and/or Slack) by logging into Zip, clicking: Settings -> Personal Settings -> Notifications.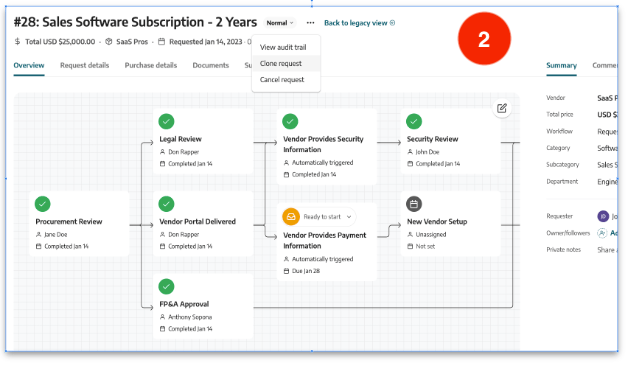
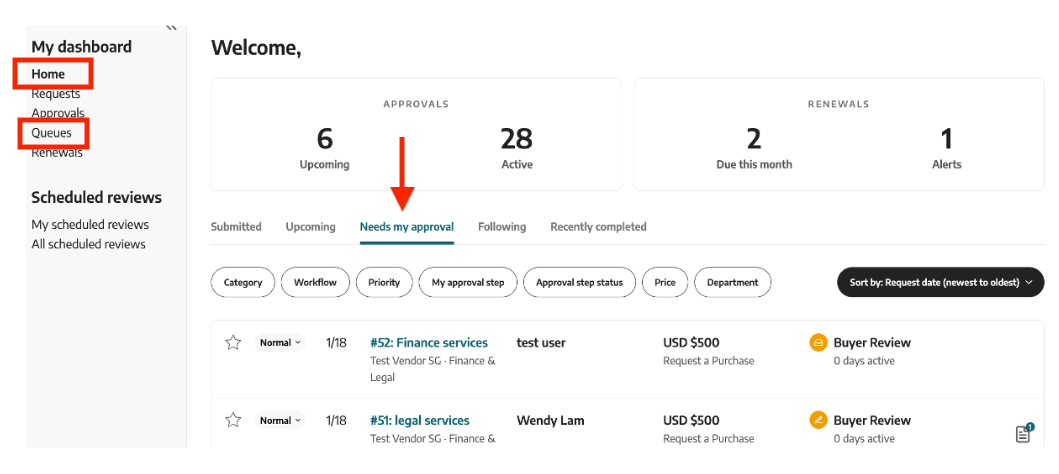
How to see all the requests that need my approval?
If you are the default assignee for your queue, you can view all pending requests for your approval by simply clicking Dashboard in the top right, on the Home dashboard page and selecting the Needs My Approval tab.
If you are not the default assignee for your queue, you can view all requests awaiting your queue’s approval by clicking Dashboard in the top right corner, selecting the Queues tab and selecting your queue. All requests in your queues will appear, you can update the Status filter if necessary to see previously approved or upcoming requests.
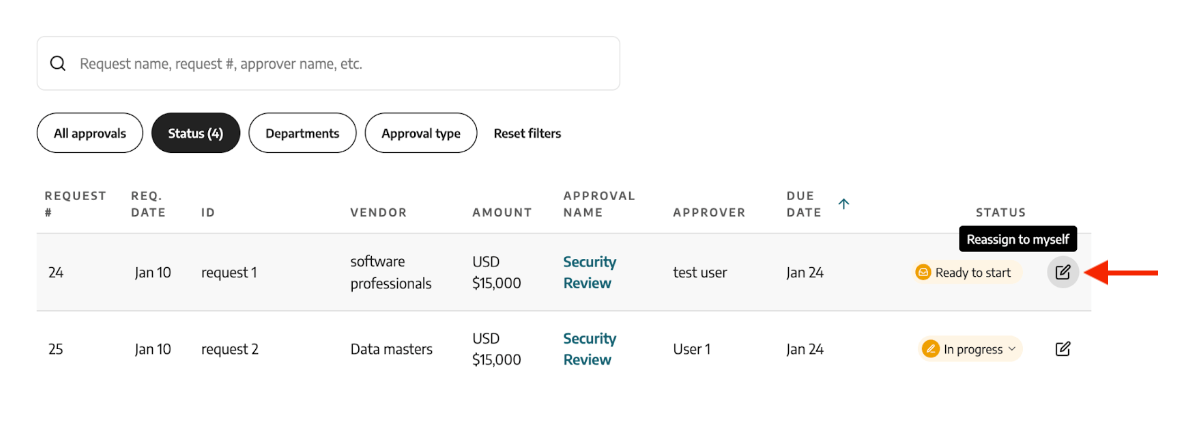
How to reassign approvals?
You can reassign a pending approval from your queue to yourself or another user. Next to the request, click on the pencil icon to reassign the approval.
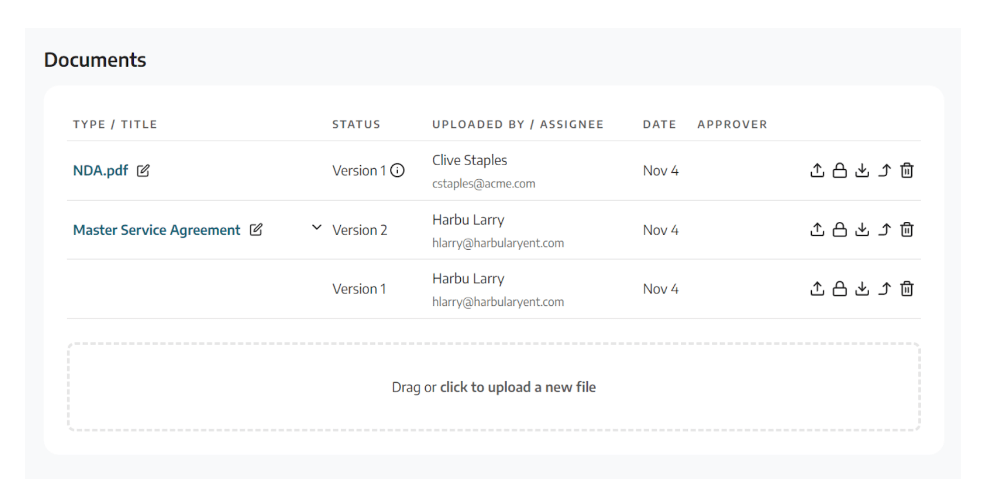
How to see all of the documents associated with a request?
Click on the Documents tab at the top of any request, to see all the documents. You can view and manage all versions of documents associated with the purchase request.
Zip Platform Support
- The Procurement Team should be the first point of contact for all functionality related questions. Examples are:
- Why are we using Zip?
- How do I see my requests in Zip / navigate Zip?
- Which subsidiary or commodity do I select?
- Do I have to use both Zip and Coupa to manage my purchase from request to payment?
- How do I submit a virtual card request?
- Status of requests
- Where do I submit a PO Change Request?
- Do I need to submit a new supplier request?
- The Finance System Admins should be the first point of contact for any technical issues and / or questions (eg. Access Requests, problems with login, bugs, etc).
Note
To contact the Procurement Team or Finance System Admins, send a message to #zip-faq with your question.54338527)
