Sentry
Overview
Note: Sentry organizes applications into “Sentry Teams”. To investigate errors across different applications or environments, our primary teams used are #gitlab (for the production rails application) and #gitlab-internal (for non-production environments). By joining said Sentry Team, the application errors should be viewable.
To find the error specifically related to a user on Sentry, try to check for a logged error in at least one of these Sentry projects:
From the main project landing page, you’ll see an overview of the application and its performance. On the bottom half of the page you’ll see recent issues; click on Open in issues on the right hand side to be taken to all issues on the project.
- Obtain the full URL the user was visiting when the error occurred along with their user ID, if needed for searching.
- Log in to Sentry.
- Enter a query into the search field. For example, after reproducing an error with your admin user. Be aware that usernames are case-sensitive in Sentry.
is:unresolved user.username:your-admin
You can also use user.id: or url: for a specific page on GitLab.com.
Use one of the following methods to get a user.id:
- Chatops: Run
/chatops run user find <username or email> - Admin account: Navigate to the admin link in the GitLab User Lookup Zendesk app
- Users API: Search for user using their email or username
At times a search will turn up a Sentry issue that appears to reference the information (user ID, URL, etc…) of another user and not the one that reported the issue. If this happens and you need to create an issue for that specific reporter, simply click the Events tab as seen below to view a list of all users affected by that issue.
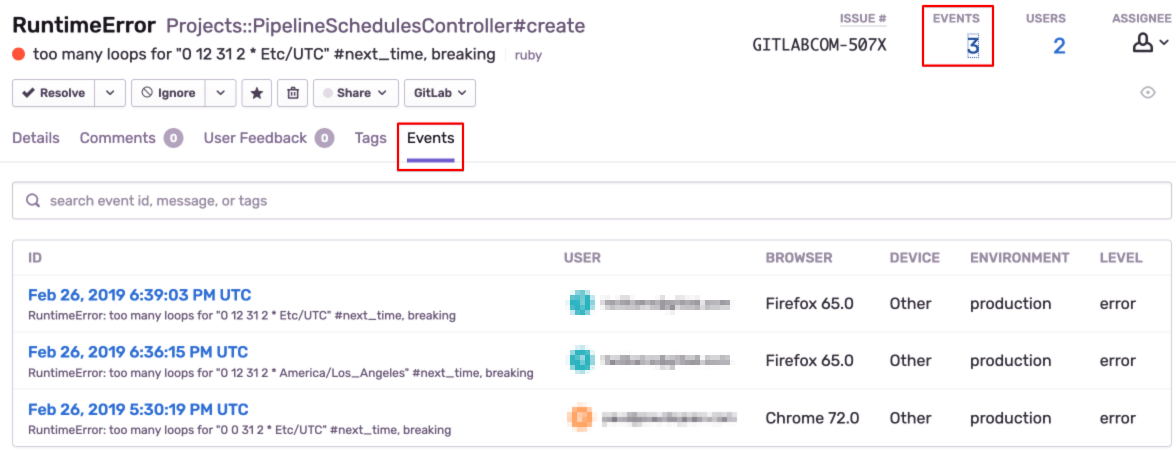
You can then click a specific event to view the Sentry issue for that user.
See the Sentry guide and this presentation (GitLab internal only) for more information.
Searching with the username in gitlabcom Sentry project
If you have the username of the user, find the error message for the user in Sentry’s gitlabcom project:
- Go to gitlabcom Sentry project
- Use
user.username:example(replaceexamplewith the actual username from GitLab) - Open sentry issue → Click on
All Events. - Filter for the specific user again using
user.username:example - Click on any event to see details of the error message
Searching with the user’s ID in gitlabcom-clientside Sentry project
If you have the ID of the user, find the error message for the user in Sentry’s gitlabcom-clientside project:
- Go to gitlabcom-clientside Sentry project
- Use
user.id:userID(replaceuserIDwith the actual ID from GitLab) - Open sentry issue → Click on
All Events. - Filter for the specific user again using
user.id:userID - Click on any event to see details of the error message
Searching customersgitlabcom Sentry project
Use the workflow to find the error message in Customers Portal Sentry project.
Searching by Correlation ID
In most cases errors in Sentry can be found by searching using user.id:, but this won’t always be the case. Sometimes, you may need to search Kibana first to locate the correlation ID that can then be searched for in Sentry.
In the following example, the customer is attempting to change the notification email for one of their groups but receives a 500 error when selecting the desired address from the dropdown list. Searching Sentry for their user.id: turns up nothing, so we need to do the following to find the 500 in Kibana to get the correlation ID that we’ll then provide to Sentry.
-
Add positive filters in Kibana for
json.usernamewith their GitLab.com username,json.controllerforProfiles::NotificationsController, andjson.statuswith500. -
Using the left-hand side menu add the
json.path,json.controller,json.status, andjson.correlation_idfields to your search results, which should give you results similar to the following if any errors occurred within your set time range.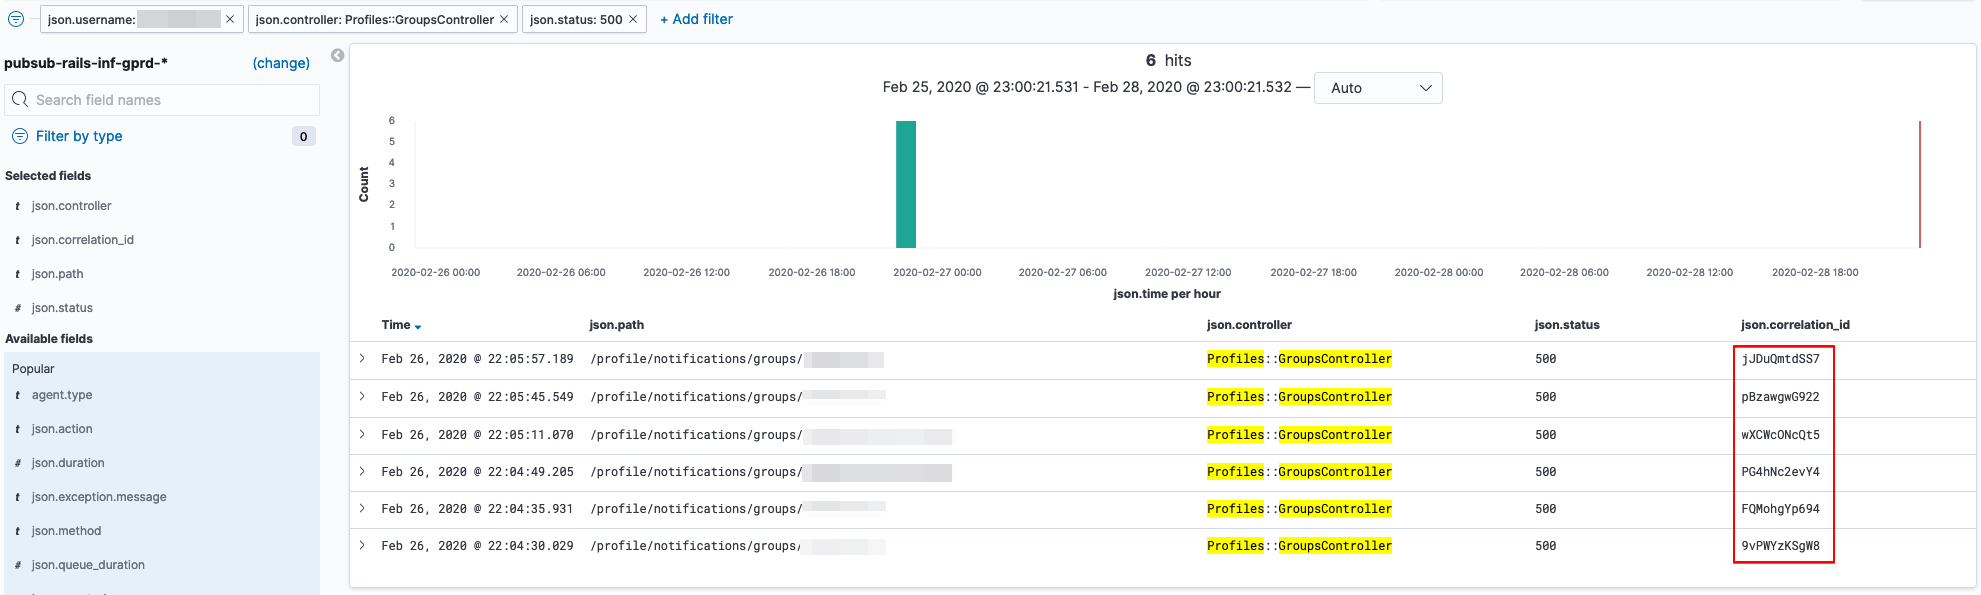
-
Pick a correlation ID value and move over to Sentry to search for it using
correlation_id:, which should give you a result.
7d49549f)
