Kano Survey for feature prioritization
Kano model
The Kano model is a theory that ties perceived product functionality with user satisfaction. It was developed in Japan in the 1980s by Professor Noriaki Kano.
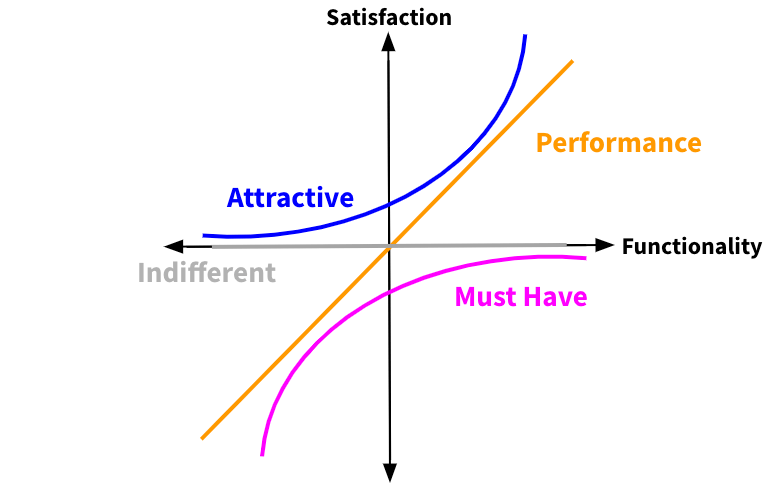
The Kano model classifies product features into five categories based on how developing them impacts user satisfaction:
- Must-be: Features that are crucial for the initial adoption but won’t lead to high satisfaction, no matter how much you invest in them.
- Performance: (a.k.a. One-dimensional) Satisfaction grows with additional investment in these desired features.
- Attractive: These are nice-to-have features, but if you implement them well, satisfaction will skyrocket.
- Indifferent: Investing in these features will not increase or decrease user satisfaction.
- Reverse: Not having these features is actually better than having them.
Once you know which categories your features fall into, you can prioritize the most important ones for development. In theory, features from the Must-be category should be prioritized first, followed by Performance and then Attractive. Depending upon the number of features that fall into each category, you may need to work with your product team to determine how to prioritize them.
Why use it?
Using the Kano model can help you to make more informed decisions when prioritizing features for a new product and to better understand why these features do or don’t resonate with your users.
How to use it?
The Kano model is best utilized with customer data, especially when it is informing the prioritization of features. To collect this data, we recommend conducting a research study by using a standardized questionnaire that was developed as a part of the Kano analysis model.
Designing a survey for a Kano study is rather simple from the research perspective, however it requires a lot of preparation by the Product Manager – especially describing the features and current state of the product area. In the following sections, we will discuss details for designing a Kano study at GitLab.
Kano Survey Example
In the project below, a Kano survey was developed to understand how to prioritize a set of new GitLab features.
Example project: Survey for CI feature prioritization
Project summary: The team was considering 12 new features to build that they thought would benefit our users. Since building new features is costly and time consuming, the team wanted to understand how users felt about each of those features, along with a prioritization. The goal was to end up with a clearer understanding of which 12 the team should build first.
In order to get feedback about the 12 features, the team needed to develop and iterate on a short summary or description for each of the features. The following sessions provide details the process to create feature descriptions and transfer them to a survey.
Preparation
Well-formulated feature descriptions are crucial for the success of your study. Participants must be able to accurately understand the features that you are asking about and the value of those features, so they can provide honest feedback. It makes sense to begin creating the survey only after the features have gone through an in-depth refinement process to ensure they provide enough detail to be clearly understood.
Category description
We usually develop new features in the context of features that already exist. For that reason, you should first walk the participant through the current experience(s) that contain the features being presented.
Example of category description:
A continuous integration pipeline in GitLab is defined as a version-controlled file in the Git repository of a project. This file is called ‘gitlab-ci.yml’ and users configure CI pipelines by editing this file and pushing it to the repository. Pipelines consists of jobs and stages. Jobs define what the pipeline should do. Stages consist of one or multiple jobs and define the sequence in which jobs run. All jobs in a stage run in parallel, and if all of them succeed, the pipeline moves on to the next stage. Different types of conditions can be specified for pipelines like prerequisites, exceptions, and so on. You can edit the pipeline YAML file either by cloning the project locally or using an online text editor.
Feature descriptions
When creating feature descriptions, follow these guidelines:
- Describe features, not MVCs
- The findings should be relevant for a reasonably long time. In other words, you would likely not be able to develop it in 1 or 2 milestones.
- Use simple and neutral language to avoid bias in how feature desciptions are perceived
- No GitLab lingo like
sections,categories - No sales or marketing words like
easy-to-use,better,faster,more efficient - Bad example:
Run Dynamic Application Security Testing (DAST) in the cloud as part of your CI jobs on cloud based runners. This will make deploying and testing applications in a sandbox significantly more efficient. - Good example:
Run Dynamic Application Security Testing (DAST) in the cloud as part of your CI jobs on cloud based runners, to deploy and test applications in a sandbox for potential vulnerabilities.
- No GitLab lingo like
- Set the feature into the context of the system
- Use consistent terminology, making sure your feature descriptions fit into the overall category description.
- Aim for one paragraph of text for each of the descriptions
- Less than 1 normal paragraph might be not enough. On the other hand, if the text is too long, participants will more likely skim through the content and not develop a full grasp of the feature.
- Include only new features
- Including features that are already developed can set a benchmark; however, it is mostly not actionable and therefore useless in this context.
- Enrich the descriptions with images or GIFs
- Having a visual aid can help participants understand the concept being described in the feature description.
In general, feature descriptions should follow this basic structure:
- Feature: What can the user see in the UI
- Behavior: What does it do
- Value: Why do we want to introduce it
Example of feature description:
A list of CI job code snippets that will display next to the online pipeline editor. You use these code snippets as the building blocks of your pipeline by copying the jobs YAML from this list and pasting it into your pipeline code. Thus, there are fewer steps in the process of creating new pipelines.
- For more feature description examples, see this CI features list Google Doc.
Tips & tricks
💡 **Tip**
: Preparing for the survey can take a lot of time and might be hard to track. Creating a separate issue to track the effort can help break up the main research issue into smaller manageable parts.💡 **Tip**
Creating feature descriptions asynchronously can take a lot of time. If you feel like your team is not moving forward quickly enough, pivot to synchronous communication.Survey
Standardized questionnaire
The standardized questionnaire for the Kano model consists of two questions that are asked for each of the features that you are interested in:
| Functional question | Dysfunctional question |
|---|---|
|
How would you feel if you had this feature?
|
How would you feel if you did not have this feature?
|
The benefit of using the standardized questionnaire is that basically all of the research design is already done, and you can reuse it from previous studies. Also, taking a consistent approach to this methodology reduces the risk of introducing errors to the process.
For ane example of a research plan, see this past Kano study plan in Google Docs
Questionnaire structure
Use Qualtrics to create the questionnaire. Each feature description with related questions (functional and dysfunctional question) should be presented on a separate block, so participants can answer each feature independent of another. Also, it is recommended to randomize the order of each block, so the presentation order does not affect participants’ feedback.
Example survey that we used in #1027
Data collection & Analysis
Using the provided questionnaire, you’ll be able to collect the data, analyze it, and report out the findings using both quantitative and qualitative approaches.
The qualitative approach
This approach will provide you with a better understanding of the why behind their prioritization. Collecting and analyzing the qualitative data first can help you to spot problems in your feature descriptions, such as whether they are confusing or unclear, so you can fix the descriptions before sending them to a larger set of participants. After taking the quantitative approach, you can also talk to a few users from the survey sample for some additional feedback on why they provided their ratings.
We recommend conducting 5 to 10 moderated sessions and/or 20 to 30 unmoderated sessions where a participant’s task is to go through the questionnaire and explain the reasoning behind their answers.
Example Dovetail project where moderated interviews were conducted before and after collecting responses via a larger survey.
The quantitative approach
We recommend collecting responses from 50 to 80 users in your target audience and analyze them using discrete analysis described in The Complete Guide to Kano Model. This approach will provide you with “the numbers” that can back up your prioritization decisions, but you will still lack the understanding behind the prioritization.
For the analysis use this spreadsheet template (GitLab internal link).
Example report (GitLab internal link) that summarizes the output from the quantitative approach.
Taking the quantitative and qualitative approach will result in a more complete story behind the data. In addition to prioritization, you’ll also be able to explain why participants scored the way they did, too. Combine these two approaches to get the most of your Kano model study.
Additional resources
- Article: The Complete Guide to Kano Model
- Article: Kano Model — Ways to use it and NOT use it
- Video: Building a Winning UX Strategy Using the Kano Model
Examples of Kano research conducted at GitLab
- Monitoring feature prioritization
- CI feature prioritization
- Threat insights feature prioritization
- GitLab Plus feature prioritization
9b1952da)
