Google Cloud Security Best Practices
Google Cloud Resources
Some Google Cloud resources, if deployed with default settings, may introduce risk to shared environments. For example, you may be deploying a temporary development instance that will never contain any sensitive data. But if that instance is not properly secured, it could potentially be compromised and used as a gateway to other, more sensitive resources inside the same project.
Below are some steps you can take to reduce these risks.
Google Compute Instances
Service Accounts
By default, Google will attach what is called the Compute Engine default service account to newly launched Compute Instances. This grants every process running on your new Compute Instance ‘Project Editor’ rights, meaning that if someone gains access to your instance they gain access to everything else in the project as well.
This default account should not be used. Instead, you should choose one of the following two options:
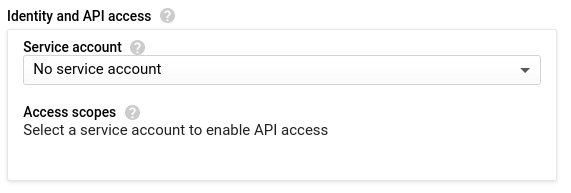
- If your instance does not need authenticated access to Google Cloud APIs, you should choose not to bind any service account at all. This can be done by appending the
--no-service-account --no-scopesflags if using thegcloudcommand, or by selecting the following option in the web interface:
- If your instance does need to authenticate to certain Google Cloud APIs, you should use a specific service account that has been granted only the minimum IAM roles required for your application to function. Access Scopes are not a replacement for properly configured IAM permissions and in general should not be relied upon as a security mechanism.
Firewall Rules
When permitting access to Compute Instances via firewall rules, you should ensure you are exposing only the minimum ports to only the minimum instances required.
When creating a new firewall rule, you can choose to apply it to one of the following “Targets”:
All instances in the network: This is probably not the option you want. Selecting this option is a common mistake and may expose insecure services on instances other than your own.Specified target tags: This is probably the option you want. This allows you to limit the rule to instances that are marked with a specific network tag. You should create a descriptive tag name like “allow-https-from-all” so that it can be easily identified and used when needed.Specified service account: This is a less likely option, but perfectly viable if you have already done some design around custom service accounts. It is similar to a tag but will be assigned automatically to all instances using a specific service account.
When choosing “Ports and Protocols” to expose, you should never select “Allow All” and should never manually enter entire ranges such as 1-65535. Instead, you should choose only the specific required TCP/UDP ports you need to expose.
Google Kubernetes Engine Clusters
GKE nodes are Compute Instances, and by default use the same Compute Engine default service account described above. Despite making it their default, Google specifically states “You should create and use a minimally privileged service account to run your GKE cluster instead of using the Compute Engine default service account.”.
Whether deploying a GKE cluster manually or automatically via Terraform, you can follow these instructions to create and attach a service account with the minimum permissions required for a GKE cluster node to function.
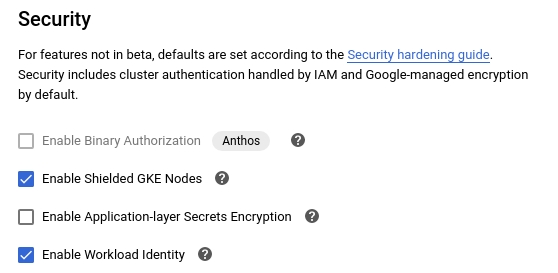
In addition, you should enable Workload Identity and Shielded Nodes on all new clusters. This can be done by appending the --workload-pool=[PROJECT-ID].svc.id.goog --enable-shielded-nodes flags if using the gcloud command, or by selecting the following options in the web interface (located under the “Security” menu):
Google Cloud Functions
Access Control
When creating a Cloud Function with a “trigger type” of HTTP, Google provides two layers of access control. The first is an identity check, via the following two options under Authentication:
- Allow unauthenticated invocations: This will permit anyone on the Internet to invoke your function, supplying any type of input parameters they choose. This option should be avoided where possible.
- Require authentication: This will allow you to manage authorized users via Google Cloud. This is the preferred option.
The second is network-based access control, via the following options under Advanced Settings -> Connections -> Ingress Settings. You should choose the least permissive option that will still allow your function to work:
- Allow all traffic: This will permit HTTP invocations from any IP address.
- Allow internal traffic only: This restricts invocations to a source in the same Google Cloud project or the same VPC SC perimeter.
- Allow internal traffic and traffic from Cloud Load Balancing: This is the same as above with the added ability to send an invocation through Google’s load balancers.
Some uses cases will prevent you from choosing the “best practice” when it comes to authenticating an inbound request. For example, you may wish to host a webhook target for an external service that doesn’t support the use of Google Cloud credentials. For this use case, you can store a complex, machine-generated secrete as an environment variable inside your function and then ensure the requesting service includes that secret inside the request headers or JSON payload. More details and examples can be found here.
Service Account
Similar to Compute Instances and GKE clusters, Cloud Functions also bind to a service account by default. And once again, Google states that “it’s likely too permissive for what your function needs in production, and you’ll want to configure it for least privilege access”.
For most simple functions, this shouldn’t an issue. However, it is possible that a complex function could be abused to allow the person invoking the function to impersonate that service account. For this reason, you’ll want to configure a new service account with the bare minimum permissions required for your function to operate.
You can then choose to use this new service account via the option under Advanced Settings -> Advanced -> Service account.
GitLab Demo and Test Instances
Test and demo instances are publicly accessible on the internet, by default. There may be occasions where team members need to test specific GitLab versions or configurations affected by known security vulnerabilities. It is your responsibility to secure your test instances to prevent them from being compromised or used in ways that could compromise our cloud environment. If you need help securing your instance or have a question, feel free to ask in the #security channel in Slack.
IP Filtering
A highly effective way to secure your cloud instances is to apply the concept of IP filtering for each test instance you create whether its a GitLab instance or otherwise. For the majority of cases, this means source IP filtering from one or more CIDR block ranges ensuring that only certain IPs and integrations can interact with the GitLab instance, therefore reducing the attack surface of the GitLab organization as a whole.
If you don’t know your current IP address to use for source IP filtering, you can utilize services like whatsmyipaddress.com or ipinfo.io to retrieve it. The steps to implement IP filtering will differ per cloud environment. Below you can find a detailed guide maintained by the support engineering team.
In addition, you can find official, platform-specific documentation of features involved in implementing IP filtering:
IP filtering should be set up and used when hosting any version of GitLab affected by known and disclosed vulnerabilities.
You can view a list of vulnerabilities affecting a given version of GitLab here. Versions of GitLab without the latest security patches and fixes applied should not be publicly accessible.
Classified Data
Do not host or store any classified data on test or demo instances.
For public-facing instances, only Green data is allowed.
RED, ORANGE, and YELLOW classified data, along with customer data and personal data, should never be copied to or stored on test or demo instances.
Clean Up
Test instances should be ephemeral.
As soon as you’ve finished testing, or you’ve finished your demo, shut down or destroy the test environment.
If this test or demo environment will be live for a substantial amount of time (>24 hours), plan a decommission date and set a reminder for to ensure the instance is shut down or destroyed in a timely manner.
Upgrade regularly
For test or demo instances that will be live for an extended period of time, it’s important to regularly update GitLab and other software on the machine to ensure the all latest security patches have been applied.
Establish a plan to update GitLab after every security release, and update system packages at least once a week.
Set a reminder for yourself to ensure you apply GitLab security updates in a timely manner.
Also, remember to clean up the instance as soon as your test or demo is has concluded.
Secure GitLab Application Settings
- Disable New User Registration
- Do not use instance-level shared Runners
Use HTTPS
To be in line with GitLab’s encryption policy, TLS should also be implemented on public-facing testing resources. For GitLab instances, you can use the LetsEncrypt integration. Let’s Encrypt is enabled by default if external_url is set with the HTTPS protocol and no other certificates are configured.
840eb803)
