Editing the Handbook
This page focuses on how to edit the handbook. Please see the handbook usage page for how and why we use the handbook, and other docs pages for further reference.
This page is intended to be complementary to Using GitLab at GitLab.
Have your own practical Handbook editing tips? Drop a video below!
Tip Use AI to edit the handbook faster, and learn about Anthropic Claude and GitLab Duo.
Add yourself to the team page
For how to add yourself to the team page, see the add yourself to team guide.
Markdown formatting
For how to format markdown in the handbook, see the markdown style guide, which includes how to embed videos.
Use the Web IDE to edit the handbook
A typical workflow to edit the handbook:
- Use the Web IDE to make changes.
- Commit changes.
- Create a merge request, assign reviewers.
- Apply suggestions if any, or make further changes if needed.
- “Set to auto-merge”, or merge once all suggestions are resolved and you have the necessary approvals.
Web IDE steps to create a new MR
-
Navigate to the handbook page you want to edit. At the bottom, or on the right, click on the URL
Edit this pageto open the new Web IDE.- Alternatively, open the public handbook project and select
Web IDEfrom the edit actions. This requires you to navigate into the source tree where the handbook files are located.

- Alternatively, open the public handbook project and select
-
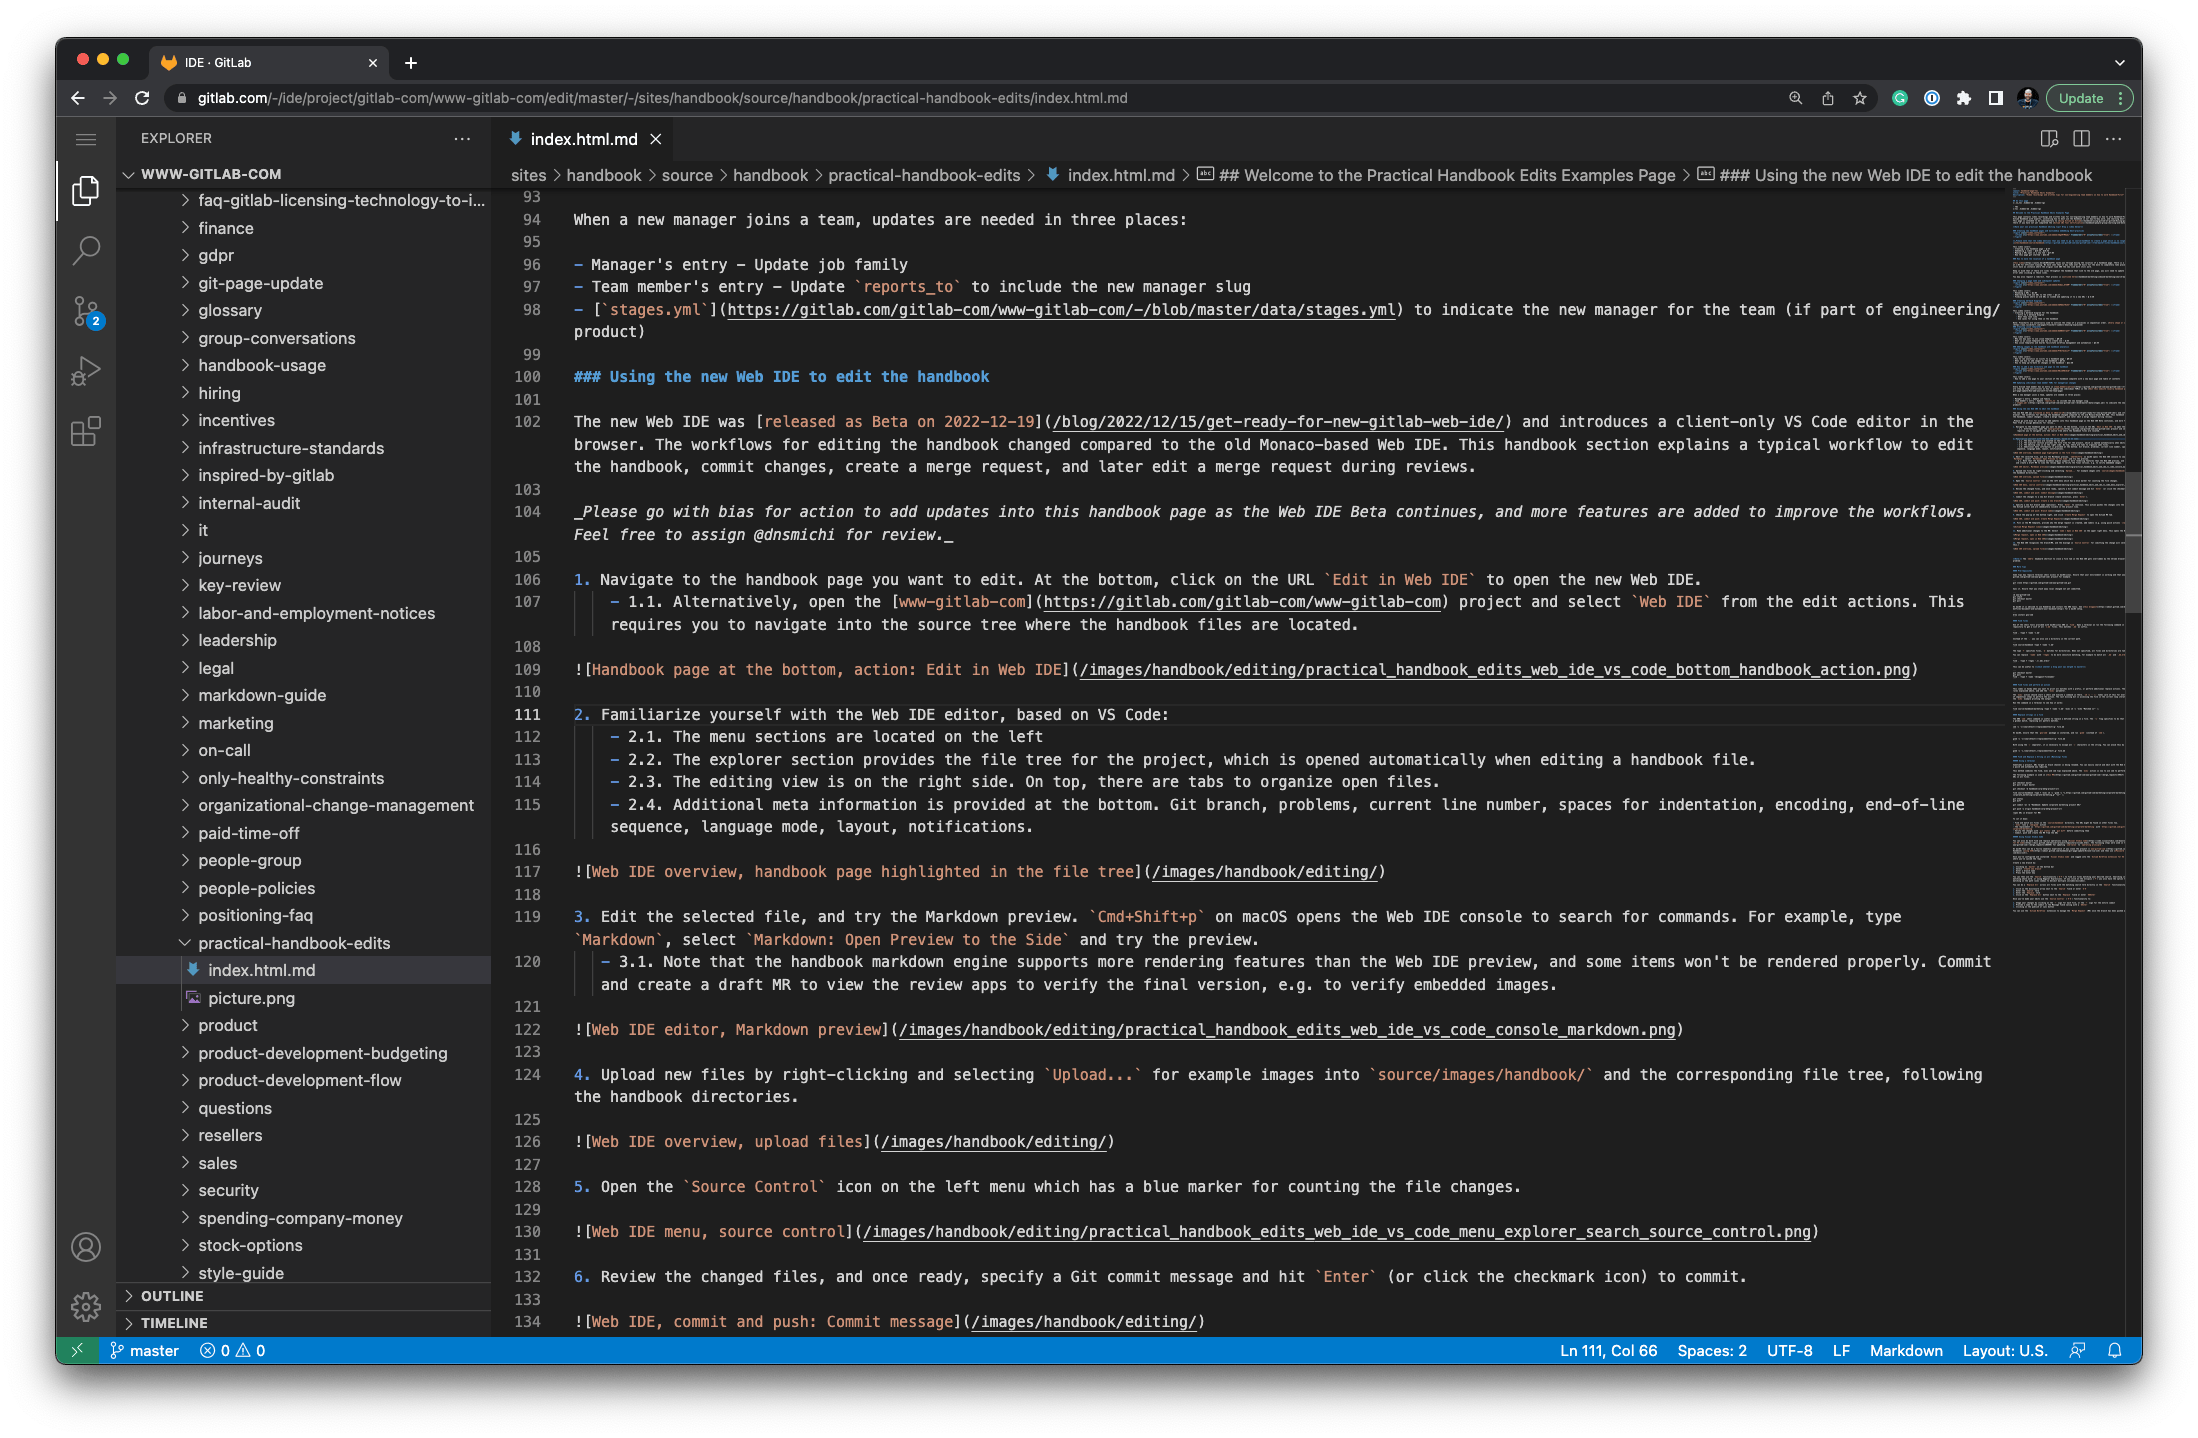
Familiarize yourself with the Web IDE:
- The menu sections are located on the left
- The explorer section provides the file tree for the project, which is opened automatically when editing a handbook file. (keyboard shortcut:
Shift+Cmd+E) - The editing view is on the right side. On top, there are tabs to organize open files.
- Additional meta information is provided at the bottom. Git branch, problems, current line number, spaces for indentation, encoding, end-of-line sequence, language mode, layout, notifications.
- Tip: Hover over the menu sections and items to learn more about their purpose and keyboard shortcuts.

-
Edit the selected file, and try the Markdown preview.
Cmd+Shift+Pon macOS opens the Web IDE command palette to search for commands. For example, typeMarkdown, selectMarkdown: Open Preview to the Sideand try the preview.- Note that the handbook markdown engine supports more rendering features than the Web IDE preview based on VS Code, and some items won’t be rendered properly. Commit and create a draft merge request to view the handbook review apps to preview the page, such as to verify embedded images.

-
Upload new files by right-clicking and selecting
Upload...for example images intostatic/images/handbook/and the corresponding file tree, following the handbook directories.- Note the images section in the markdown guide.

-
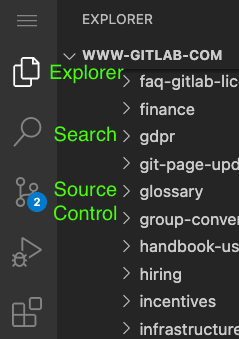
Open the
Source Controlicon on the left menu which has a colored marker for counting the file changes. Tip: Keyboard shortcutCtrl+Shift+G.
-
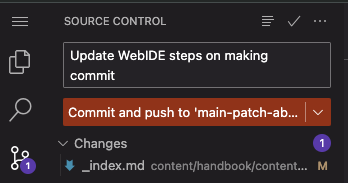
Review the changed files, and once ready, specify a Git commit message. The message should be a brief (less than 120 characters) description of your changes.
-
Click on the ⋁ on the right side of the
Commit and pushbutton, and choose theCreate new branch and commitoption. Keyboard shortcut:Cmd+Enter.
-
Specify a new Git branch name (optional). Press
Enterto continue. This action pushes the changes into the Git repository. The changes are persisted on the GitLab server and are immediately visible in the project view.
-
Check the pop-up at the bottom right, and click
Create Merge Requestto open the GitLab MR tab. Tip: The notification bell icon at the bottom brings back the notification, if accidentally dismissed.
-
Fill in the MR template, provide why the merge request is created, add labels (optionally using quick actions,
/label ~handbook), assign yourself (/assign me), and set the branch to delete when merged. Optionally, use the draft option to prevent merging until ready.
Tip: Practice the keyboard shortcuts for your workflows: After making changes, Control+Shift+G to commit, Cmd+Enter, Cursor to select the branch, Enter, etc.
Note: The Cmd+w keyboard shortcut to close a file tab in the Web IDE gets overridden by the Chrome browser to close the browser tab. This is a known problem, use this shortcut carefully.
Web IDE steps to edit an existing MR
If you are editing an existing merge request (MR), there are 2 main differences from creating a new MR: where to open the editor, and where to commit to.
-
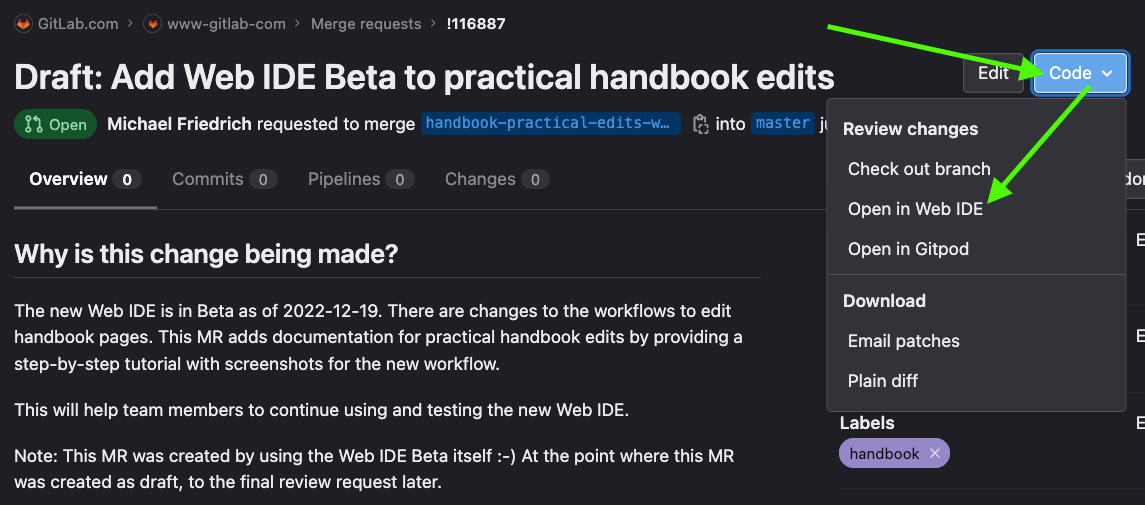
Make additional changes to the MR: Select
Code > Open in Web IDEon the upper right menu. This opens the Web IDE again to make changes. All changed files are opened automatically.
-
Make changes (see previous section for details), go to the
Source Controlarea, add a commit message, and click on theCommit and pushbutton. If you create a new branch, you will end up with a new MR instead of editing the existing one.
-
Optional: Follow the pop-up notification to navigate back to the MR. Alternatively, close the editor tab if you did not close the MR tab.

Video: Editing using the Web IDE and single file editor
Note: The video shows the old www-gitlab-com project. The editing process, however, is the same.
This video covers:
- Editing the marketing handbook as example
Edit this pageaction using the Web IDE, overview walkthrough, editing the handbook, again creating a merge request with the same actions.- Practical handbook edit tips shown in this handbook.
Historical videos
In these videos, we run through the GitLab Handbook with experts, uncovering how to best use the handbook in our day-to-day work, and learning best-practices for handbook editing along the way. They are meant to be helpful to understand generally how GitLab works, but the instructions cannot be followed exactly since the editor and repository in GitLab has changed.
- Creating new handbook pages and multimedia embedding best-practices
- How to move the location of a handbook page
- Changing a page name and subsequent updates
- Creating mermaid diagrams
- Creating issue templates
- Adding images to the handbook and handbook analytics
- How to add a new directory and page to the handbook
- How to rebase to fix a failing pipeline after fix is merged to main
- Why a handbook pipeline is failing
- How to identify why a pipeline is failing
Editing the handbook locally
- Set up an SSH key to use with GitLab, if you have not previously done so.
- Set up Git and clone the appropriate repository, such as the public handbook.
- Use your editor of choice to make changes. If you use Visual Studio Code optionally along with the GitLab Workflow extension for VS Code, you can follow the Web IDE editing instructions.
- Push the changes to GitLab.
- Create a merge request.
Additional notes:
- We don’t need .gitkeep files in our handbook, they make it harder to quickly open a file in editors. Don’t add them, and delete them when you see them.
If you want to install a local version of the website to test and preview things locally, see the handbook development page for instructions on how to set it up.
Preview changes on GitLab
To preview your changes, deploy the review app:
- Wait for the pipeline on the merge request (MR) to complete.
- Either on the “Pipelines” tab, or in the pipeline widget on the “Overview” tab of the MR, click on the circles that denote the different pipeline stages until you find the
Stage:deployand thepagesjob. - Next to the
pagesjob name, click on the “play” button. - Once two
pagesjobs complete, in the pipeline widget on the “Overview” tab of the MR, click on the “View app” button. - You may need to navigate to your page by going to any page, then using the left navigation tree. Do not use the search for this.
- If you prefer to edit the URL, note that the review app uses a
.htmlending, so if your page iscontent/handbook/path/to/page.md, the URL will bereview/app/public/handbook/path/to/path.html.
- If you prefer to edit the URL, note that the review app uses a
If you need the review app deployed after every change on a MR, you can add the ~"deploy-review-app-always" label to always trigger the job, including on MR creation.
For more information about how the review apps are configuration for the handbook projects, please see the Handbook Pages Deployment.
Naming pages and folder structure
The site uses the concept of page bundles, sections, and leaf pages. A section can have multiple leaf pages, which requires a _index.md for the section. A page bundle is a single page with a group of images, which can be an index.md.
In general, Handbook URLs should describe their content and be as clean and easy to remember as possible.
Directories (folders) and pages should use lowercase a-z, hyphen -, and underscore _.
While Git and Hugo allow any UTF-8 character to be used in the file path, using other characters (such as a space) can cause issues with the pipeline, and thus, disallowed.
Section:
section-dir/
|- _index.md
|- leaf-page1.md
|- leaf-page2.md
Page bundle:
page-name/
|- index.md
|- image1.png
|- image2.png
Section with a page bundle:
section-dir/
|- _index.md
|- leaf-page1.md
|- leaf-page2/
|  |- index.md
|  |- image.pmg
|- leaf-page3.md
Moving, deleting, or renaming a page
If you delete, rename, or move a page, you should:
- update all existing links in the handbook and internal handbook.
- Note: When searching for links, use the page name. Sometimes links use page-relative links, meaning it doesn’t use the full path.
- Please also consider searching for and updating handbook links in other places, such as docs and project templates in gitlab-com and gitlab-org.
- add a redirect.
Editing page maintainers
On the right side of the page, there is a list “Maintainers”.
The list is generated from the CODEOWNERS file in the relevant repository, such as in the handbook repository:
-
Only specific users are listed. Members of a group are not listed.
-
The list is generated based on the most specific path:
- If users are specified for a directory and then for a specific page in that directory, the list only includes the users for the specific page.
- If groups or subgroups are listed for a specific page without any specific users, the list of maintainers is empty.
Changes to the .gitlab/CODEOWNERS file require approval.
Review the bot comment for instructions on how to get the appropriate approval.
Editing content from shortcodes
When trying to edit content, you may encounter content that is “built” using shortcodes and data files.
Shortcodes look similar to {{ % performance-indicators "ux_department" % }}.
When you encounter content in a shortcode and want to edit it:
- Look for the shortcode in the shortcodes folder.
- In the above example, it’s
performance-indicators.
- In the above example, it’s
- At the top of the shortcode file should be a comment on where to look for the relevant data file. Ensure you’re using “Display source” to view the file.
- For example, look in
https://gitlab.com/gitlab-com/www-gitlab-com/-/tree/master/data/performance_indicatorsfor theux_departmentfile. - If there is no comment, you can post in
#handbookto get help, and make a MR to add it.
- For example, look in
- Edit the file, being careful to match the existing formatting.
Team member merge requests being labeled as Community contributions
If you recently created a merge request that was labeled as a Community contribution, you can fix this mislabeling issue going forward by updating the GitLab username in your personal entry in the team member directory to match the GitLab account you use for work.
Use the team page editing instructions to find your team page entry file, and update the gitlab attribute (typically found on line 10) to be an exact match for the GitLab.com username you use for work.
Troubleshooting
404 errors with edit action
When clicking on Edit this page in the upper right corner on a handbook page in your browser, you might get a 404 error in the GitLab Web IDE.
As a team member, this problem can be related to an expired SAML session for your GitLab.com profile. In order to mitigate and solve the problem, click on View page source to trigger the SAML authentication with Okta again.
Alternatively, navigate into our GitLab.com profile into your To-Do list, or try to open a confidential issue, to trigger the authentication.
It can also be browser related: Try clearing the cache, open an incognito window (on macOS: cmd shift n), or use a different browser to test.
404 on new page
If a new page is created as part of a merge request, but the page is not showing up on the site, check the file name.
The most common issue is using index.md instead of _index.md in a folder that has other pages.
The other pages will not display.
See pages and folder structure for more information.
Images not loading properly
If you added new images and they are not loading properly in your review app, please review the Images section of the markdown guide.
Failing pipelines
To see why your pipeline is failing, there are two main places to look:
- The latest comment by the bot on your merge request. It should have a list of all linter errors. However, build errors do not generate a comment.
- Individual failed jobs. On the MR > “Pipelines” tab > select any red circle > select a failed job. Error messages are near the bottom of the job log and start with
Error.
In the job log, error messages typically provide you:
- the error
- the file where the error occurred
- the line number
- the character number (where on the line it is)
For example: Error: error building site: assemble: "/builds/gitlab-com/content-sites/handbook/content/handbook/security/security-assurance/field-security/trust_center_guide.md:1:2": closing tag for shortcode 'details' does not match start tag
- File:
content/handbook/security/security-assurance/field-security/trust_center_guide.md - Line: 1
- Character: 2
To fix markdown errors, review the message. Alternatively, review the relevant section in the markdown style guide.
For all other errors, the error message should provide the information necessary to fix it.
See the below sections for more details on how to resolves specific types of issues.
If the problem was on the main branch, you may need to rebase.
If you’re unsure, you can reach out for help.
Link and anchor errors
There is a linter (Hugolint) that validates links and anchors across the handbook. If your change introduces new broken links, then the pipeline job will fail. Follow the instructions in the previous failing pipelines section for how to find the list of errors.
There are two main reasons it will fail:
- Content added in the MR includes a broken link.
- Content changed in the MR breaks an existing link.
Here’s an example of a failed hugolint job error message when viewed in the job log:
Newly broken (only in "linkcheck.json", 3 issues):
❌ [content/handbook/security/product-security/_index.md:43]: <major> Link destination "architecture/" does not exist
❌ [content/handbook/security/product-security/security-architecture/_index.md:269]: <major> Link destination "/handbook/business-technology/tech-stack/#panther" does not exist
❌ [content/handbook/security/product-security/security-architecture/zero-trust.md:45]: <major> Link destination "/handbook/security/corporate/systems/#laptop-or-desktop-system-configuration" does not exist
- The error starts with the file where the broken link is present, followed by the line number.
(For example, file path -
content/handbook/security/product-security/_index.md, line number: 43.) - Next, the error indicates which link is broken. (For example,
architecture/is the broken link destination.) - For broken or non-existent anchor links (for example,
#panther):- Did the MR change a heading that is being linked to? If so, you’ll need to update the linked anchor to match the new heading.
- If you’re linking to a heading, does it exists? Check the file in the repository instead of on the website. The links are checked pre-build, so generated content (from shortcodes and includes) don’t “exist” for the link checker.
- If the page you’re linking to has a large amount of generated content (such as performance indicator pages), you can add an exclusion to
hugolintin the relevant configuration file.
- If the page you’re linking to has a large amount of generated content (such as performance indicator pages), you can add an exclusion to
Community contributions
Pipelines for community contributions to the handbook from private forks will fail. Contributors should use a public fork, or preferably the community fork.
Fixing default branch errors
MR pipelines should catch almost all errors before they are merged into the relevant repository.
The handbook projects also pull data from www-gitlab-com yml files.
If the default branch main (for public and internal handbook) or master (for www-gitlab-com)
is “broken” and pipelines are failing for everyone, the root issue is most likely a data file error.
- Check the error message.
- If it mentions an error in building the site, or rendering something, follow the trace.
- In the layout file, if it’s failing on displaying on something
that starts with
site.Data.public., then it’s a data file issue. - There are two ways to fix. Either:
- Make the code itself more robust to deal with the types of values it may encounter. However, not everyone knows Go and Hugo well enough to do that quickly. If needed, create a “Handbook::Operations” “type::bug” issue in the handbook repository to document the problem after fixing the pipeline issue.
- Edit the data file to have values the build won’t fail on.
Example: Fixing broken main on tech writing shortcode
Consider this example error:
Error: error building site: failed to render shortcode: "/builds/gitlab-com/content-sites/handbook/content/handbook/product/ux/technical-writing/_index.md:126:1": failed to render shortcode "tech-writing": failed to process shortcode: "/builds/gitlab-com/content-sites/handbook/layouts/shortcodes/tech-writing.html:16:28": execute of template failed: template: shortcodes/tech-writing.html:16:28: executing "shortcodes/tech-writing.html" at <ref page (printf "/handbook/product/categories#%s-section" $section)>: error calling ref: parse "/handbook/product/categories#%!s(<nil>)-section": invalid URL escape "%!s"
Following the error trace, notice that the last error with a full path and line number is:
failed to process shortcode: "/builds/gitlab-com/content-sites/handbook/layouts/shortcodes/tech-writing.html:16:28".
Looking at the tech-writing shortcode,
the issue is an unexpected value in printf "/handbook/product/categories#%s-section" $section,
which matches the last part of the error message.
From there, line 11 of the tech-writing shortcode
tells us that the data is from site.Data.public.stages.stages "section".
If you have a local build of the site, you can find all the data files in the data/public folder.
The relevant file (usually a yml file) should tell you at the top where to find the original.
If you do not have a local build, you can still likely find it in the www-gitlab-com data folder.
Based on the code, you can figure out the filename. site.Data.public.stages.stages means it’s
in data/public and the file is stages.yml.
The last parts .stages "section" means it’s inside of stages: and it’s pulling data from
each section: line.
You can check the most recent changes to the file, and/or compare it to when main started failing.
In this case, an empty section: line
was the issue.
The quick and easy fix is to add text to the empty section: line, merge it, and run a new pipeline
in the public handbook project.
In this case, the handbook code was made more robust.
Prettier is formatting markdown files
If you have prettier set up in VS Code and it is formatting the .md files when they are not supposed to, check if you have Prettier set to be your default formatter with "editor.defaultFormatter": "esbenp.prettier-vscode" in your user settings.
Additionally, consider using the Glob Pattern in the extension settings to specify which files to prettify automatically.
Additional tips
For additional tips, such as how to replace strings in files, refer to the practical handbook edits examples.
Need help?
If you run into trouble editing the GitLab Handbook, help is available.
Team members, referred to as MR Buddies, are available to help you create a merge request or debug any problems you might run into while updating the GitLab Handbook. Some common questions are covered in the videos in the MR Buddies playlist. Post your request with a link in the #mr-buddies Slack channel.
For general questions about the handbook, post in the handbook Slack channel.
For more serious problems, especially ones that are time sensitive or prohibiting access to important information, there is an escalation process to reach out to team members who are able to help resolve the problem.
Practical Handbook Editing Tips
32e61d86)
