Navan Expense End Users Guide
What is Navan Expense
Navan Expense is an expense and payments platform that improves managing expenses while you’re on the road.
How to access Navan Expense
BROWSER
Navan Expense is available via Okta. To access the platform:
- Login to your Okta home page.
- Find the
Navantile.- Navan should open in a new tab with your user logged in.
- Click on
Navan Travelat the top-left corner of the page. - Select
Expenses.
MOBILE APP
- Download the app from your preferred mobile app store.
- Navan mobile app is compatible with iOS 15 or later.
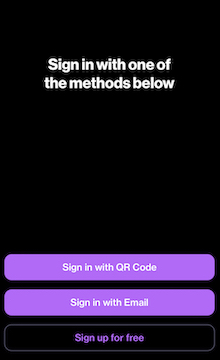
- Open the app and select
Sign in with Email.
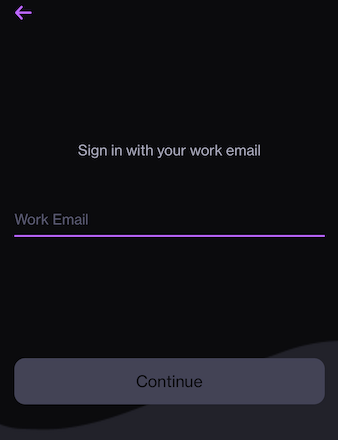
- Add your GitLab email and click
Continue.
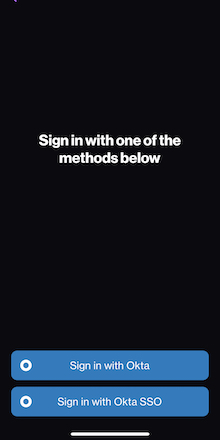
- Select
Sign in with Okta SSO.
Note
If you have the TripActions Liquid app, you can delete it from your device.For more information on how to use the mobile app, check the Getting started with Navan expense on mobile article.
Navan Expense - Getting Started
Navan Expense on mobile
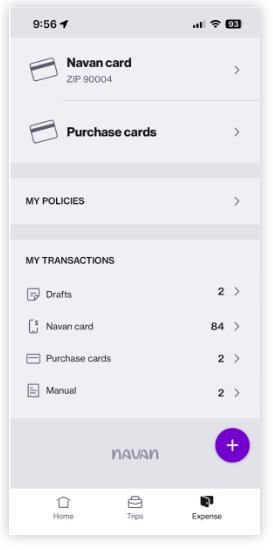
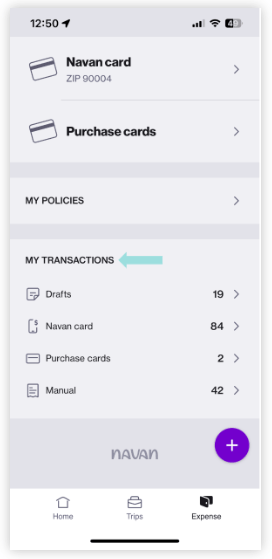
The mobile app is organized into four main sections: My reimbursements, My cards, My policies, and My transactions. Transactions that require your attention (such as adding a receipt), will appear at the top of the screen, in the To dos section. You can access your Navan profile to manage your personal card for reimbursements and calendar integrations from the badge in the top right corner.
My reimbursements
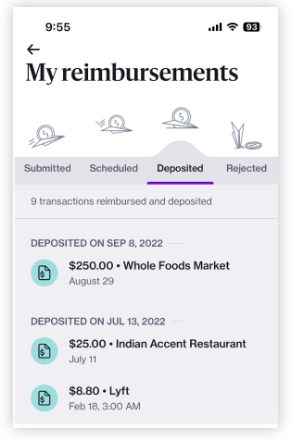
Import business transactions paid for in cash or charged on a personal card for reimbursement through the Navan mobile app. Use this folder to track the transactions that you have submitted for reimbursement.
- Submitted: Transactions that are in admin review or pending payroll reimbursement. Transactions that require actions are labeled with a purple marker. They can be resolved by selecting one from the list and taking necessary actions.
- Scheduled: Transactions approved and scheduled for reimbursement are listed by the scheduled reimbursement date.
- Deposited: Transactions that have been deposited and the deposit date.
- Rejected: Transactions that were rejected by the approver.
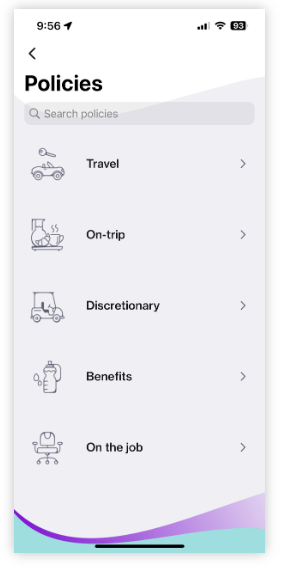
My policies
The policy tab provides an overview of your assigned policies by expense type. Please note that this section is customized to your specific policy, as assigned by the Finance team. Users will have different policies assigned depending on their anticipated expenditures and role.
My transactions
The four types of transactions in Navan Expense are organized into folders in the My transactions section: Drafts, Navan card(if applicable), Purchase cards(if applicable), and Manual. Depending on your settings, you may see some or all of these types of transactions under the tab.
To dos
If a transaction requires your attention or follow-up, it will be placed in the To dos section in one of the following categories:
- Missing receipt: Based on your company’s policy, you may be required to add a receipt for certain transactions.
- You need to pay: Out-of-policy transactions that have not been approved by your admin or manager and need to be repaid to the company fully or partially.
- Info needed: Transactions that require you to respond to an approver’s request with additional information.
- Needs your review: Transactions made with a Navan card that require you to fill out a custom field set by your company admin.
- Drafts: Receipts imported into Navan or manual expenses saved as a draft will be stored until you are ready to submit.
Profile
Access your profile by tapping the Profile icon located in the top-right corner of the app, then Expense settings. From this page you can manage the following features:
- Calendar integration: When enabled, this integration captures information from your calendar about events that are relevant to your card transactions (such as name, location, and participants) and automatically completes transaction details.
- Personal cards: Link your personal payment method(s) to import out-of-pocket expenses or repay your company if a charge made on your Navan card has not been approved.
- Personal bank account: Link your personal bank account to receive reimbursement for approved manual transactions (out-of-pocket expenses) .
- Call or Email support: Quickly connect with a support agent over the phone or by email.
Check the Getting started with Navan expense on mobile article to learn how to use the mobile app.
Navan Expense on the web
Sign in to your Navan account from a web browser, click the Navan Expense tab on the left, then select Expense under the Expense section. The Navan Expense web app has three main components: Transactions (All, To-do, My money, Drafts), Cards, and Settings.

Transactions (All)
View and manage all of your manually added transactions, Navan card transactions, and purchase card transactions under the All tab. For each listed transaction, you will see the name of the merchant, the amount, and date of the transaction, and its status. Click any transaction to view additional details, revise editable fields, or take action based the status of your expense. Transactions requiring action will also be categorized under the To-do tab.
Transactions (To-do)
The To-do tab displays transactions that require additional information or action. Click the down arrow next to each of the below categories to view associated transactions:
- Missing receipt: Transactions in this section require a receipt according to your assigned expense policy. Click Upload next to a transaction to add a receipt then drag and drop the receipt image file or click
Upload file(s)to select a saved image file. - Repayment needed: Transactions in this section are out-of-policy and require repayment to GitLab.
- Add more information: Transactions in this section are out-of-policy and more information has been requested by your approver before they approve or reject the expense. Click Add information to provide more information and then click Submit.
- Needs more information: Transactions in this section require you to complete additional transaction details requested by the Finance team. Select a transaction, then enter any missing information.
Transactions (My money)
The My money tab groups your transactions into categories based on \ status and allows you to track updates. Click the down-arrow next to each category to view associated transactions.
- Submitted: Transactions that are in admin review or pending payroll reimbursement. Transactions that require actions are labeled with a purple marker. They can be resolved by selecting one from the list and taking necessary actions.
- Scheduled: Transactions approved and scheduled for reimbursement are listed by the scheduled reimbursement date.
- Deposited: Transactions that have been deposited and the deposit date.
- Rejected: Transactions that were rejected by the approver.
Transactions (Drafts)
The Drafts tab contains transactions created from receipt forwarding or manual transactions that are saved but not submitted yet. Select a transaction to review, add missing details or receipts, then submit, or save for later.
Submitting a manual expense in the web app
Use the Add transaction button from any tab on the Transactions page to manually enter transactions for purchases made using cash or a personal card.
Note
To import manual expense from a personal card instead of manually entering in your transaction details, please use the Navan app.Cards
Manage Navan cards and purchase cards under the Cards section. Click the Navan card image or select a purchase card from the list to manage its settings. For each card, you will be directed to a new page that provides you with card information and associated transactions, including a section for transactions that require action.
Settings
Use the settings tab to connect your work calendar using the Calendar integration and also add a bank account to receive reimbursements for approved manual transactions.
- Calendar integration: When enabled, this integration captures information from your calendar about events that are relevant to your card transactions (such as name, location, and participants) and automatically completes transaction details.
- Personal cards: Link your personal payment method(s) to import out-of-pocket expenses or repay your company if a charge made on your Navan card has not been approved.
- Personal bank account: Link your personal bank account to receive reimbursement for approved manual transactions (out-of-pocket expenses) .
- Call or Email support: Quickly connect with a support agent over the phone or by email.
Support
If you have questions or need assistance with your Navan account, cards, or transactions, click support from any page of the web app to get in touch with our team.
Check the How do I use Navan Expense on the web? article to learn how to use Navan on the web.
How to connect my personal banking details to Navan Expense
Connect your personal bank account or personal cards to Navan for quick and easy submission of manual expenses, reimbursement for out-of-pocket expenses, and repayments to the company.
- If your personal bank account is not able to be connected, you will be reimbursed according to GitLab’s regular payroll process..
Importing transactions
Users with a United States-issued personal card can link the card to their Navan account to import transactions for out-of-pocket expenses. Once your personal card(s) has been added, you can view and import transactions made on your card. To link your card for imports:
- Open the Navan mobile app.
- Tap the
Profileicon, thenExpense settings. - Select
Personal cards. - Tap
+Add accountunder theFor importing transactionssection and follow the prompts.
Connecting your bank account for reimbursements
Connect your bank account to Navan to receive reimbursements for out-of-pocket expenses. Bank accounts can be linked via Plaid (US-based bank accounts only) by entering your bank account login credentials. Additionally, US-based bank accounts and accounts based in countries eligible for direct reimbursement can be linked manually by inputting your bank account information.
- For Canadian bank accounts, the format for routing number is 0XXXYYYYY
- add a zero in the beginning for electronic transfers
- XXX = last 3 digits institution number
- YYYYY = first 5 digits branch/transit number
In the mobile app
Log in to your bank account
- Navigate to the
Profileicon on your Navan app, then tapExpense settings. - Tap
Bank account. - Select
Login to bank account. Select your bankusing the search bar or selecting a bank from the list.Enter your credentials, then clickSubmit.
Link bank account manually
- Navigate to the
Profileicon on your Navan app, then tapExpense settings. - Tap
Bank account. - Select
Link bank account manually. - Use the dropdown menu to select the country where the bank account was opened.
- Enter the required bank account information.
- Tap
Review, thenLink accountto authorize the connection.
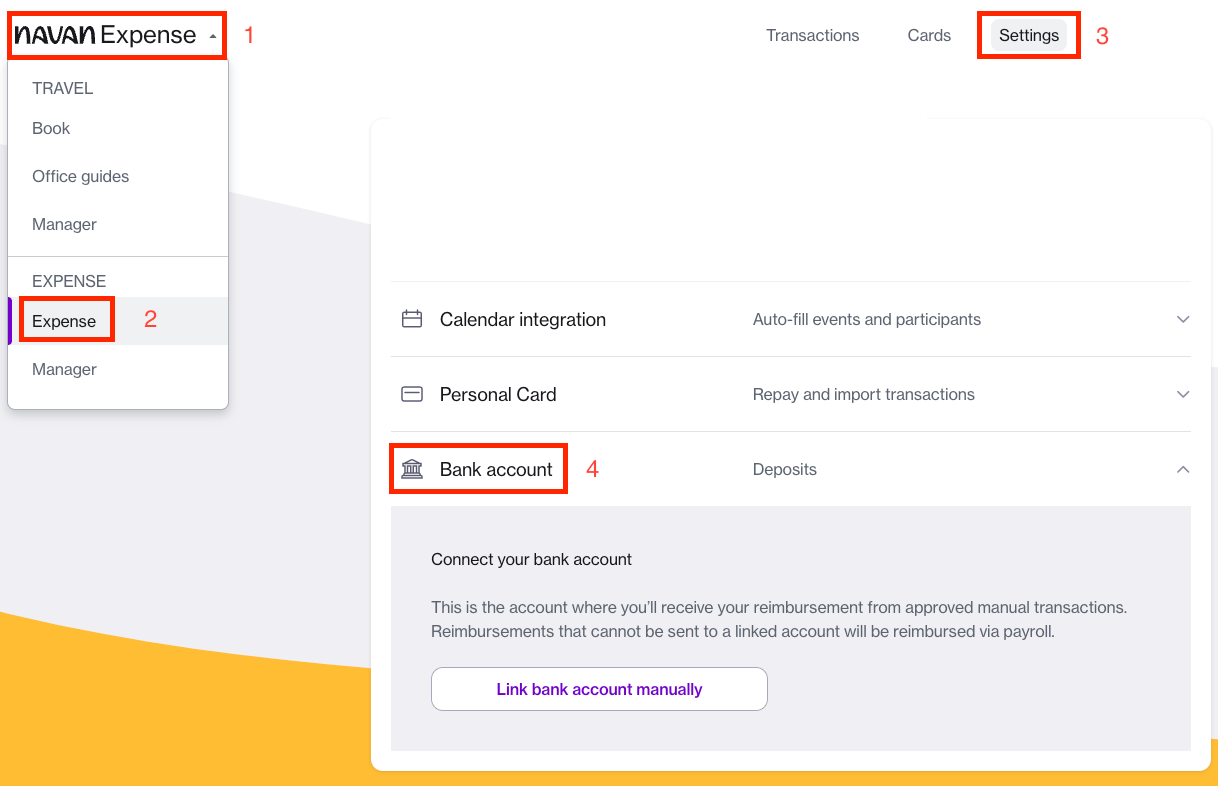
In the web app
- Open the menu and select
Expenses. - Select
Settings. - Expand the
Bank Accountsection. - Click on
Link bank account manually.
Check the How do I connect my personal banking information to Navan Expense? article to learn how to connect your card or account.
How to get reimbursed for out-of-pocket spend
Import business transactions paid in cash or charged to a personal card to receive reimbursement through the Navan mobile app. Known as manual expensing, these transactions will be automatically approved for reimbursement if they comply with your assigned policy. Transactions outside of your assigned policy are submitted for review by your company’s admin team.
There are several ways to submit for reimbursement, and all manual expenses can be saved as a draft before submitting:
- Receipt scanner: Take or upload a photo of your receipt, and all relevant details will auto-populate into the corresponding fields.
- Personal card import: Link your personal card(s) and import transactions for reimbursement.
- Note: This option is only available to users with a United States-based bank account.
- Type in expenses: Manually type in your transaction details if you cannot link a personal card or have misplaced your receipt.
- Receipt Import: Email Navan (receipts@navan.com) a copy of your receipt(s) and they will automatically be added to an existing Navan Expense transaction or created as a transaction draft.
- Receipts need to be forwarded from your GitLab email to receipts@navan.com in order to be attached to your Navan Expense account. After sending the email, the receipt should show up within a few minutes to a few hours.
Tip
After beginning a manual expense, tapSave & close to save the transaction as a draft. Drafts are saved in the Drafts folder and can be accessed and modified at any time until you submit or delete them.
Receipt Scanner
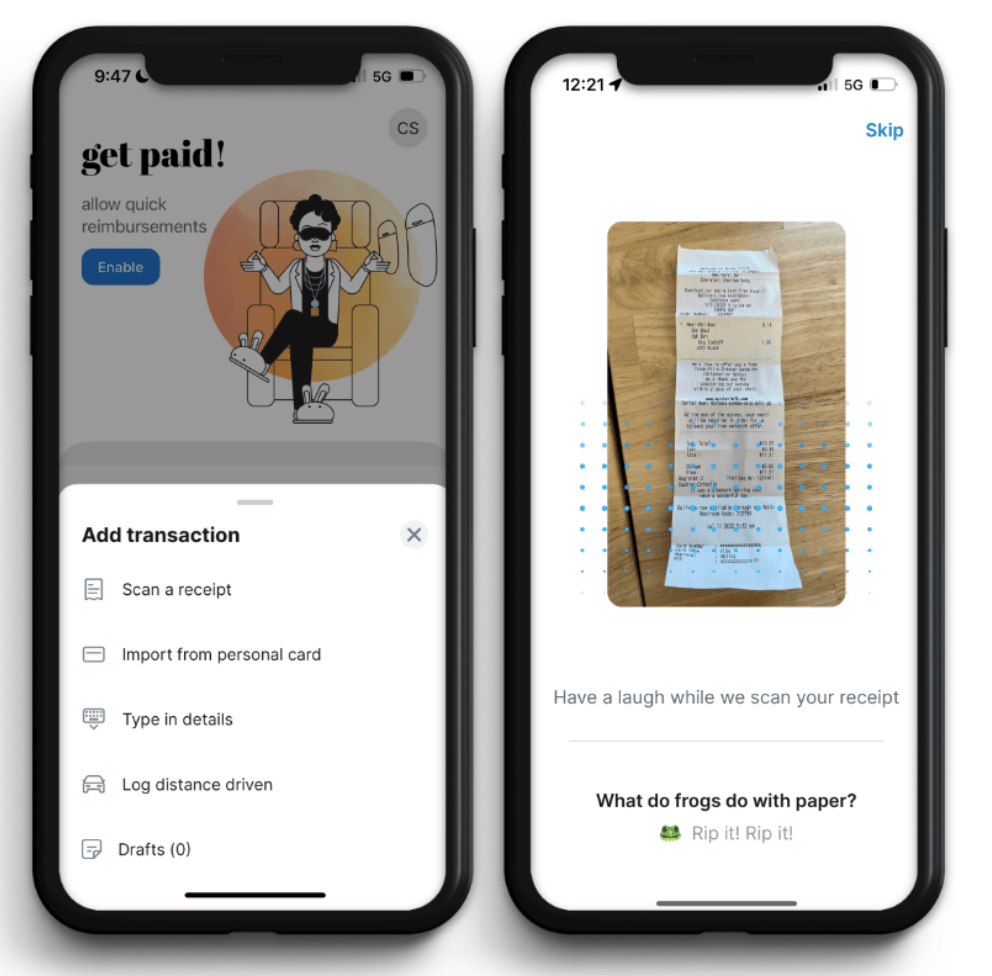
To upload a receipt, tap +New transaction, then Scan a receipt. Upload or take a picture of the receipt. For information on uploading multiple receipts for the same transaction, check the How to attach multiple receipts to the same transaction section.
When uploading a receipt image, most of the required transaction information will auto-populate. It is recommended that you review the final numbers and transaction details before submitting your expense to ensure accuracy.
Note
You will need to grant the Navan Expense app access to your phone’s camera or camera roll in order to take or access a saved picture of your receipts.Import from Personal Card (For United States-based bank account only)
To receive reimbursement for a business transaction charged to a personal card, tap +New transaction and select Import from personal card. If you have not previously linked your personal card(s) check the How to connect my personal banking details to Navan Expense section for detailed instructions. Once your card is linked, select from the transactions shown on the Import and submit screen and submit for reimbursement.

Tip
If you have recently been on a trip booked through Navan and would like to be reimbursed for a trip-related expense, toggleView by trips on to view only transactions that occurred on the date(s) of your trip(s).
Type in details
If you have not linked your personal cards to your profile or if a receipt was misplaced or not provided, tap +New transaction, select Type in details and input your expense details. Please note that a receipt must be submitted as expenses may not be approved for reimbursement when a receipt is not included.
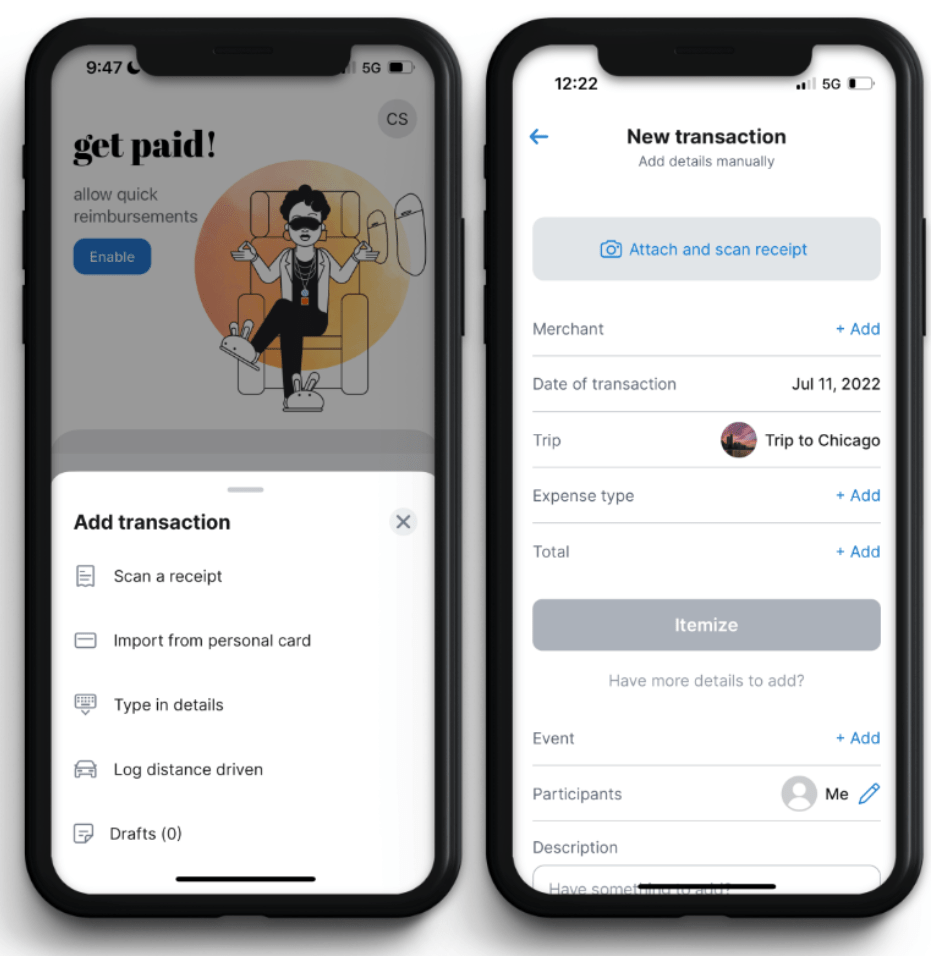
Receipt Import
Forward receipts to match receipts with an existing transaction and simplify the manual expense submission process by automatically filling in transaction details. Receipts sent to Navan will be imported and analyzed, allowing you to simply review the transaction details and submit.
Check the How can I get reimbursed for out-of-pocket spend? article for more details on the ways to submit a manual transaction.
Reimbursement Process
Transactions submitted for reimbursement can be tracked from the My reimbursements folder. They will fall into four categories: Submitted, Scheduled, Deposited, and Rejected. If you have linked your personal bank account to your profile, you will receive reimbursement via direct deposit when manual expenses are approved. If your personal bank account is not linked, you will be reimbursed according to GitLab’s regular payroll process.
Check the My reimbursements section for more details.
How to modify or add transaction details
Modify Navan Expense transactions to provide additional details, such as adding a receipt, linking associated trips, modifying the expense type, or adding participants. This includes transaction drafts, submitted expenses that are pending review, or when your company’s Expense admin has requested additional information.
Accessing Transactions Details
Transactions are organized into folders based on transaction type. Select a folder to view all transactions that fall under the transaction type, then choose a transaction to modify the transaction details following the steps below:
- Navigate to the
My transactionssection of your Navan mobile app . - Select a folder based on the different transaction types:
- Drafts: Transactions created from the receipt forwarding feature or manual transactions that are saved but not submitted yet.
- Manually added: Transactions submitted for out-of-pocket expenses.
- Navan card: Transactions charged to a virtual or physical Navan card.
- Purchase cards: Transactions charged to a purchase card.
- Choose the transaction you would like to modify or withdraw and proceed with any of the changes outlined below.
Add a Receipt
Depending on your assigned policy, you may be required to attach a copy of your receipt to an expense. If you did not submit a required receipt with your transaction initially, you can add it by scrolling to the bottom of any transaction detail page and selecting Add under the Receipt section.
For instructions on how to upload multiple receipts to the same transaction, check the How to attach multiple receipts to the same transaction section.
Add Participants
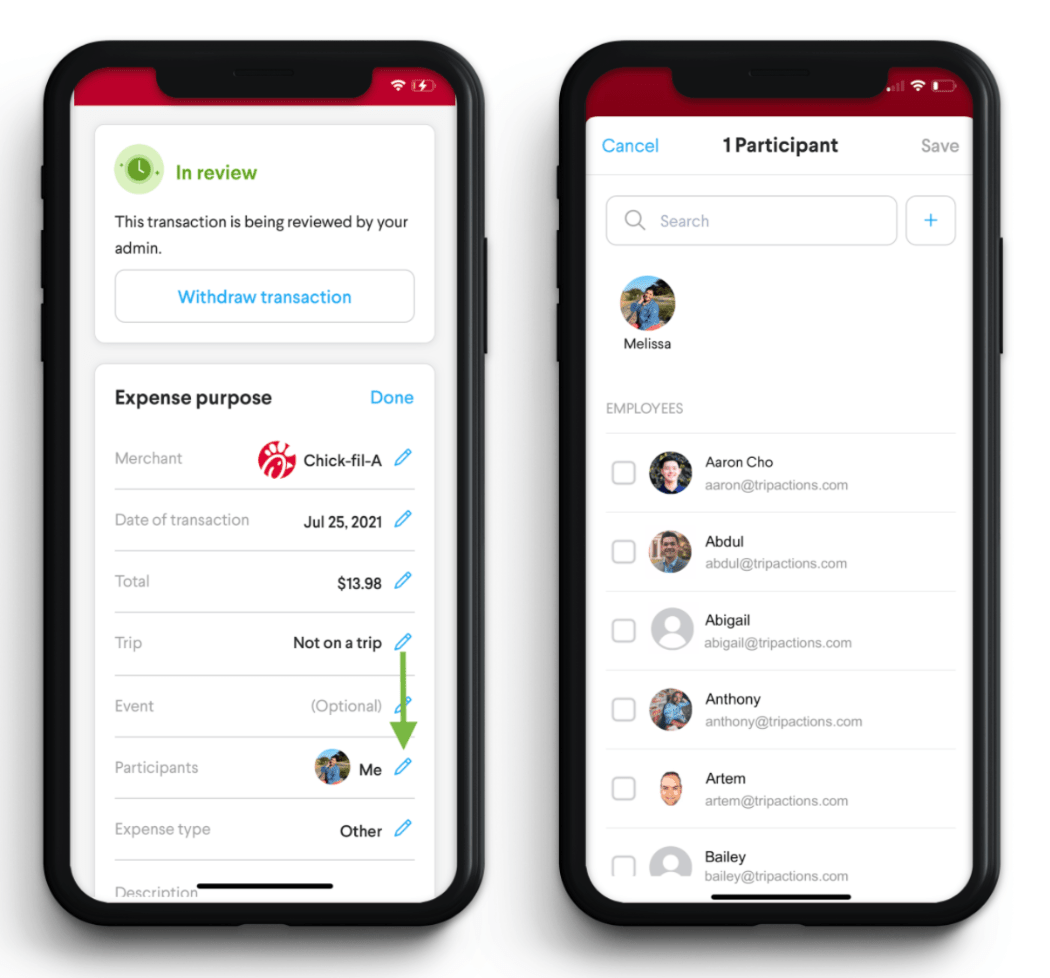
Participants can be added to certain transaction types to provide your company admin or manager with additional context around your spend. For example, you may wish to add participant information to your transaction for a team event, meal or a transaction for an UberXL where multiple passengers were present to justify a higher cost. To add a participant(s):
- On the transaction details page, tap the
Participantsfield.- Note: If you do not see the participants field, this indicates the transaction type is not eligible to have this information submitted.
- A
Searchbox will appear where you can type in the name of each participant.- Other Navan users from your company will appear on the list of participants to select from, and their information will be pre-populated.
- To add participants outside of your company, such as customers or guests, use the
+icon to enter the new participant’s information (first name, last name, and email address).
- Tap
Saveto save your changes.
Change expense type
Expense types for transactions charged to Navan cards will be automatically assigned based on the merchant where the card is used. However, you must still confirm that the transaction is assigned to the correct expense type. If you submit an expense with the incorrect expense type, your transaction may be flagged for review by your approver. From there, they will determine whether the transaction can be approved as is or sent back to you to assign the correct expense category. If you need to re-assign the transaction to a different expense type, follow the steps below:
- On the transaction details page, tap the
Expense typefield. - Navan will provide a list of suggested categories or you can select from a list of
all expense types. - Tap
Saveto save your changes.
Add or Edit a General Ledger (GL) Code
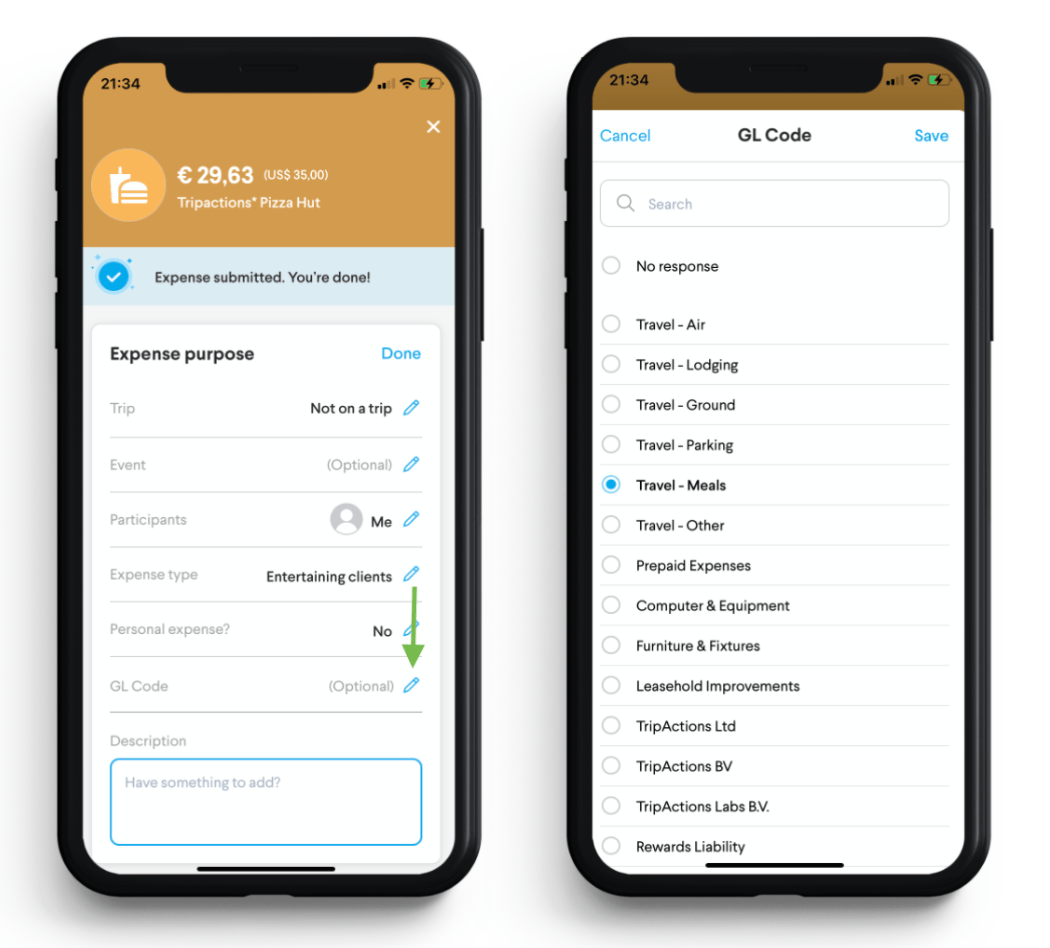
GitLab uses GL codes to map and track spend for specific types of expenses. If the system admins have provided you with the ability to add or edit the GL code associated with your transaction, you will be able to do so at the time you are submitting your transaction (for manual/out-of-pocket expenses). To add or edit a GL code, find the appropriate transaction and follow the steps below:
- On the transaction details page, tap the
GL codefield. - Search for a GL code or scroll through the list provided.
- Select a GL code and click
Save. - Tap
Saveon the transaction detail page.
Link a Related Trip
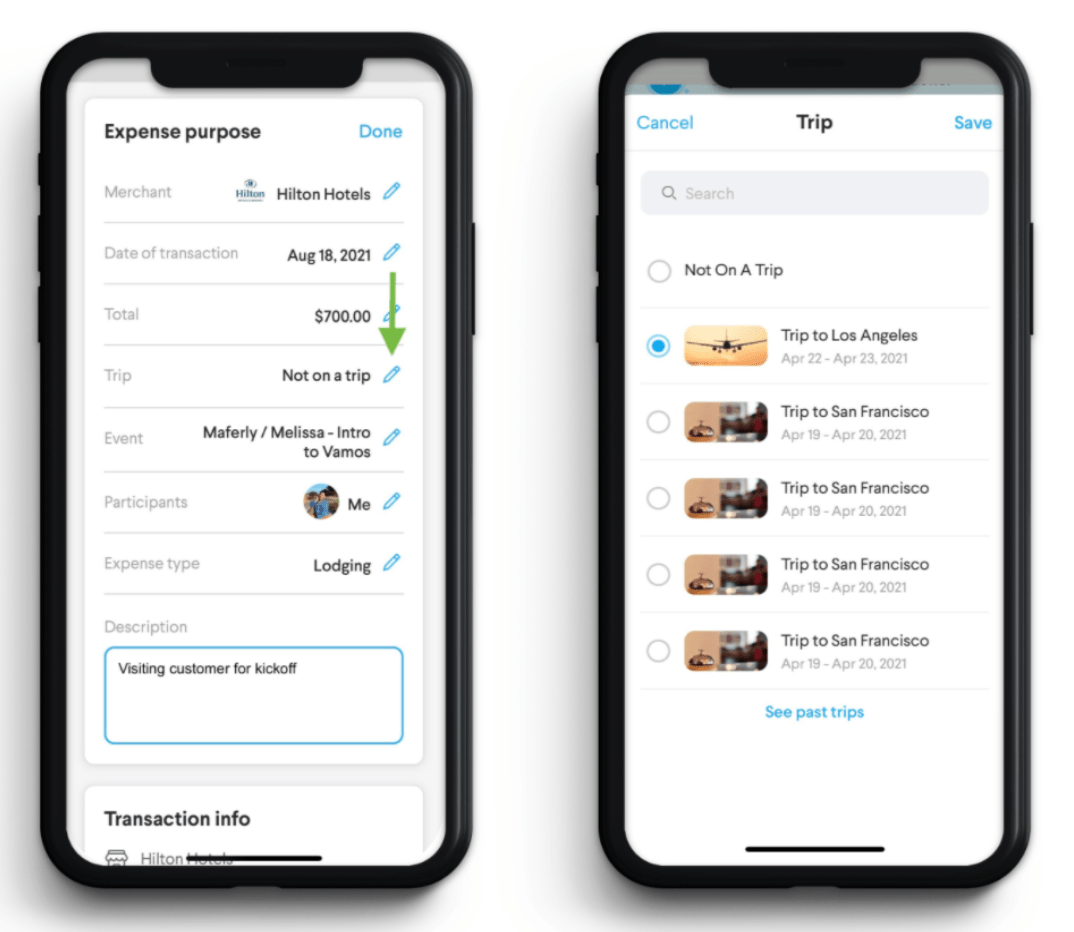
Transactions made with a Navan card during a business trip will automatically be associated with corresponding travel booked on the Navan platform. For manual (out-of-pocket expenses), you will need to ensure this information is correctly entered before submitting your expense. To associate an expense with a trip, follow the steps below:
- On the transaction details page, tap the
Tripfield. - Navan Expense will provide a list of suggested trips booked in Navan for you to select from.
- Once a trip has been selected, tap
Saveto save your changes.
Withdraw a Transaction
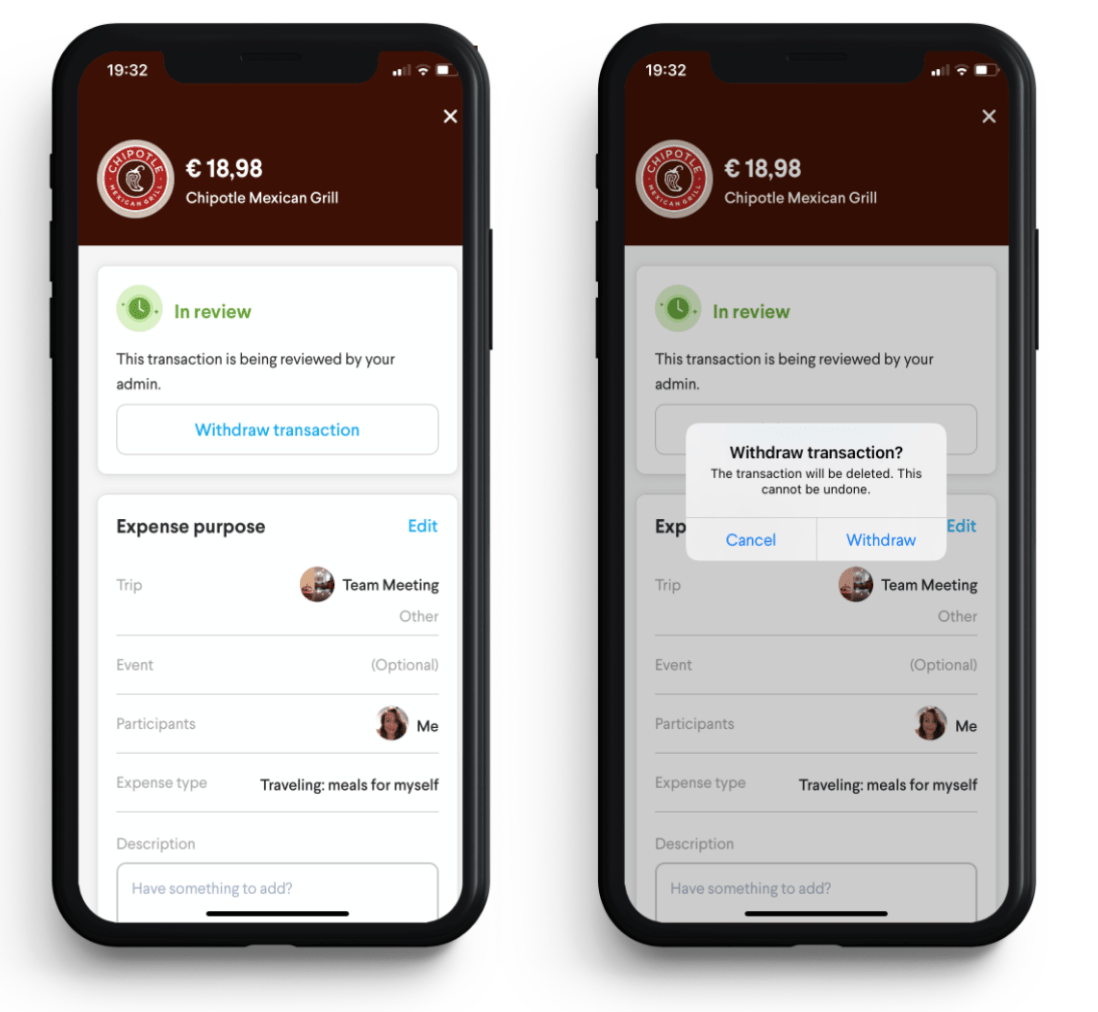
If you submit a manual transaction for an out-of-pocket expense that is not compliant with your assigned expense policy, it will be flagged for review by your expense approver. These transactions will be marked as In review and can be found in the Manual folder of the My Transactions section. If you would like to withdraw one of these transactions before your approver has taken action, you may do so by following the steps below:
- On the transaction details page, tap the
ellipsisin the top right corner. - Click
Withdraw transactionto permanently delete the transaction.
Once a transaction has been withdrawn, it will no longer appear on the admin’s dashboard or under your transaction history.
Check the How can I modify or add transaction details? article for more details on how to modify a manual transaction.
How to attach multiple receipts to the same transaction
Business expenses paid for in cash or charged on a personal card can be imported for reimbursement as manual transactions through the Navan Expense mobile app and users are required to attach a receipt for all manual transactions submitted for reimbursement. In certain instances, you may need to upload multiple receipts to the same transaction. Read below to learn how.
New Transactions
To submit a manual expense with multiple receipts, open the Navan Expense mobile app, tap Expense, +New transaction, then follow the steps below:
- Select
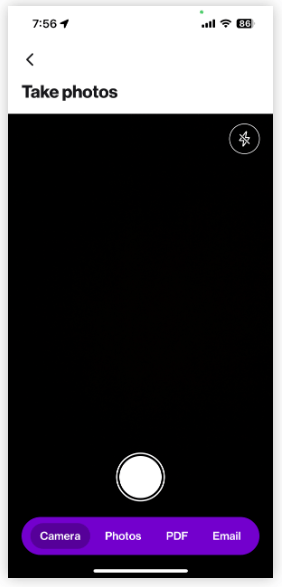
Scan a receipt, then tap the camera shutter button to capture each image(s) of the receipt. Alternatively, you can tapPhotosorPDFto upload saved receipt images or PDFs. TapEmailto forward an email copy of the receipt to Navan. As you take each photo or add a saved image, you will see a thumbnail on the bottom right side of the screen with the number of photos taken. - After reviewing your photos, tap the
Use photosbutton. - Use the
crop iconif edits are needed. Use the trash can icon to remove unneeded images. - Tap
Use photos. After the receipt information is scanned, you will be directed back to the expense screen, where you can review the information retrieved from the receipt and finish inputting the transaction details.
Submitted Transactions
To attach multiple receipts to transactions that have already been submitted, follow the steps below:
- Navigate to the
My transactionssection in the Navan mobile app, thenNavan card. - Find and select the transaction you would like to add your receipts to.
- If you have not uploaded any receipts, tap
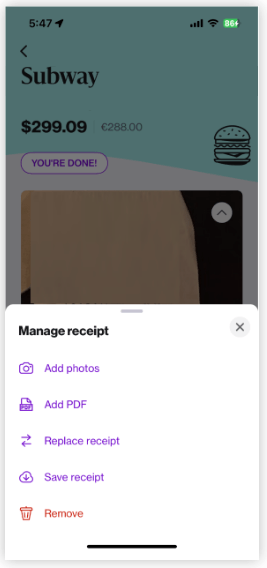
Add receiptthen select the method you would like to upload (Add photos,Add PDF, orReplace receipt). - If you need to add more receipts to a transaction that already has a receipt(s) attached, tap
View, then select the method you would like to upload (Add photos,Add PDF, orReplace receipt).
- If you have not uploaded any receipts, tap
Check the How do I attach multiple receipts to the same transaction? article for more details.
How to itemize a transaction in Navan Expense
Navan Expense provides you with the ability to automatically split a single transaction into multiple items, allowing for the assignment of expense types, GL codes, custom fields, and the approval or rejection of the transaction by the admin on a per-item basis. A common use case for itemization is hotel expenses, where certain charges should be covered by GitLab (i.e. the hotel’s nightly rate or parking cost) while others should be covered with your personal funds (i.e. spa services utilized at the hotel).
- Transaction itemization is not currently available on the web app.
Itemizing a manual transaction
- Open the Navan mobile app, then tap
Expense. - Start a new transaction.
- Tap
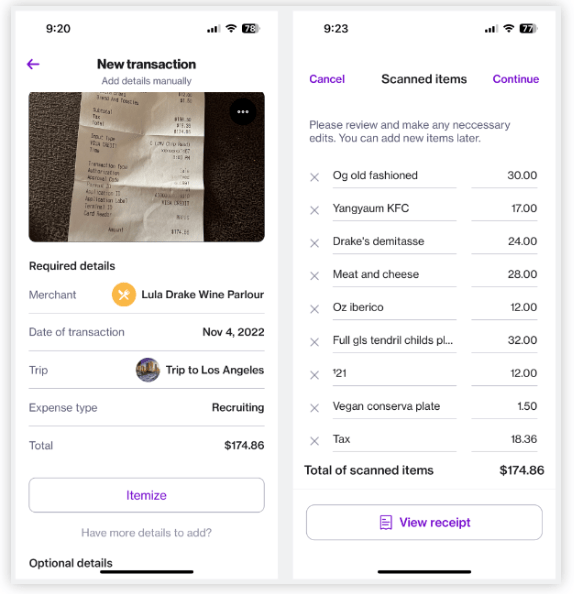
Scan a receiptto allow Navan to auto-fill your transaction information orType in detailsto input the transaction information manually. - After all of the transaction details are input, tap
Itemize. - Review the scanned items page and edit as needed.
- Note: When itemizing lodging expenses, you will be prompted to enter additional fields for the transaction, including hotel check-in and check-out dates, cost of stay, and nightly rate.
- Tap
Continue, thenLet's do it!to start categorizing your items. - Review the items captured from the receipt. Change the expense type, delete an item, or mark an item as a personal expense to remove it from the portion that will be submitted for reimbursement. Tap
Add new itemif you need to another item to the transaction. - Tap
Saveto finish and submit your transaction.
Itemizing a manual transaction after expense submission
Manual transactions are automatically approved when submitted if they fall within the parameters of your assigned expense policy and cannot be itemized. If a submitted non-itemized manual transaction has been flagged for review by the system admin for being non-compliant with your assigned expense policy, you will have the opportunity to itemize it before the admin has approved or rejected.
- Tap the
Needs your reviewtile on the homepage of your Navan Expense app. - Select a transaction.
- Tap
Itemizeand follow the steps outlined in the Itemizing a manual transaction section. You can edit the itemization until it is approved or rejected by your company admin
Check the How do I itemize a transaction? article for more details.
How to automatically add a receipt to a Navan Expense transaction
Forward email receipt to Navan Expense to automatically match it to existing transactions. Receipts sent to Navan will be imported and analyzed to auto-fill transaction details for you allowing to review, then submit.
- Multiple receipts in an email will be cataloged as one transaction. If you need to submit receipts for more than one transaction, forward them as separate emails.
Emailing Receipts to Navan
Receipts emailed to Navan will be scanned, and the transaction information will be imported to your Navan Expense account. Receipts that match an existing transaction will automatically be added to that transaction. If a match is not found, a new transaction draft will be created using the receipt and transaction details. To import a receipt, email a copy of your receipt to receipts@navan.com from your GitLab work email.
Once received, a push notification (if enabled on your device) will confirm that your receipt was successfully imported and inform you of its status:
- Successful receipt/transaction match: Shortly after emailing your receipt, you will receive a push notification that your receipt has been matched with an existing Navan Expense transaction. Tap the notification to be directed to the transaction in the mobile app, or navigate to the
My Transactionssection to view the transaction to which the receipt was added. Review the transaction to confirm that all of the information is correct. - Draft created: Shortly after emailing your receipt, you will receive a push notification that your receipt has been imported and that a transaction draft has been created and saved in the
Draftsfolder. Open the transaction to review, fill in all required fields, then submit.
- All receipts contained in each email will be cataloged as one transaction. If you need to submit receipts for more than one transaction, forward them as separate emails.
Managing Imported Receipts
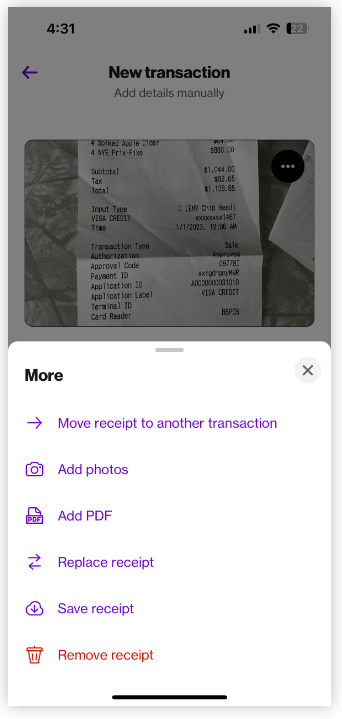
Move the receipt to another transaction or replace it from a receipt’s ellipsis menu. You can also add additional photos or a PDF, save the receipt, or delete the receipt from the transaction.
- Open your
Draftsfolder and select a transaction. - Tap the
ellipsismenu (three dots) on the corner of the receipt. - Select an option from the menu.
- Your device’s camera will open and allow you to take a picture of a new receipt, use an image from your photo library, PDF, or forward a receipt from your email address.
- Tap
Use phototo add the new receipt to the transaction. - Review the transaction details and choose
Delete, Save & close, orSubmit.
Moving a receipt to another transaction
- Open your
Draftsfolder and select a transaction. - Tap the
ellipsismenu (three dots) on the corner of the receipt. - Select
Move receipt to another transaction. - Use the search bar or scroll to locate the transaction.
- Tap
Move. - The next screen will confirm that the receipt was successfully attached to a different transaction. Use the checkbox to indicate if you would like to delete the original transaction draft.
Replacing a receipt
- Open your
Draftsfolder and select a transaction. - Tap the
ellipsismenu (three dots) on the corner of the receipt. - Select
Replace receipt. - Your device’s camera will open and allow you to take a picture of a new receipt. Tap
Use phototo import the new receipt into the transaction. - Review the transaction details and choose
Delete, Save & close, orSubmit.
Check the How can I automatically add receipts to my transactions? article for more details.
How to connect Google Calendar to Navan Expense
When calendar integration is enabled, this integration captures information from your calendar about events that are relevant to your card transactions (such as name, location, and participants) and automatically completes transaction details.
To connect your calendar, access your profile by tapping the Profile icon located in the top-right corner of the app, select Calendar Integration and enable your Google calendar.
How to submit a mileage reimbursement request
Navan Expense provides you with a quick and simple way to get reimbursed for mileage driven for business in your personal vehicle. The expense policy assigned to you for on-the-job expenses by GitLab’s Navan Expense admin will determine your mileage reimbursement eligibility.
Submitting a Mileage Expense (Available on the mobile app only)
To submit a request for mileage reimbursement, tap +New transaction, then Log distance driven. Proceed with completing your trip details.
- You can enter in your drive origin and destination using Google maps and select your route, or enter this information in manually. Your distance driven and total reimbursement amount will be automatically calculated.
- Your reimbursement amount is calculated based upon the total distance traveled multiplied by the mileage rate reimbursed by GitLab (click into the
Informationicon next toTotalto see this value). - Lastly, enter in your
Date of travel(required) and any additional details to provide your Navan Expense Admin team with more details and context for your expense (optional).
- If you do not see the option to
Log distance driven, this indicates that your company has not assigned you to an expense policy that allows for mileage reimbursement. Contact the Accounts Payable team for more information.
Check the How do I submit a mileage reimbursement request? article for more details.
Repayments for Out-of-policy Expenses
Transactions charged to a physical Navan Expense card that violate the expense policy assigned to you by GitLab will be reviewed by the Accounts Payable team. Once reviewed, the approver may choose to reject the expense and request that you repay the company for the full transaction amount or a partial amount. Alternatively, if you are aware that a transaction will require repayment, you can make a payment before your approver reviews the transaction. Repayments can be processed directly through the Navan mobile app.
Check the How can I repay my company for out-of-policy spend? article for more details.
How to submit or manage an expense for someone else
Navan Expense allows you to submit manual expenses (expenses not charged to a physical card) and manage transactions on behalf of other users within your organization through the Navan app.
Requesting Delegate Access to Book for Another Team Member
- From your Navan homepage, navigate to your profile icon and click on
Profile. - In the
Contact infotab, locateDelegate info, and thenI book travel for these users. Enter the names of the team member(s) you would like to manage book or manage travel for. - Team Members added to your list will receive an email asking them to approve or deny access. You will be notified by email once your request has been approved or denied. Pending requests will show in grey until they are approved.
Removing Yourself as a Delegate
To remove yourself as a delegate for another team member, select the X next to the name of the person you would like to remove from the list of people you book travel for. Once the user is removed, they will receive an email notifying them of the change.
Designating Delegate Access to Another Team Member
If you would like to designate a delegate to approve transacations on your behalf, book or manage travel to another team member, follow the below steps:
- From your Navan homepage, navigate to your profile icon and click on
Profile. - In the
Contact infotab, locateDelegate info, and thenThese users can book travel on my behalf. Enter the names of the users you would like to grant permission to. - Users added to your list will receive an email notifying them that they now have permission to approve on your behalf for your direct reports, book or manage travel on your behalf.
Revoking Delegate Permissions
If you no longer wish to have another team member book or manage travel on your behalf, select the X next to the name of the person you would like to remove. Once you have removed a delegate’s access to your profile, they will receive an email notifying them of the change.
Note
If you cannot remove a user from your list of delegates, this indicates that a Navan Expense admin has marked them as a company-wide delegate. Company-wide delegates can only be added or removed by a company administrator.Submitting a manual expense for another user
Navan mobile app
- Navigate to the
Profiletab on your mobile app. - Select
Expense settings. - Tap
Switch usersand use the search bar to type in the name of the user you would like to submit/manage an expense for. This will impersonate the user within the app and you will see a banner indicating you areLogged in as [user name]. - When you are ready to switch back to your profile, tap
Profileand select your name.
Navan Expense web app
- Click
Log in as(person icon) from the homepage of your Navan account. - Use the search bar to type in the name of the user you would like to submit/manage an expense for. This will impersonate the user within Navan and you will see a banner indicating
You are currently logged in as [user name]. - Once you are logged in as the user, click
Access your expensesand selectAdd transaction. - Select
Upload receiptorType in detailsand follow the prompts to submit the transaction. - Click
End sessionfrom the top banner to return to your profile. - Users you have recently logged in as will appear as small contact icons along the right side of your search page, allowing you to easily toggle between your profile and other users.
- Note: Transactions submitted on behalf of others will follow that user’s assigned policy (expense allotment). To review the user’s expense allotment, navigate to the Policy tab on the mobile app while you are logged in as them.
Reviewing transactions on behalf of another user
- Repeat the steps as outlined to log in as a different user. Note that they’ll need to delegate you with access to their account first.
- You will then be able to review any transactions submitted, including their teams’ transactions if that user is a manager.
Managing transactions for another user
- Manual transactions: Manual transactions submitted for reimbursement will fall under one of four review categories (accessed under
Transactions). If a transaction requires further action, such as requests for more information, a missing receipt, or repayment to the company for partially or fully rejected submissions, you can take action by logging in as the user as outlined in the above section. - Navan card transactions: Transactions charged on a user’s physical Navan card will be auto-approved if they are compliant with that user’s assigned expense policy. Transactions that are not auto-approved may require additional action, such as providing more information, attaching a missing receipt, or repaying the company if the transaction has been partially or fully rejected. If a transaction requires further action, you can complete any required information by logging in as the user as outlined in the above section.
Check the How do I submit or manage an expense for someone else article for more details.
How to see how much budget is left
If you want to see how much you still are allowed to expense within the policy, for example how can expense on office equipment:
- Navigate to the
Policytab. - Click
Benefits. - Under
Work from home, clickShow transactions. - On the right you see the total spent, and how much is left.
Leveraging the Navan Expense manager dashboard (available in the desktop browser only)
The Navan Expense Manager Dashboard gives managers an at-a-glance view of their direct reports’ transaction activity and spend data, as well as the ability to review and approve transactions (for managers designated as expense approvers). The manager dashboard can be accessed from the Navan desktop browser by clicking on the main dropdown menu on the left, then Manager under the Expense section. The page has four main components and filters to narrow your search.
Activity
The Activity tab provides an overview of all transaction activity. Choose Navan Expense transactions to view all activity from Navan physical cards and virtual cards, or select Manual transactions to view all expenses submitted for reimbursement.
Analysis
The Analysis section of the Navan Expense Dashboard provides an overview of their company’s business spend including transactions charged to a Navan Expense physical, virtual, and purchase card, as well as transactions submitted for manual reimbursement. Managers can use this information to:
- Group and visualize total spend and number of transactions.
- View a breakdown of different charge types (i.e. physical card vs. manual transaction) to see which methods are being used to submit expenses.
- Filter data across different time frames, groups, and issuing currencies.
Use the Filters at the top of the page to adjust the Spend overview. You have the ability to filter by time period, group, expense type, issuing currency, individual user, and more.
To access the dashboard, navigate to Navan Travel > Manager > Analysis. The Overview page will display your company’s total spend categorized by charge type. Charge types are the different ways that employees can submit an expense in Navan Expense. You will see a breakdown of each (if applicable):
- Physical Cards: The total posted amount and number of transactions charged on Navan physical cards.
- Virtual Cards: The total posted amount and number of transactions for travel spend charged on Navan virtual cards.
- Manual Transactions: The total amount and number of approved transactions submitted manually for out-of-pocket expenses.
Users
The Users tab allow managers to view their direct reports’ employee data such as their issuing currency, cost center, and more. Click on a user’s name to view additional information including their transaction history and policy assignment. In addition to the Activity tab, designated approvers can review, approve, reject, and request more information for a transaction directly through a user’s transaction history.
Note
Users designated as a manager on the Navan user list will have access to the Manager Dashboard. If you do not see a Manager Dashboard option available, either you do not have any assigned direct reports or your direct reports do not have any spend activity.Check the Leveraging the Navan Expense manager dashboard article for more details.
Navan Expense Frequently Asked Questions (FAQ)
What happens if I enter incorrect bank account information?
Account information is validated upon submission. However, we cannot validate that it is the correct account for you. Please ensure that you enter your bank account information correctly. Navan is not liable for money sent to the wrong account.
What if I have a bank account transacted in currency outside of those supported?
If your bank account’s currency is not currently supported or you wish to not link your bank account for other reasons, you can still receive reimbursements through GitLab’s payroll. For details on GitLab’s payroll cycle and process, contact the Accounts Payable Team.
What if I don’t want to link my personal card? How can I make repayments to my company?
If you do not link your personal card to Navan Expense and you owe GitLab a repayment for an expense that was not approved, you will need to connect with the Accounts Payable Team to determine the best method for repayment.
In what countries are direct reimbursements available?
Please check this section of the Expense handbook page for information on reimbursements and payout timelines.
How can I receive my funds if my reimbursement fails?
If your reimbursement fails, unlink, then relink your bank account from the My reimbursements tab on your mobile app or the Settings tab on the web app. Once relinked, Navan will resend the funds to your bank.
Is it required that I include participants on my transactions?
While it is not required, adding participants to your transactions will give your Admin Team a better understanding of cost per person and help provide justification for more costly expenses.
If I add colleagues to my transaction as participants, whose policy will be applied?
Adding participants to a transaction will not affect which policy is applied. Any transactions that you submit, regardless of participants entered, will be subject to the parameters set by your own assigned policies.
Is it possible to expense mileage for a round trip drive?
Yes, simply click on the + icon when entering your destinations to add a location.
Will I be able to submit for reimbursement in kilometers instead of miles?
The region assigned to you by your Navan Expense Admin Team will determine if you are able to submit in kilometers or miles. Note: If you are a US-based employee using your personal car on an international trip, you will still need to submit your reimbursement request in miles.
Can I still submit mileage for travel, without attaching it to a trip booked on Navan?
Yes, as long as your assigned expense policy allows for mileage reimbursement.
What rideshare applications can Navan connect to?
Navan offers connections with Lyft, Uber, and Grab so you can automatically share your location and destination information to access a ride while traveling.
Check the What rideshare applications can Navan connect to? article for more details.
Can I automatically submit Lyft expenses?
Navan Expense users can connect their Lyft account to Navan Expense to automatically send receipts and submit expenses for business travel-related Lyft rides. To leverage this option, you will first need to create a Lyft business profile with the same email address you use in Navan.
Check the How can I automatically submit Lyft expenses? article for more details.
Is there anything I can’t do in the web app that I can do in the mobile app?
To view your assigned expense policies or log miles driven for reimbursement, please use the Navan app. These features are not currently available in the web app.
Should I add tax details for Navan Expense transactions?
Team members are not required to add tax details to any expense transactions.
Check the How do I add tax information to my transactions? article for more details.
Are multiple receipts auto-approved paid in one lump sum or as separate reimbursements?
A deposit for each transaction will be made into your bank account. If you submit 5 manual expenses, you will receive 5 separate bank deposits for each individual transaction.
If my expenses are rejected, can I go back to edit and resubmit?
Expenses will need to be fully resubmitted if rejected.
Where can I see Navan Expense product releases?
Navan Expense product releases are shared in the following blog: Navan Expense product release announcements
Navan Expense Training
End User Training
Note
To access the video, please use the GitLab Unfiltered account. You can also find it by searching forNavan Expense under GitLab Unfiltered content.
This video covers:
- What is Navan Expense
- Navan Mobile App
- How to connect your bank account to Navan
- How to submit an expense
- How to itemize an expense
- How to add participants
- How to submit mileage
- My Reimbursements
- Policies
- Calendar Integration
- Using the Navan Web App
- Q&A
Manager Training
Note
To access the video, please use the GitLab Unfiltered account. You can also find it by searching forNavan Expense under GitLab Unfiltered content.
This video covers:
- What is Navan Expense
- Navan Mobile App
- How to connect your bank account to Navan
- How to submit an expense
- How to itemize an expense
- How to add participants
- How to submit mileage
- My Reimbursements
- Policies
- Calendar Integration
- Using the Navan Web App
- Manager dashboard
- Q&A
Navan Expense Support
- For functionality related questions, the Accounts Payable Team should be the first point of contact for any questions related to how to use the Navan Expense platform and expenses related questions.
- For technical related questions, the Finance System Admins should be the first point of contact for any technical issues and / or questions (eg. Access Requests, problems with login, bugs, etc).
54338527)
