Content library and workflows for Developer Advocates
The Developer Advocacy team creates content that can be used for campaigns, field enablement, product launch support, use case adoption, customer demos, and general learning and onboarding. All contents and activities the team participates in are tracked in issues following team workflows.
On this page:
- Content library
- Content creation
- Video guidelines with recording tools, specifications, and tips.
- Product tours guidelines
- Content distribution
Request content
Note: If you need an updated or newly created content asset, please follow the content request workflow.
Content Library
You can search for relevant content on this handbook page, and contact the team in the linked content epics or in the #dev-advocacy-team Slack channel.
The following sections provide an overview of all content assets, and links to find them.
Highspot
The team’s content is distributed in the content platforms below, and in Highspot in topic and type-specific spots, for example, GitLab Duo (AI) and Customer Outreach.
Blog posts
This section provides examples from the many blog posts authored by the Developer Advovacy team. Click on the author names for a full list of blog posts.
- Cesar Saavedra
- Daniel Helfand
- Fatima Sarah Khalid
- Get started with GitLab Duo Agentic Chat in the web UI
- The Co-Create Program: How customers are collaborating to build GitLab
- ICYMI: Key AI and security insights from our developer community
- Develop C++ unit testing with Catch2, JUnit, and GitLab CI
- Explore the Dragon Realm: Build a C++ adventure game with a little help from AI
- How to choose the right static site generator
- Fernando Diaz
- How to use GitLab’s Custom Compliance Frameworks in your DevSecOps environment
- Enhance application security with GitLab + HackerOne
- Secure and safe login and commits with GitLab + Yubico
- Strengthen data security with custom PII detection rulesets
- Vulnerability risk prioritization made simple with GitLab
- How to integrate custom security scanners into GitLab
- John Coghlan
- Itzik Gan Baruch
- Software supply chain security guide: Why organizations struggle
- Why are organizations moving to a unified DevSecOps platform?
- Quickly resolve broken CI/CD pipelines with AI
- FAQ: GitLab CI/CD Catalog
- Refactoring a CI/CD template to a CI/CD component
- Jenkins to GitLab: The ultimate guide to modernizing your CI/CD environment
- Michael Friedrich
- William Arias
Product tours
Product tours are a self-guided journey emphasizing the ‘What’ of a feature, skipping the ‘How-to’ steps to directly showcase the value aspects.
Centralized demo hub
We’ve created a centralized demo hub that brings together all our product tours in one location. Access demos organized across three key areas: Duo Agent Platform, Security, and DevSecOps Platform.

| Title | Area | Last updated | DRI |
|---|---|---|---|
| GitLab Duo Agent Platform | GitLab Duo Agent Platform | 2025-09-14 | @iganbaruch |
| GitLab MCP Server with Cursor - Japanese | GitLab Duo Agent Platform | 2025-12-10 | @nakiyama-ext |
| GitLab Duo Agent Platform - MCP - Japanese | GitLab Duo Agent Platform | 2025-10-15 | @nakiyama-ext |
| GitLab Duo Self-hosted - japanese | GitLab Duo Agent Platform | 2025-09-30 | @nakiyama-ext |
| GitLab GitLab Duo with Amazon Q - japanese | GitLab Duo Agent Platform | 2025-08-31 | @nakiyama-ext |
| Custom Compliance Frameworks | DevSecOps Platform | 2025-10-09 | @iganbaruch |
| Compliance Frameworks | DevSecOps Platform | 2025-01-27 | @iganbaruch |
| Compliance Frameworks - Japanese | DevSecOps Platform | 2025-05-27 | @nakiyama-ext |
| Idea to MR | GitLab Duo with Amazon Q | 2024-12-03 | @iganbaruch |
| Java modernization | GitLab Duo with Amazon Q | 2024-12-03 | @iganbaruch |
| Advanced SAST | DevSecOps Platform | 2024-09-22 | @iganbaruch |
| Advanced SAST - Japanese | DevSecOps Platform | 2025-08-31 | @nakiyama-ext |
| AI Impact analytics - japanese | GitLab Duo Agent Platform | 2025-09-01 | @nakiyama-ext |
| Value Stream Management | DevSecOps Platform | 2024-06-25 | @iganbaruch |
| Value Stream Management - japanese | DevSecOps Platform | 2025-09-30 | @nakiyama-ext |
| Interactive infographic | DevSecOps Platform | 2024-03-24 | @iganbaruch |
| Resolving vulnerabilities with GitLab Duo (AI) | GitLab Duo Agent Platform | 2024-02-24 | @iganbaruch |
| CI/CD Catalog | CI/CD | 2024-01-24 | @iganbaruch |
| CI/CD Catalog - Japanese | CI/CD | 2025-08-31 | @nakiyama-ext |
| Integrating security to the pipeline | DevSecOps | 2024-01-24 | @iganbaruch |
| Code Suggestions | GitLab Duo Agent Platform | 2024-01-24 | @iganbaruch |
Short product tours
This section lists shorter versions of product tours with fewer steps (typically under 15 steps), useful for demo booths at events and when you need to show a quick demonstration.
| Title | Area | Last updated | DRI | # of Steps |
|---|---|---|---|---|
| Advanced SAST | DevSecOps Platform | 2024-09-22 | @iganbaruch | 13 |
| Compliance Frameworks | DevSecOps Platform | 2025-01-27 | @iganbaruch | 9 |
| Vulnerability Explanation/Resolution | GitLab Duo | 2024-02-24 | @iganbaruch | 5 |
Internal Product tours
While the product tours provide guided walkthroughs with navigation dialogs and explanations at each step and can serve as self-guided tours for customers, the internal product tours are designed to help GitLab team members demo features to customers and prospects. These tours omit the explanation dialogs, creating a seamless live demo experience. Refer to the navigation guides to learn how to navigate through the flows.
| Title | Area | Last updated | DRI |
|---|---|---|---|
| Compliance Frameworks | DevSecOps Platform | 2025-02-20 | @iganbaruch |
| Idea to MR | GitLab Duo with Amazon Q | 2025-01-05 | @iganbaruch |
| Java modernization | GitLab Duo with Amazon Q | 2025-01-05 | @iganbaruch |
| Advanced SAST | DevSecOps Platform | 2024-09-24 | @iganbaruch |
| AI Impact analytics | GitLab Duo | 2024-10-30 | @iganbaruch |
| Duo Enterprise | GitLab Duo | 2024-10-28 | @iganbaruch |
Please search for the “[product name] tour - navigation guide” (ex: Advanced SAST tour - navigation guide) in Google Drive to find the step by step instructions to navigate through these tours.
Videos
YouTube playlists
GitLab YouTube channel:
- GitLab Demos
- GitLab Snapshots
- GitLab Snapshots - español
- GitLab Snapshots - português
- GitLab Duo Snapshots
GitLab Unfiltered YouTube channel:
- Developer Advocacy with talk recordings, workshops and community engagements.
- Dev Advocacy: GitLab Duo Agent Platform use cases
- GitLab Duo Coffee Chat, learning sessions with GitLab Duo and AI. (status: inactive)
- DevOps with GitLab Duo, learning sessions with GitLab Duo, DevOps and AI. (status: inactive)
- Contributor Success AI Catalog / Duo Agent Platform Demos, user stories demonstrating the power of the AI catalog and encouraging everyone to contribute
Upload Videos to GitLab Unfiltered channel
Starting from July 2025, team members are encouraged to upload videos to GitLab Unfiltered using GitLab Vidoe Scanner, which is an internal service to help team members mitigate token leak risks in videos published to the GitLab Unfiltered Channel.
Vimeo folder
- Developer Relations (internal)
Maintained talks
These talk slide decks provide storytelling for talks at events, speaking engagements, customer workshops, etc. You can use the slide decks for your own talks, workshops, etc. or repurpose specific slides into new stories. Reach out to the DRI in #dev-advocacy-team for questions and feedback.
These talks are maintained:
| Title | Area | Focus | Resources | Updated | DRI |
|---|---|---|---|---|---|
| Efficient DevSecOps workflows with a little help from My AI Agents | Agentic AI, GitLab Duo Agent Platform | Use cases and problem solving, live demos and AMA | GitLab DACH Roadshow 2025 recording, slides: public, internal, Demo: Tanuki IoT Platform | 2025-12-04 | @dnsmichi |
| Breaking and Entering (Open Source): AI for Swift Contribution | Contribute and co-create with AI | Learned best practices with AI, highlight contributors.gitlab.com | Bitkom Forum Open Source 2025 slides: public, internal | 2025-09-18 | @dnsmichi |
| Evolving the Edge: AI, CI, and Hardware-in-the-Loop for Embedded | Agentic AI, CI, Embedded | Research with GitLab CI/CD Runners, LLMs and Agentic AI with MCP on embedded hardware | Container Days 2025 recording, slides: public, internal | 2025-09-10 | @dnsmichi |
| Learning AI 101: Practical Foundations for Developers | Agentic AI | Learning LLMs, RAG, Tools, Agents, MCP use cases and practical prompts, etc. | Open Source @ Siemens 2025 recording, slides: public, internal | 2025-06-03 | @dnsmichi |
Archive:
| Title | Area | Focus | Resources | Updated | DRI |
|---|---|---|---|---|---|
| Efficient DevSecOps workflows with a little help from AI | AI, GitLab Duo | Product use cases with Duo | DACH Roadshow 2024 slides: public, internal | 2024-11-14 | @dnsmichi |
Workshops
The Developer Advocacy team maintains workshops in different product and focus areas. A workshop can be of different types: Hands-on with audience participating live in the exercises (training course), or showcase live demo/programming sessions where the audience engages with questions. Workshops should be created in collaboration with the Solution Architect and Customer Success teams, and aligned with business goals.
Note: Specific customer focussed workshops can be requested following the customer consultancy handbook.
| Title | Area | Type | Focus | DRI | Resources |
|---|---|---|---|---|---|
| Deep dive: Custom rules for GitLab Duo Agentic Chat | GitLab Duo Agent Platform | Challenge exercises | Custom rules, style guides, onboarding, code modernization | @dnsmichi | GitLab group |
| GitLab Duo best practices - Build a Python shop app | GitLab Duo | Showcase, audience watching/engaging, Sales Proof-of-value workshops (60min + async content) | Python, shop app | @dnsmichi | 2024-05-07 livestream with Eddie Jaoude, 2024-07-01, 2024-08-21 Python app, 2024-10-01 best practices |
| Build your own adventure with GitLab Duo - C++ observability tool and hardware sensors | GitLab Duo | Showcase, audience watching/engaging, Sales Proof-of-value workshops (60min + async content) | C++, observability, embedded, sensors, metrics | @dnsmichi | 2024-12-05 Build your own adventure - C++ |
Maintained documentation
Developer advocates authored and maintain the following documentation pages, with practical and technical examples aiding adoption and efficiency use cases.
| Title | Area | Created | DRI |
|---|---|---|---|
| GitLab Duo use cases | GitLab Duo/AI | 2024-03 | @dnsmichi |
| Automate storage management | Utilization, API | 2023-08 | @dnsmichi |
| Pipeline efficiency | CI/CD | 2020-09 | @dnsmichi |
Click-through Demos
Click-through demos are product simulation demonstrations that can be used for self-guided training. They are invaluable for delivering demos to customers in areas with limited internet connectivity or complex environments, where preparation is necessary to showcase the flow. Toggle off the click boxes and speaker notes using fn+F2 to experience the real look and feel of the product.
| Title | Area | Last updated |
|---|---|---|
| GitLab Duo Chat | GitLab Duo | 2024-06-19 |
| GitLab Duo (AI) | GitLab Duo | 2023-07-23 |
| Workspaces | Dev section, Create | 2023-05-23 |
| Feature Flags | CD | 2023-06-23 |
| CI Overview | CI | 2023-10-23 |
Note: The demos can be run offline in the absence of internet connectivity. To do so, you can directly obtain the necessary HTML files from here.
Projects
Source code, demo projects, workshops, tutorials, research, etc. are documented in the Projects handbook. This includes use cases for GitLab Duo (AI), CI/CD components, DevSecOps and Security, Workspaces, GitLab API, etc.
Content Creation
Video Guidelines
For your screen recording:
- Tools: We recommend Quicktime, OBS or Screen Studio.
- Post-editing: Adobe Premiere Pro (video cuts, audio gain boost, etc)
- Ask @johncoghlan for tool access and create Access Requests.
- Video settings to follow:
- Aspect Ratio / Resolution: Set window size to an aspect ratio of 16x9.
- Common resolution is 1920×1080 (16:9 aspect ratio) or 2880×1750 for screen recordings.
- If recording for social, consider square (1:1) for multi-platform compatibility or vertical (9:16).
- If you’re connected to a 4K monitor, it may be easier to capture from your laptop.
- If using Screen Studio for videos that will be used in videos edited by the Brand team, please follow this guidance:
- Remove all Zooms in Screen Studio, the brand team will add Zooms as needed.
- Set rounded corners and padding to 0% to maximize screen size.
- Turn on
Always use pointer cursor. - Set cursor size to 1.2x, use the left-most
Cursor styleoption. - Export as follows: Format - MP4, Resolution - 1080p, and Compression - Web.
- Aspect Ratio / Resolution: Set window size to an aspect ratio of 16x9.
Demo environments setup:
- User accounts
- Prefer the demo-tanuki account for brand demos. (login is in 1Password, Marketing vault)
- Use your own accounts (or GDK admin) for all other demos.
- GitLab UI in Chrome browser
- Zoom: 125% (or 110% as alternative)
- Minimized bookmarks bar (
cmd shift b) - Theme: White
- GitLab layout width: Fluid (
Profile > Settings > Layout width)
- IDEs in Dev Environments
- Be overly generous with zoom in your IDE so that our viewers can clearly see what is happening on screen.
- VS Code: Zoom (
cmd++) once or twice more than you think you need to. - JetBrains:
Settings > Appearance & Behavior > Appearance > Accessibility > Zoom.125%worked best in tests by @dnsmichi - Simplify your IDE by closing unnecessary tabs and toolbar items.
- Disable all AI integrations from IDE vendors.
- You can simplify view by hiding unnecessary icons that are nested in top and bottom bars or using Zen mode,
cmd+k+z
Additional guidance can be found in the internal handbook: dev environments
Checklist for external content requests
- Video should include audio voice-over, or text-only voice-over script.
- Which output artifact should be provided (default: mp4).
- Delivery format (default: 16:9, 1920x1080) works or needs a custom format.
- Where is the video artifact being used (YouTube, blog embed, social).
Recording with Screen Studio
Screen Studio offers to capture screen areas, windows and combine it with the webcam view. It comes with a simple intuitive recording and editing UI, and uses intelligent automated “zooming into scenes” with a timeline to edit.
Screen Studio provides a minimal overlay UI to start a recording.

-
Select Display, Window or Area
- Screen Studio can record any resolution but it is recommended to use 16:9 or 4:3 depending on specification.
- Area: Select the AR and drag through the recording region.
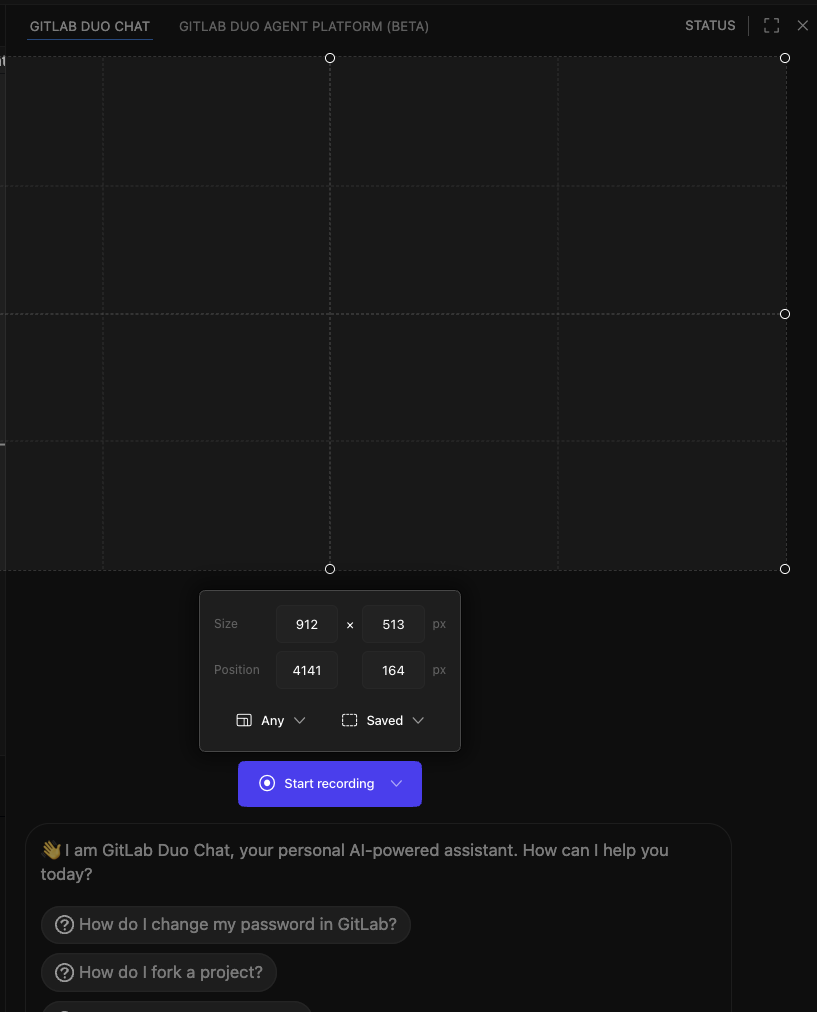
-
Click record to start recording.
After finishing the recording, choose to save the project first, and then open the editor.
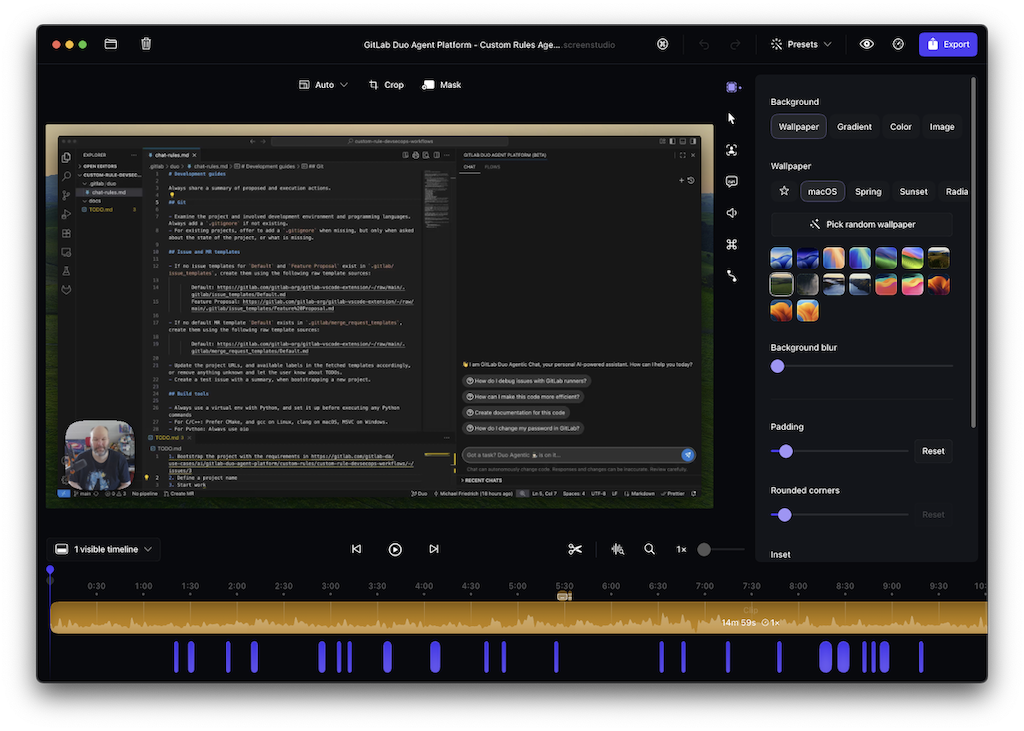
- In the editor, you can review all settings, video alignments, Zoom timeline, etc. before saving the final video.
- There you can set:
- Padding (left and right)
- Constant cursor size
- Zoom timeline with multiple automated, AI-based zooms
- After making these adjustments, save the project.
- Then
exportandExport to file. - In the export dialog, choose
mp4under.mp4dropdown
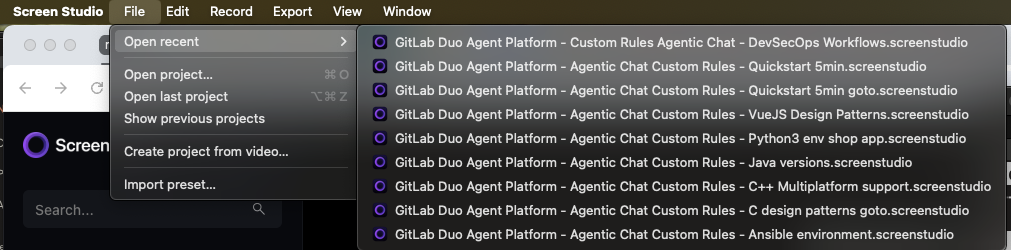
Screen Studio saves projects on disk in the ~/Screen Studio Projects folder. Project files follow the name and .screenstudio extension, which are containers with raw video files and settings.
!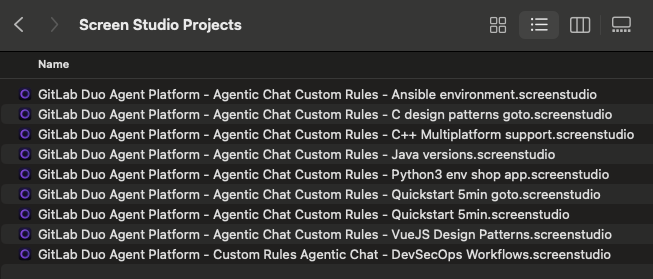
You can inspect them on the terminal with ls and re-open them in the Screen Studio project list.
After finishing the content delivery, it is recommended to upload all video files (exported artifacts and Screen Studio Projects) to the team GDrive to save local storage.
Screen Studio Recording specifications
Recordings delivered to product marketing/brand video team need to follow these specs:
- Resolution: 1920x1080 (16:9 aspect ratio).
- Screen Studio can record any resolution that follows the 16:9 aspect ratio requirements, and then export 1920x1080 resolutions (e.g. a 4K monitor, or portion of a 49" monitor)
- Exported recording artifact:
mp4 - Settings:
- No padding
- Always show Cursor
- Cursor size: 1.2x
- No additional Zooms/Edits
- No webcam / user view.
Other demo recordings
- Follow the same settings as for brand video, but experiment with the best layout for the audience.
- Add automated zooms and review them before export.
- Social media: Square video or export as GIF.
- YouTube: 16:9, 1920x1080, more padding.
- Always add your webcam video to tutorials, walkthroughs and deep-dives to provide a human personal touch.
Recording with OBS
In many cases, OBS will allow greater control and flexibility for screen recordings.
Here are some tips to keep in mind:
- Scene - a scene is a collection of sources that you will record simultaneously.
- Sources - sources can be audio, screen recordings, webcams, etc.
- To add a source, click the
+icon. These are the three most common sources you will use:- macOS Screen Capture: screen recordings
- Audio Input Capture: optional, when direct voice recording is needed
- Video Capture Input: optional with speaker/webcam in the recording
- To record your Macbook screen, use
macOS Screen Capture, give the source a name, and right-click to edit the Source properties. - Properties - these are elements of the Source you can modify. You can choose between different screens (laptop vs monitor) as well as whether to capture the whole screen, a window, or a specific application.
- To add a source, click the
- Preferences - preferences control how your Scene gets recorded. We recommend the following preferences:
- OBS > Preferences > Video
- Base (Canvas) Resolution 1920x1080, Aspect ratio 16:9
- Output (Scaled) Resolution 1920x1080, Aspect ratio 16:9
- OBS > Preferences > Output > Dropdown: Advanced.
- OBS > Preferences > Advanced: Enable “Recording > Automatically remux to mp4” (this is important for Adobe Premiere Pro which cannot import mkv containers)
- OBS > Preferences > Video
Review the Developer Advocacy showcase notes (internal) and recording (public).
Post-editing with Adobe Premiere Pro
Access: Requires an Access Request, example.
Review the Developer Advocacy showcase notes (internal) and recording (public).
Audio gain boost with professional broadcaster microphones
If you are using a professional broadcaster microphone (e.g. Shure SM7B), and the audio gain is too low, there are different options:
- The hardware solution (audio interface + Cloudlifter) will greatly improve initial results, as the SM7B microphone really needs that extra gain before it reaches your computer.
- OBS Recording
- Increase the audio gain in OBS during recordings.
- Locate
Source > Audio Capture Device - Right-click and select
Filters - Set Gain to +10 or +20dB.
- Noise Suppression: RNNoise or Speex
- Compressor: Ratio 3:1, Threshold -18dB, Attack 6ms, Release 60ms
- Limiter: Threshold -6dB, Release 60ms
- Tip: Ask Claude for best practice settings (prompt:
How to boost audio in OBS for a SureSM7B microphone as input?).
- Post-edit for Screen Studio
- Edit the Screen Studio exported recording in Adobe Premiere Pro, and adjust the audio.
- Create a new project and add the video source in the media browser.
- Drag and drop the video into the right editor scope.
- Right-click on the audio track, and select
Audio Gain. - Choose
Set Gain to:and enter25 dB.
Recording equipment
Review the discussion and tips in this FY26Q2 issue (internal).
@dnsmichi ’s setup is documented on dnsmichi.at.
Product Tours guidelines
Guideline and tips for creating GitLab tours with Navattic
- Keep it concise – Product tours should ideally have 5 to 12 steps, each focused on delivering clear value. Unlike tutorials, which tend to be instructional, product tours should be quick and engaging.
- Provide context – Add links to blog posts and documentation in pop-up dialogs to provide additional resources without cluttering the main content.
- Apply GitLab branding – In the theme settings, select “GitLab Branding [Navattic Team]” to ensure a consistent design.
- Use the appropriate capture type – Navattic supports two types of screen captures:
- Web captures (preferred) create an in-product experience.
- Screenshots should be used for non-web-based applications (e.g., IDEs).
- Set the correct resolution – When capturing in Chrome, set your browser to 1680x1050 (Full HD). You can use Window Resizer to adjust the resolution.
- Include a call to action – The final step should feature a CTA, typically a Free Trial link.
- Use Beacons to highlight elements – Apply the Highlight appearance setting to emphasize key elements.
- Enable keyboard navigation – This features in the tour settings allows users to navigate the tour using arrow keys for a smoother experience.
- Use Presenter Mode – This feature hides pop-ups when necessary, ensuring a cleaner visual presentation.
- Set pop-ups appropriately:
- Use Modals with a heavy backdrop for the first and last steps.
- Use Tooltips for intermediate steps, enabling the Backdrop setting when appropriate.
- In the Dialogs, please try using action-specific labels like “Commit,” “Install,” or “Submit” instead of “Next” to make users feel like they are actively engaging with the product.
- Refer to available examples – Review existing product tours to understand the preferred format.
- Before releasing any public facing product tour, request a review from the Developer Advocacy team.
Requesting Access to Navattic
If your team has special requirements for tours and you want to develop tours with Navattic yourself, we can help.
- We can offer a 3-month trial license to team members who request access and provide a valid business justification for using Navattic.
- If a user actively utilizes the tool, we may extend their access or consider purchase additional licenses as needed.
- If a user is not actively using the tool, their license may be reassigned to another team member.
- To request access, open an issue
For questions or assistance, reach out to us in our team channel: #dev-advocacy-team.
Publishing Product Tours
Product tours are published in the following locations:
- Developer Advocacy content library
- Highspot
- GitLab documentation (follow the GitLab documentation style guide for demo links)
Additionally, select tours may be featured on the website.
Contribute to product tours
The Developer Advocacy team creates product tours to showcase key workflows and highlight new features, such as Advanced SAST, GitLab Duo, GitLab Duo with Amazon Q, and more. The team is committed to building, reviewing, and publishing product tours to ensure a consistent and high-quality experience for our users and potential customers. You can also contribute by proposing additional tours and provide the content, script, and environment. Here is how you can collaborate with the Developer Advocacy team to create new product tours:
- Use the product tour submission template to propose your idea.
- Answer all the questions in the template. This ensures the Developer Advocacy team can evaluate your idea effectively.
- The Developer Advocacy team will review the pitch and either a) greenlight the tour and suggest timeline for creation based on other priorities the team has, b) offer suggestions for improvements, or c) explain why the idea might not be a fit for the tour and offer other ideas for getting the message out.
- Once a tour is approved, the author will use the product tour template (google doc) to draft the script. Link to the template exists in the product tour submission template.
- Add a link to the template in a comment in the submisson template issue.
- The Developer Advocacy team will collaborate with the author on the script, use Navattic to create the tour, and publish it in the official targets when applicable (for example, website, docs, HighSpot, Developer Advocacy handbook).
Content Distribution
UTMs for URL tagging and tracking
The Developer Advocacy team works with the Developer Relations Team UTM Strategy, which is based on the larger Marketing UTM strategy. The utm_content prefix for the Developer Evangelism team is de_, this allows for easily filtering of the team’s data in Sisense.
You can use the UTM Generator on the Community UTM Page to easily generate UTM Codes for your campaigns.
We use the following campaigns:
- Blog posts (general) - All GitLab blog where we are not authors. Content tracking for social media.
- Blog posts (authors) - GitLab blog posts where we are authors. Content tracking for social media.
- Talk resources (general) - QR codes and short URLs for talk slides.
- Community newsletter - community newsletter short URLs.
- Demos (TMM, DE) - technical demos with standalone URLs.
- Release Evangelism - Release evangelism activities.
- Podcast resources - URLs shared with podcast hosts.
- Contributed articles - external articles shared on social media.
Event and content specific tracking examples are KubeCon EU 2023.
Content Distribution Workflow
After content has been crafted and published, the next step is distribution. Here are some steps to assist in the process:
- Use the UTM Generator to create UTM codes and short URLs for your content. Further insights about this can be found in the Developer Advocacy UTM Strategy.
For documentation and community:
- Tutorial blog posts, demos, etc. that are helpful to everyone should be added to the GitLab documentation. Follow the contribution docs and create related topics headings if not existing. Raise an MR, use content short URLs, and ask the assigned technical writer to review. Example MR: Add tutorial blog posts to workspaces docs
- Consider sharing your content on one of our community platforms like the GitLab Forum or the r/gitlab subreddit. If you’re covering a topic that’s broader than GitLab, you can also consider other subreddits or cross-posting your content on blogging sites like dev.to.
For social media:
- Draft some copy for sharing your content on social media. See Content Sharing for tips and an overview of different platforms. Review the message tips for additional engagement ideas, e.g. emojis.
- Suggest your content as a story on EveryoneSocial so other GitLab team members can also share it. Details on how to suggest content on EveryoneSocial.
- After posting your content on social media, share a link in the
#social-media-actionSlack channel to request promotion from the social media team.
For GitLab teams:
- Content that can be useful to our Field Teams, should also be posted in Highspot.
- Share an update in the #dev-advocacy-team Slack channel using the following message template:
:results-tanuki: <Content type> published: <title>

Social short UTM URLs:

1. LinkedIn:
2. Twitter:
3. Mastodon:

Content epic: <URL>

Thanks/cc @teammembers
Example:
:results-tanuki:  Blog published: Set up your infrastructure for on-demand, cloud-based development environments in GitLab

Social short UTM URLs:

1. LinkedIn: https://go.gitlab.com/EHIjRt
2. Twitter: https://go.gitlab.com/uz7OSE
3. Mastodon: https://go.gitlab.com/pFxdKa

Content epic: <URL>

Thanks a lot @HelpfulCoworker for editing this long read :handshake: :purple_heart:
Product Adoption Initiatives
- FY25 GitLab Duo adoption - Developer Relations epic (internal).
- FY25 CI/CD adoption - Developer Relations epic (internal)
9fd4a5d3)
