Data Infrastructure
Overview Data Infrastructure pages are available in our Internal GitLab Handbook.
Quick Links Airflow Data Image Project Monte Carlo Python Guide Snowflake Guide
The Data Platform is used for data analytics purposes. This document conceptually describes on high level the components which all together are defined as the Data Platform.
This document is limited to describe the Data Platform conceptually. There are other resources that describe it in more detail (i.e. the Data Pipelines and the infrastructure/
| Role | Responsibility |
|---|---|
| GitLab Team Members | Responsible for taking notice of how the standard that forms the Data Platform |
| Data Platform Team Members | Responsible for implementing and executing data use cases based on this standard |
| Data Management Team | Responsible for approving significant changes and exceptions to this standard |
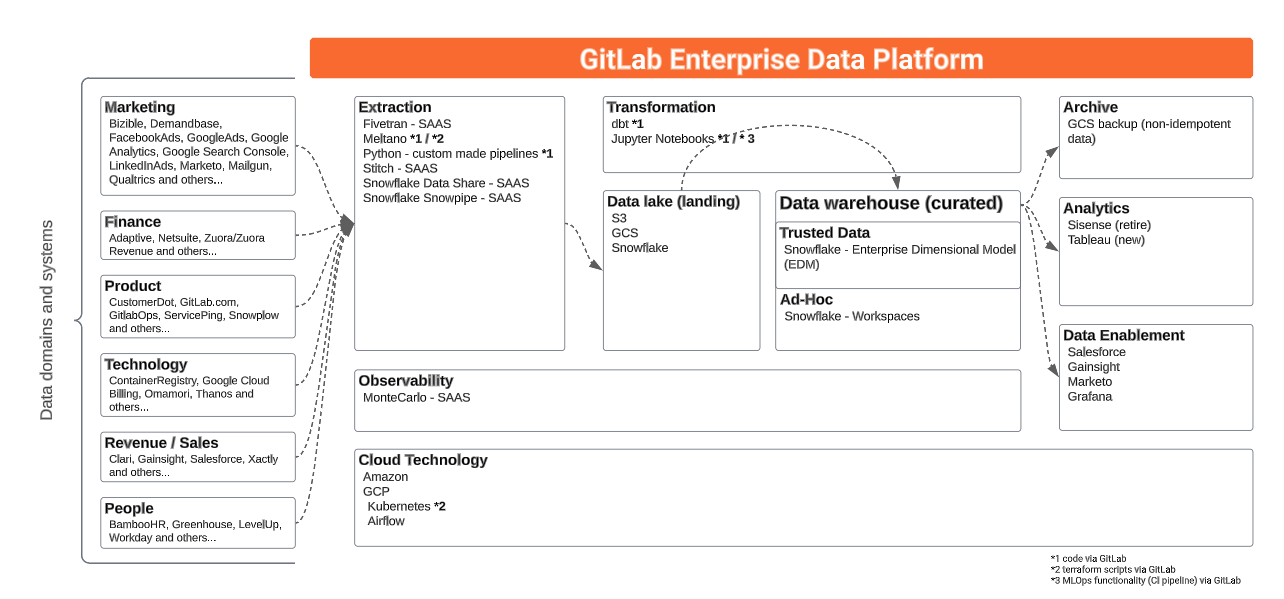
We use GitLab to operate and manage the analytics function. Everything starts with an issue. Changes are implemented via merge requests, including changes to our pipelines, extraction, loading, transformations, and parts of our analytics.
| Stage | Tools |
|---|---|
| Extraction | Stitch, Fivetran, Tableau Prep, and Custom Code |
| Loading | Stitch, Fivetran, Tableau Prep, and Custom Code |
| Orchestration | Airflow, Tableau Prep |
| Data Warehouse | Snowflake Enterprise Edition |
| Transformations | dbt and Python scripts |
| Data Visualization | Tableau |
| Advanced Analytics | jupyter |
We currently use Stitch and Fivetran for some of our data sources. These are off-the-shelf ELT tools that remove the responsibility of building, maintaining, or orchestrating the movement of data from some data sources into our Snowflake data warehouse. We run a full-refresh of all of our Stitch/Fivetran data sources at the same time that we rotate our security credentials (approx every 90 days). Prior to running a full refresh we will drop all of the tables.
Stitch and Fivetran handle the start of the data pipeline themselves. This means that Airflow does not play a role in the orchestration of the Stitch- and Fivetran schedules.
Other solutions we use to extract data are:
For source ownership please see the Tech Stack Applications data file.
The following table indexes all of the RAW data sources we are loading into the data warehouse from external locations. We manage the development backlog and priorities in the New Data Source/Pipeline Project Management sheet, with links to GitLab issues for up-to-date status and progress management. The new data source handbook page describes how the Data Team handles any request for new data sources.
The link in the pipeline column in the table below will bring you to the detailed page of the specific data pipeline if applicable.
Key
RAW database where data is stored.PREP database where source models are materialized.PROD layer (which includes transformations in dbt).x indicates undefined or not run| Data Source | Pipeline | Raw Schema | Prep Schema | Audience | RF / SLO | MNPI | Tier |
|---|---|---|---|---|---|---|---|
| Adaptive | Airflow | adaptive_custom |
x | Finance | Yes | Tier 2 | |
| Adobe / Bizible | Airflow | bizible |
sensitive |
Marketing | 24h / 36h | No | Tier 2 |
| Airflow | Stitch | airflow_stitch |
airflow |
Data Team | 24h / 24h | No | Tier 3 |
| AWS Billing | Snowflake external tables | aws_billing |
aws_billing |
Engineering | 24h / 24h | No | Tier 2 |
| BambooHR | Airflow | bamboohr |
sensitive |
People | 12h / 24h | No | Tier 2 |
| Clari | Airflow | clari |
clari |
Sales | 24h / 24h | Yes | Tier 2 |
| Clearbit | x | x | x | x / x | No | Tier 3 | |
| Common Room | Snowflake task | commonroom |
commonroom |
DevRels/Developer Advocates |
No | Tier 3 | |
| CustomersDot ERD | pgp | tap_postgres |
customers |
Product | 24h / x | No | Tier 1 |
| Demandbase | Snowflake task | demandbase |
demandbase |
Marketing | 24h / x | No | Tier 2 |
| Elastic Search Billing | Airflow | elasticsearch_billing |
elastic_billing |
Engineering | 24h / 24h | No | Tier 2 |
| End to End test metrics | Snowflake tasks | e2e_metrics |
e2e_metrics |
Engineering | 24h / 48h | No | Tier 2 |
| Facebook_ads | Fivetran | facebook_ads |
facebook_ads |
Marketing | 24h / 48h | No | Tier 3 |
| Fivetran_Logs | Fivetran | N/A |
N/A |
Data | 24h / 48h | No | Tier 3 |
| Gainsight Customer Success | Fivetran | gainsight_customer_success |
gainsight_customer_success |
Customer Success | 24h / 48h | No | Tier 3 |
| GitLab.com | pgp | tap_postgres |
gitlab_dotcom |
Product, Engineering | 12h / 55h | No | Tier 1 |
| GitLab Ops DB | pgp | tap_postgres |
gitlab_ops |
Engineering | 6h / x | No | Tier 1 |
| GitLab Profiler DB | x | x | x | x | x / x | No | Tier 3 |
| GitLab Container Registry Logs | Airflow | Container Registry |
Container Registry |
Engineering | x | No | Tier 2 |
| Google Ads | Fivetran | google_ads |
google_ads |
Marketing | 24h / 48h | No | Tier 2 |
| Google Analytics 360 | Fivetran | google_analytics_360_fivetran |
google_analytics_360 |
Marketing | 6h / 32h | No | Tier 2 |
| Google Analytics 4 | BigQuery Exporter | google_analytics_4_bigquery |
google_analytics_4 |
Marketing | 24h / 48h | No | Tier 2 |
| Google Cloud Billing | BigQuery Exporter | gcp_billing |
gcp_billing |
Engineering | 24h / x | No | Tier 1 |
| Google Search Console | Fivetran | google_search_console |
google_search_console |
Marketing | 24h / 48h | No | Tier 2 |
| Graphite API | Airflow | engineering_extracts |
x | Engineering | 24h / 48h | No | Tier 3 |
| Greenhouse | Sheetload | greenhouse |
greenhouse |
People | 24h / 48h | No | Tier 2 |
| Handbook YAML Files | Airflow | gitlab_data_yaml |
gitlab_data_yaml |
Multiple | 8h / 24h | No | Tier 2 |
| Handbook MR Data | Airflow | handbook |
handbook |
Multiple | 24h / 24h | No | Tier 2 |
| Handbook Git Log Data | Airflow | handbook |
handbook |
Multiple | 1w / 1m | No | Tier 2 |
| Iterable | Fivetran | iterable |
n/a | Multiple | 24h / 48h | No | Tier 3 |
| Just Global Campaigns | Snowflake task | just_global_campaigns |
just_global_campaigns |
Marketing | 7d / 14d | No | Tier 3 |
| Kantata | Airflow | kantata |
kantata |
Customer Success | 24h / 48h | Yes | Tier 3 |
| Level Up/Thought Industries | Airflow | level_up |
level_up |
People | 24h / 24h | No | Tier 3 |
| LinkedIn ads | Fivetran | linkedin_ads |
n/a |
Marketing | 24h / 48h | No | Tier 3 |
| Marketo | Fivetran | marketo |
x | Marketing | 24h / 24h | No | Tier 2 |
| Monte Carlo | Snowflake Share | n/a |
prep_legacy |
Data | 12h / 24h | No | Tier 3 |
| Netsuite | Fivetran | netsuite_fivetran |
netsuite |
Finance | 6h / 24h | Yes | Tier 2 |
| Omamori | Airflow | omamori |
omamori |
Engineering | 1h / 24h | No | Tier 2 |
| Pajamas Adoption Scanner | Airflow | pajamas_adoption_scanner |
pajamas_adoption_scanner |
Engineering | 24h / 48h | No | Tier 3 |
| PMG | x | pmg |
pmg |
x | x / x | No | Tier 3 |
| Time Off by Deel | Snowpipe | pto |
gitlab_pto |
Engineering Productivity / People | 7 days / x | No | Tier 3 |
| Qualtrics | Airflow | qualitrics |
qualtrics |
Marketing | 12h / 48h | No | Tier 2 |
| Rally | Stitch Webhook | rally_webhook_stitch |
sensitive |
UX | 24h / 48h | No | Tier 3 |
| SaaS Service Ping | Airflow | saas_usage_ping |
saas_usage_ping |
Product | 1 week / 24h (more context) | No | Tier 1 |
| Salesforce | Stitch | salesforce_v2_stitch |
sfdc |
Sales | 6h / 24h | Yes | Tier 1 |
| Salesforce Sandbox | Stitch | salesforce_stitch_sandbox_v2 |
TBC |
Sales | 24h / 48h | Yes | Tier 3 |
| SheetLoad | SheetLoad | sheetload |
sheetload |
Multiple | 24h / 48h | Yes | Tier 1 |
| SIRT Alertapp | Snowflake task | sirt_alertapp |
sirt_alertapp |
Engineering | 24h / 48h | No | Tier 3 |
| Snowplow | Snowpipe | snowplow |
snowplow |
Product | 15m / 24h | No | Tier 1 |
| Tableau Cloud | Tableau Prep | tableau_cloud |
tableau_cloud |
Data Team | 24h / 24h | No | Tier 3 |
| Thanos | Snowflake Task | prometheus |
prometheus |
Engineering | 24 h / x | No | Tier 3 |
| Version DB | Automatic Process | version_db |
version_db |
Product | 24 h / 48 h | No | Tier 1 |
| Workday | Fivetran | workday |
workday |
People | 6h / 24h / | No | Tier 2 |
| Xactly | Meltano | tap_xactly |
N/A | Sales | 24h / N/A | Yes | Tier 2 |
| Zendesk | Meltano | tap_zendesk |
zendesk |
Support | 24h / 48h | No | Tier 2 |
| Zendesk Community Relations | Meltano | tap_zendesk_community_relations |
zendesk_community_relations |
Support | 6h / 24h | No | Tier 2 |
| ZenGRC | Meltano | tap_gengrc |
N/A | Engineering | 8h / 16h | Yes | Tier 3 |
| Zoom | Meltano | tap_zoom |
N/A | People | 24h / N/A | No | Tier 3 |
| Zuora | Stitch | zuora_stitch |
zuora |
Finance | 6h / 24h | Yes | Tier 1 |
| Zuora API Sandbox | Stitch | zuora_api_sandbox_stitch |
Legacy |
Finance | 24h / 24h | Yes | Tier 3 |
| Zuora Central Sandbox | Fivetran | zuora_central_sandbox_fivetran |
zuora_central_sandbox |
Finance Sandbox | - | Yes | Tier 3 |
| Zuora Developer Sandbox | Fivetran | zuora_dev_sandbox_fivetran |
TBD |
Finance Sandbox | - | Yes | Tier 3 |
| Zuora Data Query | Airflow | zuora_query_api |
zuora_query_api |
Finance | 24h / 48h | Yes | Tier 1 |
| Zuora Revenue | Airflow | zuora_revenue |
zuora_revenue |
Finance | 24h / 48h | Yes | Tier 1 |
See the source contact spreadsheet for who to contact if there are any external errors.
| Aspect | Tier 1 | Tier 2 | Tier 3 |
|---|---|---|---|
| Description | - Trusted Data solutions that are most important and business critical. - Components needs to be available and refreshed to ensure day-by-day operation |
- Data solutions that are important and beneficial for gathering insights. - Components should be available and refreshed to supporting day-by-day operation |
- Data solutions that are important for Ad-Hoc, periodically or one-time analysis. - Components could be unavailable or data not refreshed. |
| Criteria | - Any data, process, or related service that would result in a $100k or higher business impact if unavailable for 24 hours - Affecting more than 15 business users |
- Any data, process, or related service that would result in less than $100k business impact if unavailable for 24 hours - Affecting between 5 and 15 business users |
- Any data, process or related service that would not result in a immediate business impact if unavailable for more than 5 working days - Affecting less then 5 business users |
| Impact due to outage | Severe | Lenient | Negligible |
In order to integrate new data sources into the data warehouse, specific members of the Data team will need admin-level access to data sources, both in the UI and through the API. We need this admin-level access through the API in order to pull all the data needed to build the appropriately analyses and through the UI to compare the results of prepared analyses to the UI.
Sensitive data sources can be limited to no less than 1 data engineer and 1 data analyst having access to build the require reporting. In some cases, it may only be 2 data engineers. We will likely request an additional account for the automated extraction process.
Sensitive data is locked down through the security paradigms listed below;
Service ping data ingestion, specific details should be found in the Service ping page or in the Readme.md page for Service pingRefer to the Snowplow Infrastructure page for more information on our setup.
We use Airflow on Kubernetes for our orchestration. Our specific setup/implementation can be found here. Also see the Data Infrastructure page for more information.
We currently use Snowflake as our data warehouse. The Enterprise Data Warehouse (EDW) is the single source of truth for GitLab’s corporate data, performance analytics, and enterprise-wide data such as Key Performance Indicators. The EDW supports GitLab’s data-driven initiatives by providing all teams a common platform and framework for reporting, dashboarding, and analytics. With the exception of point-to-point application integrations all current and future data projects will be driven from the EDW. As a recipient of data from a variety of GitLab source systems, the EDW will also help inform and drive Data Quality best-practices, measures, and remediation to help ensure all decisions are made using the best data possible.
In order not to extract geo data into Snowplow, the following columns were nullified:
geo_zipcodegeo_latitudegeo_longitudeuser_ipaddressThis nullified is applied in Snowplow from 2023-02-01 and the files have the same structure, just column values are set to NULL. The Data Team updated old files and set mentioned columns to NULL, and also set columns to NULL in Snowflake. This is applicable to the RAW, PREP and PROD layers in Snowflake.
As desired to avoid a duplicate load of the updated files in the S3 bucket as per Snowflake documentation, the folder structure is modified from:
- gitlab-com-snowplow-events/
    output/ <---- all files are located here
        2019/
        2020/
        2021/
        2022/
        2023/
            01/
            02/
            03/
to the new structure:
- gitlab-com-snowplow-events/
    output_nullified/ <---- all files are nullified and update
        2019/
        2020/
        2021/
        2022/
        2023/
            01/
    output/ <---- new files will land here and will be loaded by Snowpipe
        2023/
            02/
            03/
All new loads in the S3 bucket will go into the same folder as before gitlab-com-snowplow-events/output.
To get access to snowflake support portal, please follow the below steps.
Register using GitLab email id to community portal
This registration will send a welcome email to GitLab mail with the subject Welcome to the Snowflake Community. In the mail it will ask you to finish the registration as part of that you will be asked to set your password for the community portal.
Once done login again to your snowflake community account and on the home page, click submit case. For the first time, the user who do not have access to submit a case with snowflake. It will ask you to fill in the form for access.
In the form select the access for already snowflake customer. On the next page, it will ask for information Account Name, Cloud Name, and Region Name. Below is one way to pull this information from the snowflake console.
Account Name - select CURRENT_ACCOUNT();Region Name- select CURRENT_REGION();Cloud Name - Based on the region name value we can identify the cloud name.Once done you should receive the acknowledgment mail with the subject [Request received] Case# instantly. In case you don’t receive the mail resubmit the form.
Post that you will receive confirmation mail within 24 hours on your request with the subject line Case# -Self Register - Enable Case access
To gain access to Snowflake:
restricted_safe role).analyst_marketing role, only the analyst_marketing is reported and all inherited roles in the analyst_marketing are not.
Snowflake can be used to perform analyses on the data that is available by writing SQL-code. Anything created and any outcome of the analyses is considered as an ad-hoc analyses. It is important to know that anything that is created (i.e. worksheets and dashboards) is not version controlled and not supported or managed by the Central Data Team. I.e. When a team member off-boards from GitLab, the worksheets and dashboards are not accessible anymore. In order to persist analyses, team members can build Tableau workbooks, store code snippets in a GitLab project, or commit code to the Data Team’s dbt project.
In order to be granted access to Snowflake, an AR must be opened as described. A new user will be created with access to query the PROD database.
There are 2 levels of data access:
snowflake_analyst role to their account.snowflake_analyst_safe to their account. See the SAFE Guide for the needed approvals.All users will have access to dev_xs and reporting -(size M) warehouse. When creating the user, the dev_xs warehouse as default warehouse.
We use Permifrost to help manage permissions for Snowflake. Our configuration file for our Snowflake instance is stored in this roles.yml file. Also available is our handbook page on Permifrost.
We follow this general strategy for role management:
analyst_finance, data_manager, product_manager)accountadmin, securityadmin, useradmin, sysadmin) are assigned directly to usersEvery user will have their own user role that should match their user name.
Object level permissions (database, schemas, tables) in Snowflake can only be granted to roles.
Roles can be granted to users or to other roles.
We strive to have all privileges flow through the user role so that a user only has to use one role to interact with the database.
Exceptions are privileged roles such as accountadmin, securityadmin, useradmin, and sysadmin.
These roles grant higher access and should be intentionally selected when using.
Functional roles represent a group of privileges and role grants that typically map to a job family.
The major exception is the analyst roles.
There are several variants of the analyst role which map to different areas of the organization.
These include analyst_core, analyst_finance, analyst_people, and more.
Analysts are assigned to relevant roles and are explicitly granted access to the schemas they need.
Functional roles can be created at any time. It makes the most sense when there are multiple people who have very similar job families and permissions.
This list of functional roles gives a high level understanding of what the role entails. If missing or to know in all detail what a role entails check this YAML file.
| Functional Role | Description | SAFE Data Y/N |
|---|---|---|
data_team_analyst |
Access to all PROD data, sensitive marketing data, Data Platform metadata and some sources. |
Yes |
analyst_core |
Access to all PROD data and meta data in the Data Platform |
No |
analyst_engineering |
Access to all PROD data, meta data in the Data Platform and Engineering related data sources. |
Yes |
analyst_growth |
Access to all PROD data, meta data in the Data Platform and various data sources. |
Yes |
analyst_finance |
Access to all PROD data, meta data in the Data Platform and finance related data sources. |
Yes |
analyst_marketing |
Access to all PROD data, meta data in the Data Platform and marketing related data sources. |
Yes |
analyst_people |
Access to all PROD data, meta data in the Data Platform and various related data sources, including sensitive people data. |
Yes |
analyst_sales |
Access to all PROD data, meta data in the Data Platform and various related data sources |
Yes |
analytics_engineer_core |
A combination of analyst_core, data_team_analyst role with some additions |
Yes |
data_manager |
Extension access to Snowflake data | Yes |
engineer |
Extension access to Snowflake data to perform data operation tasks in Snowflake | Yes |
snowflake_analyst |
Access to PROD data in Snowflake, EDM schema and workspaces |
No |
snowflake_analyst_safe |
Access to PROD data in Snowflake, EDM schema and workspaces including SAFE data |
Yes |
Object roles are for managing access to a set of data.
Typically these represent all of the data for a given source.
The zuora object role is an example.
This role grants access to the raw Zuora data coming from Stitch, and also to the source models in the prep.zuora schema.
When a user needs access to Zuora data, granting the zuora role to that user’s user role is the easiest solution.
If for some reason access to the object role doesn’t make sense, individual privileges can be granted at the granularity of a table.
Masking Roles manage how users interact with masked data. Masking is applied at the column level and which columns are masked is the decision of the source system owner. Masking is applied to a column in a schema.yml file within the dbt code base when a data object is created via dbt. As some users will need access to unmasked data the masking role allows for permissions to the unmasked data to be granted on a functional or object role level. For example if the masking role of people_data_masking is applied to the column locality then the functional role of analyst_people can be set as a member of the people_data_masking role to allow the analysts to see unmasked people data.
When a masking policy is created, it is created based on the masking roles and only one masking policy can be applied to a column.
This is an example role hierarchy for an Data Analyst, Core:
graph LR
    A([User: datwood]) -->|Member of| B[User Role: datwood]
    B -->|Member of| C[Functional Role: analyst_core]
    C -->|Member of| D[Object Role: workday]
    C -->|Member of| H[Object Role: dbt_analytics]
    C -->|Member of| E[Object Role: netsuite]
    C -->|Member of| F[Object Role: zuora]
    G{{Privileges: analytics_sensitive}} -->|Granted to| C
This is an example role hierarchy for an Data Engineer and Account Administrator:
graph LR
    A([User: tmurphy]) -->|Member of| B[User Role: tmurphy]
    B -->|Member of| C[Functional Role: engineer]
    C -->|Member of| F[Functional Role: loader]
    C -->|Member of| H[Functional Role: transformer]
    G{{ Privileges: Read/Write Raw}} -->|Granted to| C
    A -->|Member of| D[Privileged Role: sysadmin]
    A -->|Member of| E[Privileged Role: securityadmin]
This is an example role hierarchy for a Security Operations Engineer:
graph LR
    A([User: ssichak]) -->|Member of| B[User Role: ssichak]
    A -->|Member of| C[Privileged Role: securityadmin]
Here are the proper steps for provisioning a new user and user role:
Provisioning label appliedsecurityadmin role
securityadmin ownershipuser_provision.sql script and replace the email, firstname, and lastname values in the initial blockokta-snowflake-users Google GroupHere are the proper steps for deprovisioning existing user:
Deprovisioning label applied.securityadmin role
securityadmin ownership.user_deprovision.sql script and replace the USER_NAME. The reason for not removing and leaving the user in snowflake and setting disabled = TRUE is to have a record of when the user lost access.okta-snowflake-users Google GroupFor more information, watch this recorded pairing session (must be viewed as GitLab Unfiltered).
In FY25-Q1, we are moving towards semi-automating the above Managing Roles for Snowflake process, OKR epic. This will enable all GitLab Team Members to create a Snowflake user themselves with minimal support by the Data Platform Team. This will speed up the provisioning process and shorten the time a GitLab Team member can get access to Snowflake.
All GitLab Team Members are encouraged to open a MR following this runbook if they need access to Snowflake.
High-level description of the process:
The rest of the section is meant to describe the automated process in more detail.
The main processes that have been automated are:
roles.yml which is used by Permifrost to update Snowflake role/user permissionsBoth of these processes will be made accessible via CI jobs so that the user can potentially self-serve, requiring just MR review/approval from a data engineer.
Both CI jobs follow a common pattern, the end user simply has to add/remove users from within the snowflake_usernames.yml file, and the CI job will run based on the changes to the file.
Prior to running Permifrost, the users/roles need to be first created in Snowflake.
The snowflake_provisioning_snowflake_users CI job allows the user to create these users/roles in Snowflake.
See the CI jobs page for more information on the available arguments and default values.
Once the users/roles have been created in Snowflake, roles.yml needs to be updated to reflect the desired permissions.
The snowflake_provisioning_roles_yaml CI job allows the end user to automatically update roles.yml with the desired permissions.
See the CI jobs page for more information on the available arguments and default values.
Furthermore, the next section provides additional details on optional templated arguments within snowflake_provisioning_roles_yaml CI job:
This is useful if you have many users that need a value different from the default. One option would be to run with the default values, and then manually update the MR, but depending on the number of users to update, a potentially better option is to pass in a custom values template.
The rest of the section will do two things:
roles.ymlTo illustrate how templates work, let’s start with an example. This is the default roles template:
{
  "{{ username }}": {
    "member_of": [
      "snowflake_analyst"
    ],
    "warehouses": [
      "dev_xs"
    ]
  }
}
This is valid JSON, but note that it is templated. That is, {{ username }} is a Jinja template, and the template will be later rendered to an actual value within the script.
Now, an example of when we want to override the default value above. What happens if for the next batch of users, we want them to also have dev_m warehouse?
Within the CI job, we could pass in a custom template to override the default value like so:
ROLES_TEMPLATE: {"{{username}}": {"member_of": ["snowflake_analyst"],"warehouses": ["dev_xs", "dev_m"]}}
Currently, these are the available template-able values that will be rendered:
{{ username }}{{ prod_db }}{{ prep_db }}{{ prod_schemas }}{{ prep_schemas }}{{ prod_tables }}{{ prep_tables }}This section is meant to provide custom templates (non-default values) that represent common-occurring values in roles.yml that can be copy/pasted for use.
Default: None, no databases are added
Common: CI job argument to create a personal prep/prod database for each user:
DATABASES_TEMPLATE: [{"{{ prod_database }}": {"shared": false}}, {"{{ prep_database }}": {"shared": false}}]
Default:
ROLES_TEMPLATE: {"{{ username }}": {"member_of": ["snowflake_analyst"], "warehouses": ["dev_xs"]}}
Common- CI job argument to create a role for a data engineer:
ROLES_TEMPLATE: {"{{ username }}": {"member_of": ["engineer","restricted_safe"],"warehouses": ["dev_xs","dev_m","loading","reporting"],"owns": {"databases": ["{{ prep_database }}","{{ prod_database }}"],"schemas": ["{{ prep_schemas }}","{{ prod_schemas }}"],"tables": ["{{ prep_tables }}","{{ prod_tables }}"]},"privileges": {"databases": {"read": ["{{ prep_database }}","{{ prod_database }}"],"write": ["{{ prep_database }}","{{ prod_database }}"]},"schemas": {"read": ["{{ prep_schemas }}","{{ prod_schema }}"],"write": ["{{ prep_schemas }}","{{ prod_schema }}"]},"tables": {"read": ["{{ prep_tables }}","{{ prod_tables }}"],"write": ["{{ prep_tables }}","{{ prod_tables }}"]}}}}
Default:
USERS_TEMPLATE: {"{{ username }}": {"can_login": true, "member_of": ["{{ username }}"]}}
Common: N/A. There are no other templates that we currently use for users
The snowflake_provisioning_roles_yaml CI job runs update_roles_yaml.py which updates roles.yml file.
The changes to roles.yml within the CI job are pushed back to the branch/MR.
In order to push to the repo from within the CI pipeline, a Project Access Token (PAT) is needed, more info pushing to the remote repo in this StackOverflow answer.
The PAT is named snowflake_provisioning_automation and was created in the ‘GitLab Data Team’ project, using the analyticsapi@gitlab.com account.
The PAT value is saved within 1Pass, and also as a CI environment variable so that it can be used by the GitLab runner.
When adding a user to the snowflake_users.yml file, specifically when appending to the bottom of the file, it causes unexpected behavior if done using the GitLab Single File Editor, more info in this issue.
The workaround is that at the bottom of snowflake_users.yml, it has this comment:
#### do not insert users below this line ####
Inactive Snowflake users will be deprovisioned weekly via snowflake_cleanup DAG, implemented in this issue.
All active Snowflake users/roles are declared within roles.yml. Therefore, if any users in Snowflake are missing within roles.yml, they are considered inactive and the process will drop them.
These users will be dropped by running the following deprovision_user.sql script.
This process is not exposed via CI job due to its sensitive nature and because it is less time sensitive. Therefore, a weekly ‘cleanup’ task via Airflow will be run instead.
The permifrost_bot_user is used to run both Snowflake provisioning and deprovisioning processes. This is for 2 reasons:
permifrost_bot_user already has the proper permissions to run provisioning/deprovisioning as the same perms are needed to run existing Permifrost jobs.permifrost_bot_user already runs existing Permifrost jobs using both Airflow and Gitlab CI, so the applied NSP IP addresses will not be redundant when added for both provisioning (run via CI) /deprovisioning (run via Airflow).Provisioning USAGE permissions for external tables to user roles inside snowflake is not handled by permifrost in the moment. If you have to provision access for an external table to a user role, then it must be granted manually via GRANT command in snowflakedocs using a securityadmin role. This implies that the user role already has access to the schema and the db in which the external table is located, if not add them to the roles.yml.
When you apply for a Snowflake account via an AR and get access provisioned it takes until 3.00AM UTC for the change to take effect. This is because we have a script running daily to provision the access in Snowflake. When you can login, you can do this via Okta. After you logged in via Okta, you need to select the right role that is attached to your account. This is by default the same as your account and it follows the convention of your email addres minus @gitlab.com.
When you don’t select the right role in Snowflake, you only see the following Snowflake objects:
Selecting the right role can be done via the GUI. When in Snowsight home screen, in the up left corner.
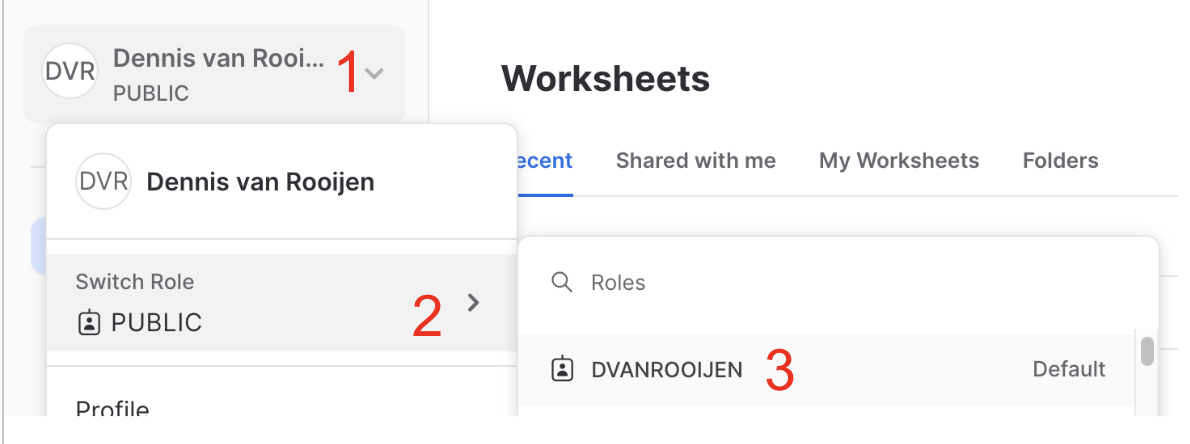
When in Snowsight in a worksheet, in the up right corner.

publicYou can set this to your default by running the following:
ALTER USER <YOUR_USER_NAME> SET DEFAULT_ROLE = '<YOUR_ROLE>'
Compute resources in Snowflake are known as “warehouses”.
To use our credit consumption effectively, we try to minimize the amount of warehouses. For development purposes (executing dbt jobs locally, running MR pipelines and querying in Snowflake) we use the dev_x warehouse. The names of the warehouse are appended with their size (dev_xs for extra small).
| warehouse | purpose | max query (minutes) |
|---|---|---|
admin |
This is for permission bot and other admin tasks | 10 |
dev_xs/m/l/xl |
This is used for development purposes, to be used when using the Snowflake UI and in CI-pipelines | 180 |
gainsight_xs |
This is used for gainsight data pump | 30 |
gitlab_postgres |
This is for extraction jobs that pull from GitLab internal Postgres databases | 10 |
grafana |
This is exclusively for Grafana to use | 60 |
loading |
This is for our Extract and Load jobs and testing new Meltano loaders | 120 |
reporting |
This is for the BI tool for querying. | 30* |
transforming_xs |
These are for production dbt jobs | 180 |
transforming_s |
These are for production dbt jobs | 180 |
transforming_l |
These are for production dbt jobs | 240 |
transforming_xl |
These are for production dbt jobs | 180 |
transforming_2xl |
For refreshing Snowplow models | 120 |
transforming_4xl |
This is for the Airflow dag: dbt_full_refresh |
120 |
usage_ping |
This is used for the service_ping and service_ping_backfill load. | 120 |
If you’re running into query time limits please check your query for optimisation. A bad performing query in development will result in a bad performing query in production, having impact on a daily basis. Please always use the right (size) warehouse. Ground rules of using/selecting a warehouse:
Warehouses are set as t-shirt sizes. Larger warehouses are more costly for GitLab
Consider using a running warehouse
The query timeout in Snowflake is set to 30 minutes for the REPORTING warehouse.
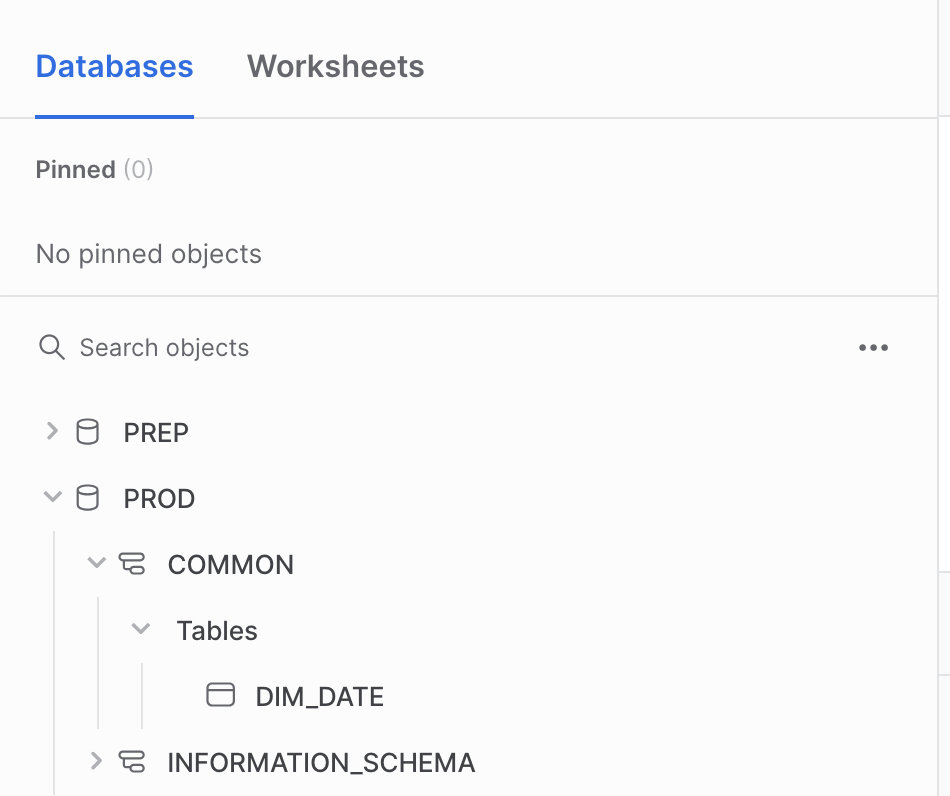
We use three primary databases: raw, prep, and prod.
The raw database is where data is first loaded into Snowflake; the other databases are for data that is ready for analysis (or getting there).
prep and prod are controlled (created, updated) via dbt. Every Quarter the Data Platform Team runs a check for tables and views that are not related to a dbt model and will be removed.
The following list of schema are exceptions and not checked:
SNOWPLOW_%DOTCOM_USAGE_EVENTS_%INFORMATION_SCHEMABONEYARDTDFCONTAINER_REGISTRYFULL_TABLE_CLONESQUALTRICS_MAILING_LISTNETSUITE_FIVETRANThere is a snowflake database, which contains information about the entire GitLab instance.
This includes all tables, views, queries, users, etc.
There is a covid19 database, which is a shared database managed through the Snowflake Data Exchange.
There is a testing_db database, which is used for testing Permifrost.
There is a bi_tool_eval database, which is used for testing bi tooling. Users are able create own testing sets manually.
All databases not defined in our roles.yml Permifrost file are removed on a weekly basis.
| Database | Suitable to use in Tableau |
|---|---|
| raw | No |
| prep | No |
| prod | Yes |
Only the prod database should be used in Tableau as this data has been transformed and modeled for business use. Using raw and prep databases in Tableau could result in incorrect data and or broken queries/dashboards now or in the future. Important to keep in mind that data transformations are checked and tested only for the prod database results. This means if dashboards are directly connected to the raw or prep database it could break or report wrong data.
No dbt models exist for this data and so it may be the case that the data needs review or transformation in order to be useful or accurate. This review, documentation, and transformation all happens downstream in dbt for PREP and PROD. This database should not be used in Tableau.
This is the first layer of verification and transformation in the warehouse, but is not yet ready for general business use. This database should not be used in Tableau.
sfdc, zuora)This database and all schemas and tables in it are queryable by Tableau. This data has been transformed and modeled for business use.
With the exception of public, and boneyard, all schemas are controlled by dbt.
See the dbt guide for more information.
The table below shows a mapping of how models stored within folders in the models/ directory in the analytics project will be materialized in the data warehouse.
The source of truth for this is in the dbt_project.yml configuration file.
| Folder in snowflake-dbt/models/ | db.schema | Details | Queryable in Tableau |
|---|---|---|---|
| common/ | prod.common | Top-level folder for facts and dimensions. Do not put models here. | Yes |
| common/bridge | prod.common | Sub-folder for creating many-to-many mappings between data that come from different sources. | Yes |
| common/dimensions_local | prod.common | Sub-folder with directories containing dimensions for each analysis area. | Yes |
| common/dimensions_shared | prod.common | Sub-folder with dimensions that relate to every analysis area. | Yes |
| common/facts_financial | prod.common | Sub-folder with facts for the financial analysis area. | Yes |
| common/facts_product_and_engineering | prod.common | Sub-folder with facts for the product and engineering analysis area. | Yes |
| common/facts_sales_and_marketing | prod.common | Sub-folder with facts for the sales and marketing analysis area. | Yes |
| common/sensitive/ | prep.sensitive | Facts/dims that contain sensitive data. | No |
| common_mapping/ | prod.common_mapping | Used for creating one-to-one mappings between data that come from different sources. | Yes |
| common_mart/ | prod.common_mart | Joined dims and facts that are relevant to all analysis areas. | Yes |
| common_mart_finance/ | prod.common_mart | Joined dims and facts that are relevant to finance. | Yes |
| common_mart_marketing/ | prod.common_mart | Joined dims and facts that are relevant to marketing. | Yes |
| common_mart_product/ | prod.common_mart | Joined dims and facts that are relevant to product. | Yes |
| common_mart_sales/ | prod.common_mart | Joined dims and facts that are relevant to sales. | Yes |
| common_prep/ | prod.common_prep | Preparation tables for mapping, bridge, dims, and facts. | Yes |
| marts/ | varies | Contains mart-level data and data pumps that send data to third party sources. | Yes |
| legacy/ | prod.legacy | Contains models built in a non-dimensional manner | Yes |
| sources/ | prep.source |
Contains source models. Schema is based on data source | No |
| workspaces/ | prod.workspace_workspace |
Contains workspace models that aren’t subject to SQL or dbt standards. | Yes |
| common/restricted | prod.restricted_domain_common |
Top-level folder for restricted facts and dimensions. Equivalent of the regular common schema, but for restricted data. | Yes |
| common_mapping/resticted | prod.restricted_domain_common_mapping |
Contains restricted mapping, bridge, or look-up tables. Equivelement of regular common mapping schema, but for restricted data. | Yes |
| marts/restricted | prod.restricted_domaincommonmarts |
Yes | |
| legacy/restricted | prod.restricted_domain_legacy |
Contains restricted models built in a non-dimensional manner. Equivalent of the normal legacy schema, but for restricted data. | Yes |
For data warehouse use cases that require us to store data for our users without updating it automatically with dbt we use the STATIC database. This also allows for analysts and other users to create their own data resources (tables, views, temporary tables). There is a sensitive schema for sensitive data within the static database. If your use case for static requires the use or storage of sensitive data please create an issue for the data engineers.
Scenario’s we have been using the STATIC database:
A request comes in to upload a set of data into one of our data sources. This set of data is going to be uploaded once and never updated again.
In this case we have created a new table in the STATIC database and loaded the data there via BULK UPLOAD / COPY command. Then this model has been exposed to the PREP layer. The final model reads from this table via a UNION statement.
This way we have the data in the STATIC database and even if we perform a full-refresh of the data source, we will be able to include this manually uploaded set of records.
Examples of this implementation can be found below:
We use data masking obfuscate private or sensitive information with our data warehouse. Masking can be applied in a dynamic or static manner depending on the particular data needs. Masking can be applied at the request of the data source system owner or at discretion of the Data Team. As our current data masking methods are applied procedurally using dbt they can only be applied in the PREP and PROD database. If masking is required in the RAW database alternant methods of masking should be investigated.
Static data masking is applied during the transformation of the data and the masked result is materialized into the table or view. This will mask the data for all users regardless of role or access permission. This is accomplished in the code with tools such as the hash_sensitive_columns macro within dbt.
Dynamic masking is currently applied on tables or views in the prep and prod layer at query run time based on assigned policies and user roles using the Dynamic Data Masking capabilities of Snowflake. Dynamic masking allows for data to be unmasked for selected users wile masked for all other users. This is accomplished by creating masking policies that are then applied to the column at the time of table or view creation. Masking policies are maintained within the data warehouse source code repository. Please see the dbt guide to setup dynamic masking.
Note: Dynamic masking is not applied on raw database yet.
All timestamp data in the warehouse should be stored in UTC. The default timezone for a Snowflake sessions is PT, but we have overridden this so that UTC is the default. This means that when current_timestamp() is queried, the result is returned in UTC.
Stitch explicitly converts timestamps to UTC. Fivetran does this as well (confirmed via support chat).
The only exception to this rule is the use of pacific time to create date_id in fact tables, which should always be created by the get_date_pt_id dbt macro and labeled with the _pt_id suffix.
We use the term snapshots in multiple places throughout the data team handbook and the term can be confusing depending on the context. Snapshots as defined by the dictionary is “a record of the contents of a storage location or data file at a given time”. We strive to use this definition whenever we use the word.
The most common usage is in reference to dbt snapshots. When dbt snapshots is run, it takes the current state of the source data and updates the corresponding snapshot table, which is a table that contains the full history of the source table. It has valid_to and valid_from fields indicating the time period for which that particular snapshot is valid. See the dbt snapshots section in our dbt guide for more technical information.
The tables generated and maintained by dbt snapshots are the raw historical snapshot tables. We will build downstream models on top of these raw historical snapshots for further querying. The snapshots folder is where we store the dbt models. One common model we may build is one that generate a single entry (i.e. a single snapshot) for a given day; this is useful when there are multiple snapshots taken in a 24 hour period. We also will build models to return the most current snapshot from the raw historical table.
Our Greenhouse data can be thought of as a snapshot. We get a daily database dump provided by Greenhouse that we load into Snowflake. If we start taking dbt snapshots of these tables then we would be creating historical snapshots of the Greenhouse data.
The extracts we do for some yaml files can also be thought of as snapshots. This extraction works by taking the full file/table and storing it in its own, timestamped row in the warehouse. This means we have historical snapshots for these files/tables but these are not the same kind of snapshot as dbt. We’d have to do additional transformations to get the same valid_to and valid_from behavior.
valid_to. For yaml extracts this correspond to the last time the extraction job was run. For Greenhouse raw, this represents the data as it is in the warehouse. Were we to start taking snapshots of the Greenhouse data the speaker would have to clarify if they mean the raw table or the latest record in the historical snapshots table.The scope of data backups at Data Platform level is to ensure data continuity and availability for reporting and analytics purposes. In case of an unforeseen circumstance happening with our data in Snowflake or with our Snowflake platform, the GitLab data team is able to recover and restore data to the desired state. In our backup policy we tried to find a balance between the risk of an unforeseen event and the impact of the mitigated solution.
Note: the (Snowflake) Data Platform doesn’t act as a data archival solution for upstream source systems i.e. for compliance reasons. The Data Platform relies on data that was and is made available in upstream source systems.
We’ve identified currently 2 types of unforeseen circumstances:
This can be data manipulation action done by a GitLab Team member or by services with access to the data in Snowflake. Some examples are accidentally dropping/truncating a table or running incorrect logic in a transformation.
The vast majority of data in snowflake is copied or derived from copies of our data sources, which is all managed idempotently with dbt and so the most common procedure for data restoration or recovery is through recreating or refreshing objects using dbt Full Refresh. For data in the RAW database, which comes from our extraction pipelines we follow the appropriate Data refresh procedure.
However, there are some exceptions to this. Any data in snowflake which is not a result of idempotent processes or that cannot be refreshed in a practical amount of time should be backed up. For this we use Snowflake Time travel. Which includes:
The data retention period is set via dbt This should be implemented in code via a dbt post-hook example.
The following set of rules and guidelines applies to backing up data/using time travel:
At the moment the following snowflake objects are considered in scope for Time Travel recovery:
RAW.SNAPSHOTS.*Once a table is permanent with a retention period we are able to use Time Travel (internal runbook) in the event we need to recover one of these tables.
For the unlikely event that Snowflake becomes unavailable for an undetermined amount of time, we additionally backup the any business critical data, where Snowflake is the primary source, to Google Cloud Storage (GCS). We execute these backup jobs using dbt’s run-operation capabilities. Currently, we backup all of our snapshots daily and retain them for a period of 60 days (per GCS retention policy). If a table should be added to this GCS backup procedure it should be added via the backup manifest.
In order to keep Snowflake up and running, we perform administrative work.
In order for Snowflake to access the files in the storage bucket (i.e GCS, S3), the files must be copied into a Snowflake external stage.
To create the external stage, the new path to the bucket must be included (included means appended to the existing list of storage locations) in the STORAGE_ALLOWED_LOCATIONS attribute. If it is not appended, but overwritten to the existing attributes, all existing storage locations will be erased and stop many pipelines to run. Follow these instructions to append the new external stage:
use role ACCOUNTADMIN, if you don’t have access to this role, you cannot proceed
get all current storage locations by running this:
DESC INTEGRATION GCS_INTEGRATION;
From the output, copy the value under property_value where property=STORAGE_ALLOWED_LOCATIONS. It will look something like: gcs://postgres_pipeline/,gcs://snowflake_backups,...
Update the Storage Integration, instructions:
take the ‘current_paths’ that you just copied and combine it with the ’new_path’ that you want to add.
,'', These need to be added manuallyALTER statement template:
ALTER STORAGE INTEGRATION GCS_INTEGRATION
SET STORAGE_ALLOWED_LOCATIONS = ('current_path1','current_path2','new_path');
ALTER statement example:
ALTER STORAGE INTEGRATION GCS_INTEGRATION
SET STORAGE_ALLOWED_LOCATIONS= ('gcs://postgres_pipeline/','gcs://snowflake_backups','gcs://snowflake_exports');
After you run the ALTER statement, the new stage can now be created, like so:
CREATE STAGE "RAW"."PTO".pto_load
STORAGE_INTEGRATION = GCS_INTEGRATION URL = 'bucket location';
We use dbt for all of our transformations. See our dbt guide for more details on why and how we use this tool.
Data Customers expect Data Teams to provide data they can trust to make their important decisions. And Data Teams need to be confident in the quality of data they deliver. But this is a hard problem to solve: the Enterprise Data Platform is complex and involves multiple stages of data processing and transformation, with tens to hundreds of developers and end-users actively changing and querying data 24 hours a day. The Trusted Data Framework (TDF) supports these quality and trust needs by defining a standard framework for data testing and monitoring across data processing stages, accessible by technical teams and business teams. Implemented as a stand-alone module separate from existing data processing technology, the TDF fulfills the need for an independent data monitoring solution.
The primary elements of the TDF include:
The TDF embraces business users as the most important participant in establishing trusted data and uses a simple and accessible testing model. With SQL and YAML as a test agent, a broad group of people can contribute test cases. The test format is straightforward with simple PASS/FAIL results and just four test case types. Adoption grows quickly as TDF demonstrates value:
Over time, it is not uncommon to develop hundreds of tests cases which are run on a daily basis, continually validating data quality.
SQL is the universal language in databases and nearly everyone who works with data has some level of SQL competency. However, not everyone may be familiar with SQL and we don’t want that to limit who can contribute. We use dbt to support the TDF which enables the defining of tests via SQL and YAML.
With all tests being run via dbt, storing tests results is simple. We store the results of every test run in the data warehouse. Storing test results enables a variety of valuable features, including:
These test results are parsed and are available for querying in Tableau.
The schema we store all test results is: WORKSPACE_DATA.
Note: This schema only containts views.
The Data Warehouse environment can change quickly and the TDF supports predictability, stability, and quality with test coverage of the areas in the Data Warehouse that are most likely to change:
The implementation details of these tests are documented in our dbt guide.
The data team is working on either a dashboard or the use of collections to organize trusted data dashboards as well as published Tableau Data Sources which as certified as trusted data.
More to come.
The row count tests reconciles the amount of rows between source database and target database by extracting data from source DB tables and load into Snowflake table and extract similar stats from Snowflake and perform comparison between source and target. Their is a challenge to have an exact match between source and target, because;
Depending on the scenario, its advisable to check the row count not on the highest (table) level, but check the row counts on a lower granular level. This could be one or more fields with a logical distribution, but still on a aggregated level. An example could be an insert or update date in a table.
Based on the row counts from source and row counts on the target (Snowflake data warehouse), a reconciliation can take place to determine if all rows are loaded into the data warehouse.
The framework is designed to handle execution of any kind of query to perform the test. As per the current architecture every query will create one Kubernetes pod, so grouping into one query reduces creation of the number of Kubernetes pods. For record count and data actual test between postgres DB and snowflake the approach followed is grouping low volume source tables together and large volume source tables run as an individual task.
A new yaml file is created which is supposed to do all types of reconciliation (so its not incorporated in the existing yaml extraction manifest). Manifest file combines a group of low volume tables together and a large volume table as individual tasks. Row count test comparisons from Postgres and snowflake are stored in a snowflake table named “PROD”.“WORKSPACE_DATA”.“PGP_SNOWFLAKE_COUNTS”.
graph LR

yml>pumps.yml]

dataModel[(data model)] --> o{{Airflow DAG}}

yml --> o
o --> S3

S3 --> workato{{Workato recipe}} --> target[(Target)]
In order to make it easy for anyone to send data from Snowflake to other applications in the GitLab tech stack we have partnered with the Enterprise Applications Integration Engineering team to create this data integration framework, which we are calling Data Pump.
This is all orchestrated in the Data Pump Airflow DAG, which runs the pump, and is set to run once daily at 05:00 UTC.
Step 1: Create a data model using dbt in /marts/pumps (or /marts/pumps_sensitive if the model contains RED or ORANGE Data), following our SQL and dbt style and documentation standards. Create an MR using dbt model changes template. Once this is merged and appears in Snowflake in PROD.PUMPS or PROD.PUMPS_SENSITIVE you are ready for steps two and three.
Step 2: Add Model to pumps.yml using the ‘Pump Changes’ MR template with the following attributes:
null if there is none and the table is small)True if this model contains sensitive data and is in the pumps_sensitive directory and schemaTrue if you want to create a single file in the target location. False if multiple files can be writtenStep 3: Create an issue in the platypus project using the ‘change’ issue template so that the Integration team can map and integrate the data into the target application.
| Model | Target system | RF | MNPI |
|---|---|---|---|
| pump_hash_marketing_contact | Marketo | 24h | No |
| pump_marketing_contact | Marketo | 24h | No |
| pump_marketing_premium_to_ultimate | Marketo | 24h | No |
| pump_subscription_product_usage | Salesforce | 24h | No |
| pump_product_usage_free_user_metrics_monthly | Salesforce | 24h | No |
| pump_daily_data_science_scores | Salesforce | 24h | Yes |
| pump_churn_forecasting_scores | Salesforce | 24h | Yes |
The Daily Data Science Scores Pump and the Pump Churn Forecasting Scores Pump are two specific use-cases of the data pump, used to bring data science related data from Snowflake into S3, so that it can be picked up by Openprise and loaded into Salesforce.
The source model for the Daily Data Science Scores pump called mart_crm_account_id contains a combination of PtE and PtC scores, while the Churn Forecasting Scores pump source model mart_crm_subscription_id contains scores strictly related to the Churn Forecasting model.
The Email Data Mart is designed to automatically power updates to Marketo to enable creation of structured and targeted communications.
The Data Model to Gainsight Pump is designed to automatically power updates to Gainsight to enable creation of visualizations, action plans, and strategies for Customer Success to help our customers succeed in their use of GitLab.
The Qualtrics mailing list data pump process, also known in code as Qualtrics SheetLoad, enables emails to be uploaded to Qualtrics from the data warehouse without having to be downloaded onto a team member’s machine first. This process shares its name with SheetLoad because it looks through Google Sheets for files with names starting with qualtrics_mailing_list. For each of the files it finds with an id column as the first column, it uploads that file to Snowflake. The resulting table is then joined with the GitLab user table to retrieve email addresses. The result is then uploaded to Qualtrics as a new mailing list.
During the process, the Google Sheet is updated to reflect the process’ status. The first column’s name is set to processing when the process begins, and then is set to processed when the mailing list and contacts have been uploaded to Qualtrics. Changing the column name informs the requester of the process’ status, assists in debugging, and ensures that a mailing list is only created once for each spreadsheet.
The end user experience is described on the UX Qualtrics page.
Attempting to reprocess a spreadsheet should usually be the first course of action when a spreadsheet has an error and there is no apparent issue with the request file itself. Reprocessing has been necessary in the past when new GitLab plan names have been added to the gitlab_api_formatted_contacts dbt model, as well as when the Airflow task hangs when processing a file. This process should only be performed with coordination or under request from the owner of the spreadsheet, to ensure that they are not using any partial mailing list created by the process, as well as not making any additional changes to the spreadsheet.
To reprocess a Qualtrics Mailing List request file:
1. Disable the Qualtrics Sheetload DAG in Airflow.
2. Delete any mailing lists in Qualtrics that have been created from the erroring spreadsheet. You should be able to log into Qualtrics using the Qualtrics - API user credentials and delete the mailing list. The mailing list’s name corresponds to the name of the spreadsheet file after qualtrics_mailing_list., which should also be the same as the name of the tab in the spreadsheet file.
3. Edit cell A1 of the erroring file to be id.
4. Enable the Qualtrics Sheetload DAG in Airflow again and let it run, closely monitoring the Airflow task log.
A Data Spigot is a concept/methodology to give external systems, access to Snowflake data in a controlled manner. To give external systems access to Snowflake, the following controls are in place:
The process for setting up a new Data Spigot is as follows:
| Connected system | Data scope | Database table/view | MNPI |
|---|---|---|---|
| Grafana | Snowplow loading times | prod.legacy.snowplow_page_views_all_grafana_spigot |
No |
| Gainsight | prod.common_prep.prep_usage_ping_no_license_key |
No | |
| Gainsight | prod.common_mart_product.mart_product_usage_wave_1_3_metrics_latest |
No | |
| Gainsight | prod.common_mart_product.mart_product_usage_wave_1_3_metrics_monthly |
No | |
| Gainsight | prod.common_mart_product.mart_product_usage_wave_1_3_metrics_monthly_diff |
No | |
| Gainsight | prod.common_mart_product.mart_saas_product_usage_metrics_monthly |
No | |
| Gainsight | prod.common_mart_product.mart_product_usage_paid_user_metrics_monthly |
No | |
| Gainsight | prod.common_mart_product.mart_product_usage_free_user_metrics_monthly |
No | |
| Gainsight | prod.restricted_safe_common_mart_sales.mart_arr |
Yes | |
| Salesforce | Snowflake API | mart_product_usage_paid_user_metrics_monthly, mart_product_usage_paid_user_metrics_monthly_report_view |
No |
| Zapier | t.b.d. | prod.workspace_customer_success.mart_product_usage_health_score |
No |
Sales Systems Use-Case: Using the Snowflake API
We use Tableau as our Data Visualization and Business Intelligence tool. To request access, please follow submit an access request. Use the template Tableau_Rquest for Tableau access requests.
Per GitLab’s password policy, we rotate service accounts that authenticate only via passwords every 90 days. A record of systems changed and where those passwords were updated is kept in this Google Sheet.
We also rotate Snowflake user passwords the first Sunday of every 3rd month of the year (January, April, July, October) via the Snowflake Password Reset DAG.
The data team is responsible for provisioning users within the tools managed by the Data Team. This includes tools like Tableau, MonteCarlo, Fivetran, Stitch, and Snowflake.
For Snowflake, we have a robust process documented in the Snowflake Permissions Paradigm section of this page.
For other tools, add users via the UI and in the appropriate Google Group if one exists.
A new user in Stitch should by default be added to the General role. This role gives sufficient access to Stitch to create new, change existing and troubleshoot running extractions.
Much like Google Drive all GitLab team members have access to Google’s Data Studio which can be used to build dashboards with data from Google Sheets or other Google data sources. Hence there is no access request needed to get access provisioned to Google Data Studio. Google Data Studio is especially popular with Marketing with their use of Google Analytics. Though this resides outside of the platform described above, any data managed within Google’s Data Studio must adhere to the same Data Categorization and Management Policies as we do in the rest of our platform.
There are 3 types of objects available in Google Data Studio:
The sharing and access process in Data Studio is comparable to sharing in Google Drive / Google Docs. Google Studio Objects can be shared with individuals in our GitLab organization account or with the Organization as a whole. There are no group or role level permissions available. Given the decentralized quality of managing dashboards and data sources in Data studio it is advised that business critical data and reporting be eventually migrated to Snowflake and Tableau. This is made easy with the use of sheetload or FiveTran, which has a BigQuery connector.
A GitLab Team Member that creates any artifacts in Google Studio owns the owner permissions of that particular object. With the ownership the GitLab Team Member holds responsibility to keep data SAFE within GitLab and outside the organization. Google Data Studio currently doesn’t provide an admin interface that can take over the ownership. Upon off-boarding any ownership of existing objects should be carried over to ensure business continuity by the respective object owner. Note that Red Data should never be stored or transmitted within Google Data Studio.
The Sales Analytics have a couple (but expanding) list of regular update processes that will benefit from being able to be run automatically without human intervention.
Some of those are:
Snowflake.For this, we have implemented a solution consisting of multiple Airflow dags, per schedule.
As of right now (subject to further iterations and changes), the steps are the following:
A Sales Analyst works on a Python Notebook (example notebook) and makes it ready for production (making sure the cell execution results are cleared, no local variables/secrets are laying around etc.)
The Sales Analyst uploads the notebook and its respective query in the corresponding folder, depending on what schedule the notebook should run on. The available schedules (and therefore folders) under https://gitlab.com/gitlab-data/analytics/-/tree/master/sales_analytics_notebooks are:
This has been implemented by creating 4 main DAGs (one per schedule) consisting of as many tasks as there are notebooks for that schedule. New tasks are dynamically added to the DAG as notebooks are committed to the repository.
The code for the dags can be found in the Sales Analytics Dags in the gitlab-data/analytics project.
Currently, under the /daily/ notebooks we have one sample notebook and its corresponding query.
This notebook runs daily and the scores produced during execution are loaded into Snowflake in the RAW.SALES_ANALYTICS schema.
For this data to be available on Tableau, dbt models will have to be written to expose them as views in the production database, under the PROD.WORKSPACE_SALES schema.
For that the Sales Analyst can either open an MR directly into the gitlab-data/analytics project, or create an issue on this project and a data platform engineer will implement the necessary dbt models.
In order to change the desired day of the week/time of these schedules, the Sales Analyst can open an issue on the gitlab-data/analytics project.
Dag failure alerts are sent from Airflow to the #sales-analytics-pipelines, so the Sales Analysts can monitor errors with the notebooks
If the errors seem to be platform-related, the Sales Analyst can reach out to the data platform engineers either via Slack (via the #data-engineering channel), or by opening an issue on the gitlab-data/analytics project
A couple of new functions have been added to the Gitlabdata library (Link to PyPi, Link to the source code) to allow reading from and writing to GSheets files.
The function is called read_from_gsheets(link to function source code) and it accepts a spreadsheet_id and a sheet_name as parameters, it returns a dataframe.
⚠️ The specific sheet should be shared with the relevant
gCloud SERVICE ACCOUNTuser’s email account (See System Set Up).
The function is called write_to_gsheets(link to function source code) and it accepts a spreadsheet_id, a sheet_name and a dataframe as parameters.
⚠️ The specific sheet should be shared with the relevant
gCloud SERVICE ACCOUNTuser’s email account (See System Set Up).
For production use-cases, a service user has been provided and the credentials are stored in the Data Team Secure Vault under GCP Service Account for Exporting to GSheets.
⚠️ The specific sheet should be shared with the service account user’s email (
data-team-sheets-sa@gitlab-analysis.iam.gserviceaccount.com) prior to calling this function, otherwise the account won’t be able to write to or read from the sheet.
For local development, you need to set the GSHEETS_SERVICE_ACCOUNT_CREDENTIALS environment variable with the value of your team’s gCloud SERVICE ACCOUNT Credential (The actual JSON content should be the value of this environment variable, not the path.)
This can be done by running the following command in the terminal of your choice: export GSHEETS_SERVICE_ACCOUNT_CREDENTIALS = 'JSON_CREDENTIAL_CONTENTS'
To maintain our high standard in security and avoid any potential breaches, it is required that each team requests and manages their own gCloud SERVICE ACCOUNT.
The GCP team can support with the creation of the user / GCP project. Here is an example of the issue to create the Service Account for the Revenue Strategy and Analytics team.
The gCloud SERVICE ACCOUNT requires Google Workspace Delegated Admin permissions.
⚠️ The specific sheet should be shared with the
gCloud SERVICE ACCOUNTuser’s email prior to calling this function, otherwise the account won’t be able to write to or read from the sheet.
The Sales Systems team needs to run the same query several times per day against Snowflake and load that data into Salesforce.
The data team provided an API user so the Sales Analytics team can automate this process, instead of manually downloading the data and uploading it into Salesforce. More detail on this use-case can be found in the original issue #15456.
The data pulled from the database is encapsulated in a view that strictly exposes only the requested data and the sales systems team will be querying this view directly via the Snowflake API.
A new role was created specifically, called SALES_SYSTEMS_SNOWFLAKE_API_ROLE for this use-case on Snowflake and it has been configured to only have read access on the underlying view.
The Snowflake API user has been created following the steps in the official Snowflake documentation on Using Key Pair Authentication and the credential is stored in our Data Team Secure vault and is to be shared with the Sales Systems team.
We created a runbook with a step-by-step guide on how to create the user and role for this purpose - link to the Snowflake API User runbook.
Exceptions to this standard will be tracked as per the Information Security Policy Exception Management Process.
The platform infrastructure.
3b6873bb)
