Practical Handbook Editing Tips
This page contains instructions, tips, and historical recordings for non-technical team members on how to work handbook-first.
Content on this page is to provide additional tips as a supplement to the editing handbook page. Please keep the basics of how to edit the handbook, including how to get help on the editing handbook page.
Before you begin in command line
Some tips may require terminal shell access on macOS/Linux. Ensure that your environment is working and that you have cloned the public handbook repository for example.
git clone https://gitlab.com/gitlab-com/content-sites/handbook.git
Sync it. Ensure that you stash away local changed not yet committed.
cd handbook
git stash
git checkout main
git pull
On macOS it is advised to use Homebrew and install the GNU tools. See this blogpost for a macOS setup.
brew install gnu-sed
Find files
One of the shell tools provided with macOS/Linux GNU is find. Open a terminal an run the following command in the main directory of the www-gitlab-com repository to get a list of all *.md files. This matches .md as suffix.
find . -type f -name '*.md'
Instead of the . you can also use a directory in the current path.
find source/handbook -type f -name '*.md'
The type f specifies files, d matches for directories. When not specified, all files and directories are taken into account.
You can replace -name with -regex to do more sensitive matching, for example to match all .md and .md.erb files.
find . -type f -regex '.*\.md[.erb]*'
This can be useful to check whether a blog post was merged to master:
git checkout master
git pull
find . -type f -name '*blogpost-filename*'
Find files and perform an action
This comes in handy when you want to print all matches with a prefix, or perform additional replace actions. The main principle is to follow the matching rules explained above, and add the -exec parameter.
The exec action should start a shell and execute a command in there. sh -c '' \; takes care of this for every file that matches. Imagine this as a loop of sequential steps to perform the action. The last missing bit is accessing the file in the current loop iteration. This is done via the {} marker inside the echo example printing the output.
Run the command in a terminal to see how it works:
find source/handbook/marketing -type f -name '*.md' -exec sh -c 'echo "Matched {}"' \;
Replace strings in a file
The GNU sed shell command is useful to replace a defined string in a file. The -i flag specifies to do that inline in the same file. The g flag defines a global match, replacing all pattern matches.
sed -i 's/<searchtext>/<replacementtext>/g' file.md
On macOS, ensure that the gnu-sed package is installed, and run gsed (instead of sed).
gsed -i 's/<searchtext>/<replacementtext>/g' file.md
With using the / separator, it is necessary to escape all / characters in the string. You can avoid this by choosing another separator, for example ,:
gsed -i 's,<searchtext>,<replacementtext>,g' file.md
How to Find and Replace Content
<div style="position: relative; padding-bottom: 56.25%; height: 0; overflow: hidden;">
  <iframe allow="accelerometer; autoplay; clipboard-write; encrypted-media; gyroscope; picture-in-picture; web-share" allowfullscreen="allowfullscreen" loading="eager" referrerpolicy="strict-origin-when-cross-origin" src="https://www.youtube.com/embed/lWBkNqxPxw8?autoplay=0&controls=1&end=0&loop=0&mute=0&start=0" style="position: absolute; top: 0; left: 0; width: 100%; height: 100%; border:0;" title="How to Find and Replace Content in the Handbook using Terminal and a Code Editor"
  ></iframe>
</div>
There are times when you need to find every instance of a word, phrase or link and searching in the handbook online search field is too cumbersome or does not return accurate results. With an code editor and your terminal, you can find and replace content easily and quickly.
Terminal
- Navigate to the appropriate project. If you’ve cloned the project to your root directory, try
cd www-gitlab-com git checkout mastergit pullorgit pull origin master(This brings in the most recent changes from master to your local machine.)git checkout -b MYBRANCH(ReplaceMYBRANCHwith the name of the branch you will be using for your merge request.)- Keep your Terminal window open, and now open your code editor (in this example, Visual Studio Code).
Visual Studio Code
-
Go to the Search section (View -> Search).
-
Type in the word, phrase or link you are searching for.
-
Type in the word, phrase or link you wish to replace it with in the Replace field, under the Search field.
-
Press the Replace All symbol at the end of the Replace field (or Option-Command-Enter).
-
You will get a pop-up asking you to confirm that you indeed with to
Replace X occurence(s) accross X files with X ?. If correct, pressReplace. Please note that it is possible to click on a search result to see individual changes and replace only a subset of all occurrences by clicking the replace button next to a given search result only.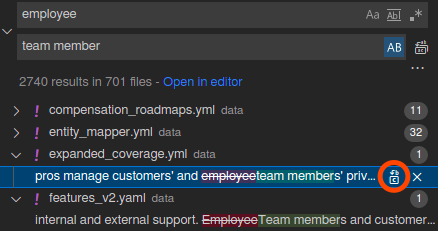
-
Return to your Terminal.
Terminal
git add .(This will add all your current changes from VS Code.)git commit -m "Title of your MR"(Ex."Update #peopleops Slack Channel to #people-connect"and be sure to enter your Title within quotation marks.)git push- You will get a message in terminal saying
To push the current branch and set the remote as upstream, useand then there will be a sentence starting withgit push. Copy and paste this sentence to your most current, active Terminal line, which ends in %. - You will see a line in Terminal containing
remote: https://gitlab.com/ ..... Cut and paste the link starting with https:// to your browser. This will take you to your Create Merge Request page. Now you can continue in your browser as you would when creating a MR in Web IDE. git checkout master(This will put you back on master in your Terminal.)
Find and Replace a String in all (Matching) Files
Please see the following suggestions for doing a bulk find and replace.
If you rename a file/URL in one of the handbook repositories, please add a redirect using an alias.
If you rename a file/URL in the www-gitlab-com repository, please remember to add a redirect to redirects.yml by following this process.
Using a terminal
Sometimes a project, URL target or Slack channel is being renamed. You can easily search and edit with the Web IDE on GitLab.com but for other files there is a quick and automated way required.
This method combines the find, exec and sed tips explained above. The exec action is now to use sed to perform an inline replacement of a pattern/string.
The following example is used in this MR for updating the Corporate Marketing project URL in all files.
git checkout master
git pull origin master

git checkout -b handbook/corp-mktg-project-url

find source/handbook -type f -exec sh -c 'gsed -i "s,https://gitlab.com/gitlab-com/marketing/corporate-marketing,https://gitlab.com/gitlab-com/marketing/corporate_marketing/corporate-marketing,g" "{}"' \;

git status
git diff

git commit -av -m "Handbook: Update corporate marketing project URL"

git push -u origin handbook/corp-mktg-project-url

<open URL in browser for MR>
To cut it down:
- Find and match all files in the
source/handbookdirectory. The URL might be found in other files too. execruns ased/gsedaction- The replacement is
https://gitlab.com/gitlab-com/marketing/corporate-marketingwithhttps://gitlab.com/gitlab-com/marketing/corporate_marketing/corporate-marketing - Verify the changes with
git statusandgit diffbefore committing them - Commit, push and create the MR from the URL
Using Visual Studio Code
You can also do bulk find and replace operations using Visual Studio Code along with the GitLab Workflow extension for VS Code. The following steps were used in this MR for updating sub-value to operating principle.
On macOS this can be a fairly seamless experience if you clone the project (www-gitlab-com for the Handbook) using SSH and then use 1Password for SSH & Git.
Once you’ve configured and installed Visual Studio Code and logged into the GitLab Workflow extension for VS Code open the www-gitlab-com directory where you’ve synced the repo.
Create a new branch by:
- Clicking on
masterin the bottom bar - Select
Create new branch - Enter a branch name
- Press the enter key
You can then use the Search functionality (⌘⇧F) to find all files matching your desired search. Searching in Visual Studio Code allows matching case, matching whole word, or using Regular Expressions. If you click on the ellipsis (…) you also have the option to include or exclude files by pattern matching on the path (uses commas to delimit multiple includes/excludes).
You can do a Replace All across all files with the matching search term directly in the Search functionality:
- Click on the disclosure arrow next to the
Searchfield or enter⌘⇧H - Enter the
Searchterm - Enter the
Replaceterm - Click on the
Replace Allbutton next to theReplacefield or enter⌥⌘Enter
Once you’ve made your edits use the Source Control (⌃⇧G) functionality to:
- Stage your changes by clicking on the
+sign for each file, or the+sign for the entire commit - Provide a name to the commit in the Message field saving with a
⌘Enter - Clicking on the publish or sync button
You can use the GitLab Workflow extension to manage the Merge Request (MR) once the branch has been pushed and MR created.
Remove trailing whitespaces
CI/CD linting jobs can use checks for trailing whitespaces. When detected, the checks cause the pipeline to fail, and require editing the files again. This can increase time to create and review MRs. The following tips help with removing trailing spaces in detected files faster.
content/handbook/marketing/developer-relations-and-community/_index.md:78:70 MD009/no-trailing-spaces Trailing spaces [Expected: 0 or 2; Actual: 1]
An IDE or the command line are common ways to fix the problem.
- Visual Studio Code: Open the file to edit. On macOS, use the shortcut
cmd k xto clear trailing whitespaces andcmd sto save the file. - vim: Change to the command mode (ESC), start a command with
:and copy the following sequence to clear all trailing whitespaces:%s/\s\+$//e. Press enter, and save the file with:wq.
Visual Studio Code provides an editor setting to remove trailing whitespaces permanently. Navigate to File > Preference > Settings > User > Text Editor > Files > Trim Trailing Whitespace and check the box to trim whitespaces when files are saved automatically. Please use this setting carefully, because some files contain many whitespaces to fix and can render the Merge Request change diff hard to read. This increases MR review time. It is recommended to remove and fix trailing whitespaces in a separate MR.
Bulk remove trailing whitespaces
You can replace trailing whitespaces in multiple files on the command line using GNU sed and find. The following example recurisvely searches the content/handbook directory for files matching the pattern *.md and executes a script on each file, which replaces trailing whitespaces inline (sed -i ...).
find content/handbook -type f -name '*.md' -exec sh -c "sed -i 's/[ \t]*$//' "$1" '{}'" \;
Remove trailing whitespaces in a merge request
Sometimes the easiest way to fix one - or a few - trailing whitespace lint errors is directly in the merge request.
- From the
Changestab in the merge request, find the file and line number mentioned in the lint error message - Click the speech bubble next to the line number to add a comment
- In the comment dialog, click the
insert suggestionbutton to copy the line into the comment dialog - Remove the trailing whitespace from the end of the line
- Click
Add comment nowand apply the suggestion
5d545e93)
