ON24
About ON24
Page in progress - Recently purchased. Marketing Operations is in the process of integrating and implementing. Follow along in epic.
Provisioning
We have a limited number of seats. Before putting in an Access Request, please open an issue for Marketing Operations to review your request. Once your request is approved, then proceed to open an Access Request
User Roles
ON24 licenses are only required for people who are building webinar programs (presenters/speakers do not need a license). We have a limited number of licenses and adding more comes with a price.
Platform Login: Administrative Access (may also be referred to as a license or seat)
- The Platform Login has full access to Elite and all functionality, including the ability to create and edit webinars
- These logins are ONLY meant for those creating, setting up, and developing webinars / events
- The ability to edit / change logins is available
Presenter Roles: URL/Link Access
- Presenters may log in as Producer, Presenter, or a Q&A Moderator
- All three roles will access the event via a unique link for each event
The chart below outlines the user permissions for each role (Producer, Presenter, and Q&A moderator)
| Producer | Presenter | Q&A Moderator | |
|---|---|---|---|
| Upload slide and videos | x | ||
| Add poll questions | x | ||
| Start/stop the webinar | x | ||
| Arrange presentation materials | x | ||
| Change webcam layouts | x | ||
| Mute and disconnect presenters | x | ||
| Advance slides | x | x | |
| Push poll questions to the audience | x | x | |
| Whiteboarding tools | x | x | |
| Screen share | x | x | |
| Q&A | x | x | x |
| Team chat | x | x | x |
Resources
Please note, you will not be able to access these trainings until you have an ON24 login. You can request access by opening a MOps issue.
- Getting Started with Webcast Elite Certification
- Preparing Your Webinar Content
- Presenter Certification & Training Program
- ON24 Analytics 101 and Analytics 102
- ON24 Knowledge Center
- ON24 Office Hours
Things to know
- Customize your webcast list view by using the 3 vertical lines as seen in the screenshot. Use this to see additional webcast information
- Reminder emails, follow up emails and registration emails are all being handled by Marketo at this time. We may consider a different workflow as we become more accustomed to the platform
- Our On24 contract includes up to 1,000 live attendees per webinar. If we were to exceed that number, attendees will still be able to join the live event and our account would be billed overages. The fee structure for attendee overages past 1,000 and up to 2,500 is $500 per 250 additional attendees.
- Live tech support (provided by On24) is available on a per-webcast basis. Live support costs $850 per 90 minutes of support and includes 30 minutes of presenter prep and video checks before the start of the webinar. As a best practice, we recommend requesting support for webcasts with more than 500 attendees and multiple presenters. Support can be requested by clicking the
Order Servicesbutton in the top right corner of the webcast overview in the On24 platform.
Use of tags
Current use of tags will not supercede use of marketing analytics filters elsewhere and will primarily be used within On24 Analytics to review virtual event performance. There is a limit of 10 tags per event. Each tag has an intended grouping, like workshops or webcasts or for tracking the intended target audience or the virtual event’s primary or available languages.
Tags in On24 will only be available in the tag dropdown if they have already appeared in a previous console build. Due to this limitation, as the tags are used on live virtual events, they should be removed from the template and test consoles where they were initially placed - so those empty consoles do not affect analytics. MktgOps will own the task of periodically removing the tags from template and test consoles, but it is appreciated if others take the initiative.
Below are tags the teams have strategitically created, but feel free to create your own custom tag if you find a practical use for it. Current 40 tags in use for the teams:
DO NOT USE: Added to templates created by the On24 team that we do not intend to use at GitLabTemplate: Use a console with this tag when cloning a new webinar event. Remove the tag from any console template intended to go live. There should, for the time being, only be 4 consoles with this tagGitOpsDevOps PlatformCICDAutomated Software DeliveryCompetitiveLanguage: JapaneseLanguage: KoreanLanguage: FrenchLanguage: GermanLanguage: ItalianLanguage: SpanishLanguage: English w/ interpreterType: Workshop(Used for Field Marketing Hands-on workshops)Type: Webcast(only used when another type is not used)Type: ABM Webcast(Used for events designed for a single or small subset of specific accounts)Type: GTM Webcast(A webcast aligned with a GTM, produced by the GTM team.)Type: Technical Demo Series(Used for the weekly Technical Demo Series)Audience: PartnersAudience: Customers - PractitionersAudience: Customers - ManagersAudience: Customers - ExecsAudience: Prospects - PractitionersAudience: Prospects - ManagersAudience: Prospects - ExecsAudience: Channel(Directly targeting the channel partner, any member of the partner organization)Audience: Channel Marketing(Any activity directly targeting the marketing people within the channel/partner organization)GlobalAPACEMEAAMERUS Public SectorAll SegmentsSMBMMENTCase Study(Used on any webcast that presents a customer story)Partner Involved(Used on any webcast that is co-branded or has a partner speaking on the webcast)
Creating an ON24 Webcast
Note: Live webinars, the start time, duration, and present type, cannot be changed 1-hour prior. For simu-live and sim-2-live webinars, changes cannot be made 2 hours prior. The drop-down menus will become inactive to ensure the webinar is properly set up and the technical infrastructure is prepared. For on-demand recordings, the start time represents when you want the presentation to be available for the audience to view. It can be changed as long as the scheduled start time has not already passed.
Step-by-step guide
-
Log in to ON24 by visiting https://wcc.on24.com/webcast/login
-
To create a brand new event, click on Create Webcast in the top corner of your library.
-
Enter a title for your webcast and choose your
Present Type. Keep in mind the webcast title will be used as a token on theregistration confirmationandreminderemails, which are handled via On24 automatically, so make sure the title used is reader friendly. -
Choose the date and time your event is to go live. When choosing your time zone, we recommend using one with a city or country listed. The generic time zones do not update with time changes, such as Daylight Savings Time.
- Note: If you change the time of a webinar, you will need to notify those already registered of the change. Webcast Elite will not automatically notify them of the change. You can access a list of registrants through the Reports URL.
-
Choose the duration of your event. The duration can be set in 15-minute increments for any webinar under two hours. Webinars longer than two hours may be set in 30-minute increments. The duration will display on the registration page and in the calendar reminders.
-
Choose the audience language for your event. Choosing a language here will update the language for all of the system’s static messages, buttons, and default email confirmations. You can switch languages as needed. Changing the language here will not update any other webcast in your library, and will not automatically translate any custom text you previously added to the event.
-
Tag your event with up to 10 custom tags by clicking on the “+”, to help you filter your webcast library. These tags are for internal purposes and will not be shared with the public. Previously used tags will appear in the drop-down.
- Please remember to remove the
TEMPLATEtag from your On24 event as other users need to be able to easier fine the console templates.
- Please remember to remove the
-
Registration confirmation,24 Hour Reminderand1 Hour Reminderemails are handled through On24 rather than Marketo, for setup simplicity. Make sureRegistration Confirmation Email,Reminder emailandReminder 2 emailare all toggled on. You can also clickPreview/Editto view the email and check for any formatting you’d like to change or to review active tokens. If you make changes, remember toSaveand send yourself apreviewemail to make sure nothing is broken.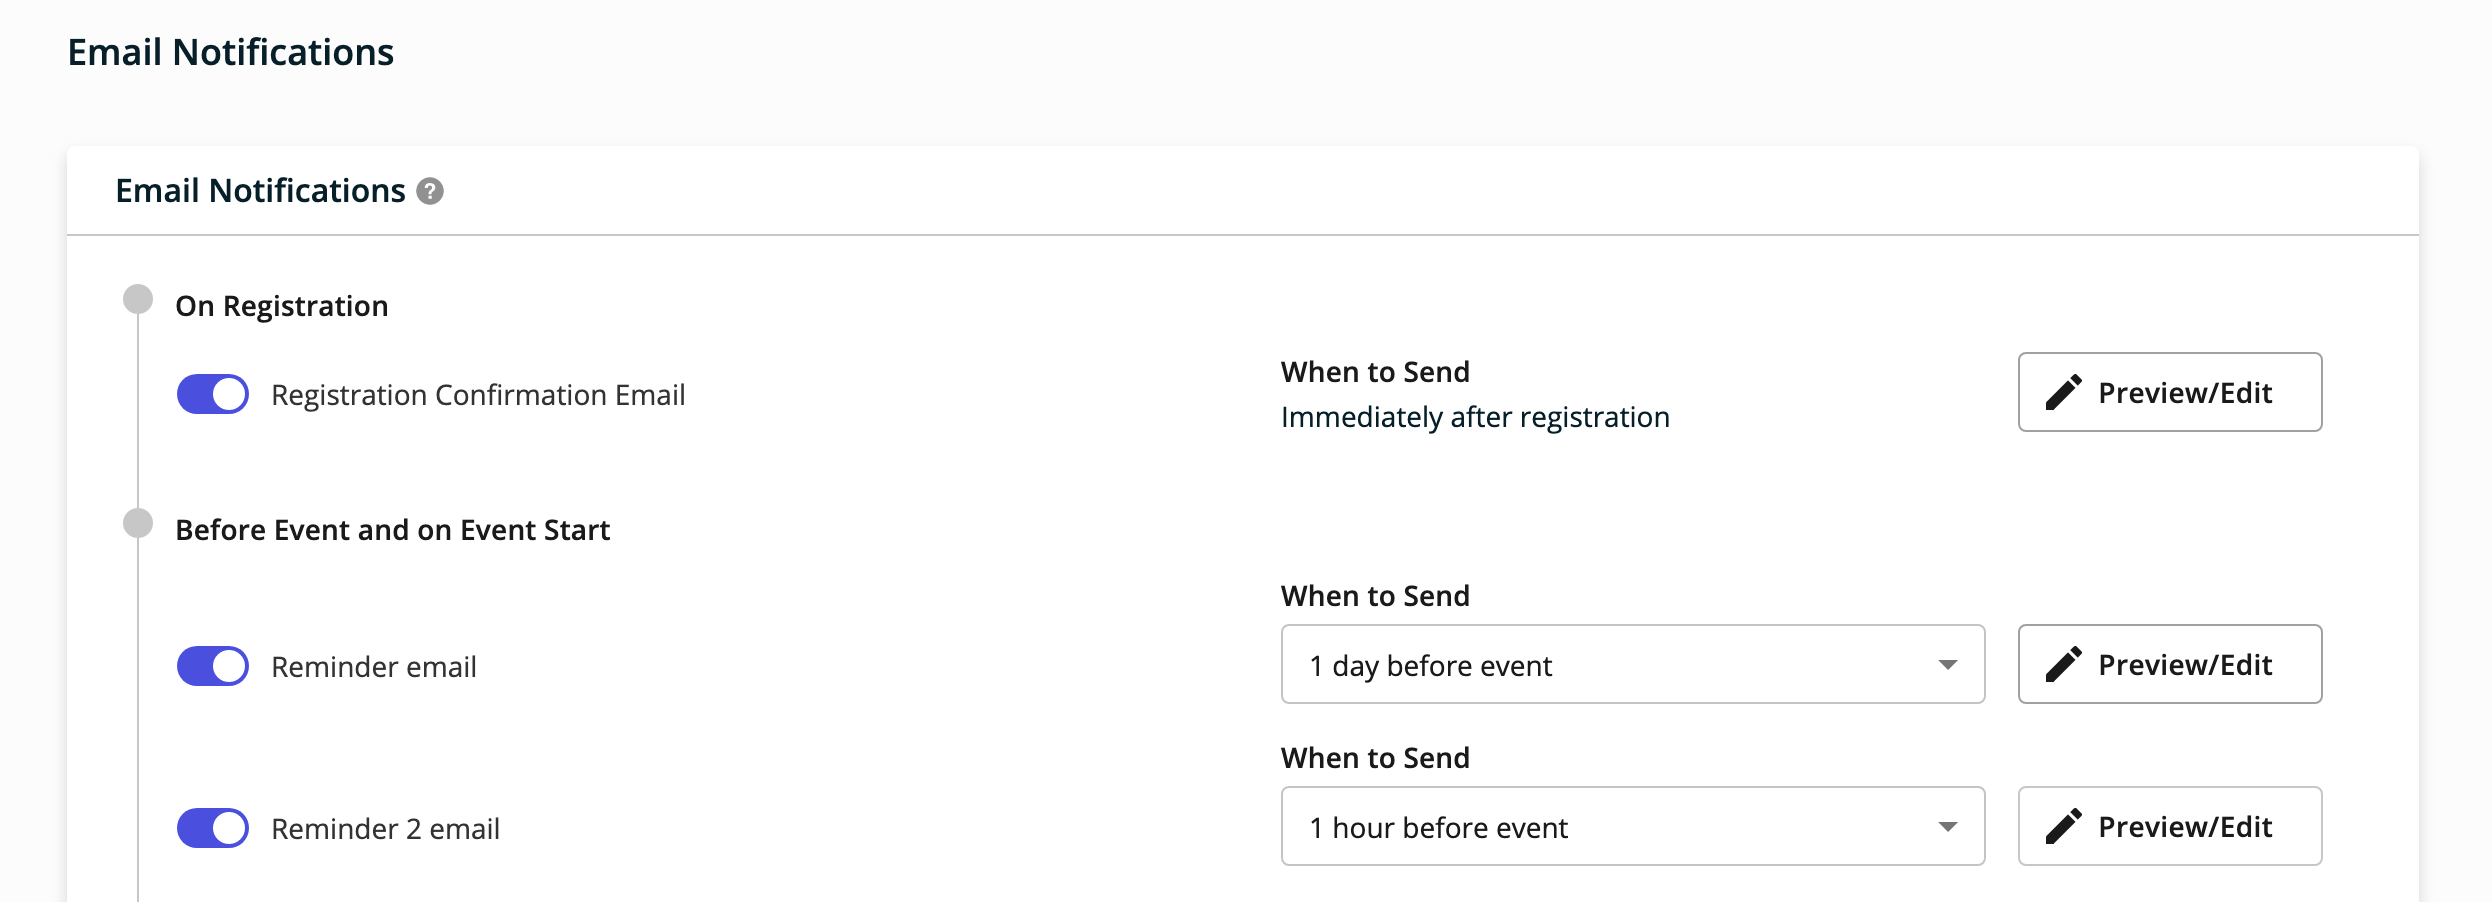
- A note about email reminders: Registrants may receive the reminder emails at varying times depending on their email administrators queuing on their end (prioritizing resources, etc.) and how many emails are being processed by ON24 at any given time. As a best practice, we recommend keeping the subject lines generic to accommodate for these delays. Instead of saying, “The webinar begins in 15 minutes,” consider changing it to “The webinar will begin at the top of the hour.” Read On24’s full email reminder documentation here
-
ON24 captures Benchmark data from all the webcasts run through Webcast Elite. Help them organize that data by choosing a Category and Application, if you’d like.
-
Once you’ve filled in all the required fields, click Create. The system will automatically generate an Event ID and Webcast URLs for your event.
Event IDs
Each webinar will be given a unique Event ID. This number will be listed in your webcast library, as well as at the top of the screen throughout the platform. Provide this number when reaching out to ON24 about the event.
Webcast URLs
Click the globe icon in your webcast library or on the chain icon anywhere in an event to access the URLs for the webcast.
- Audience URL - The audience URL is used to promote your webinar and access the audience view of the webcast. This URL can be distributed for posting on various websites or for inclusion in email notifications.
- Reports URL - Use the Reports URL to access the online reports associated with the webcast.
- Preview URL - The Preview URL is used for previewing the audience console and test functionality before the webcast goes public.
- Present URL - Use the Present URL to access the presenter tool (either Presentation Manager XD (PMXD) or Elite Studio). One of these (depending on which you are using) will be the tool the presenting team will use to produce the webinar, manage the presentation elements (slides, polls, etc.), and interact with the attendees of the webcast.
Console Builder
The Console Builder is at the heart of creating a custom webcast experience for your audience. The webcast console is what your audience will see when they attend your webcast. We currently have 2 console templates:
Standard event template, which includes a media player, slides, Q&A, resources, and speaker bio modulesXL Media Player, which is a media player with no slides. This template should be used if your presenter prefers to screen share their slides, as opposed to uploading their deck into a separate module. This console also includes Q&A, resources, and speaker bio modules Note we are sticking to using specific templates for the time being while we build out integrations and test platform capabilities vs team use case.
Follow these steps to apply a console template:
-
Click
Console Builderfrom the left hand menu -
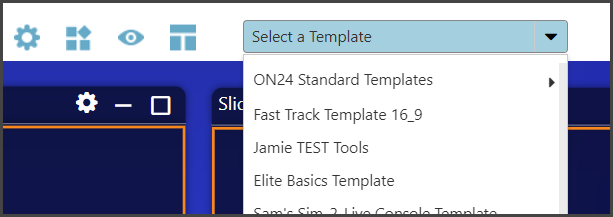
Open the Template Library, housed in the Select a Template drop-down
-
Double click on the name of the desired template
-
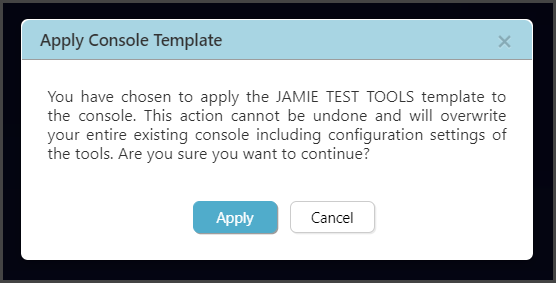
When applying a console template, all setting and tools from the saved template will override the existing console. A confirmation dialogue will pop-up to prevent you from accidentally wiping out your current console.
Connecting On24 Web Events to Marketo Programs
Marketo Program Templates and the Differences
- Alliance template: YYYYMMDD_EventName_Alliance_On24_template
- This program uses
FORM 3299: Alliancesand fills in theCRM Partner IDfield using themy.partnerid}}program token. Be sure to fill in the token.
- This program uses
- Partner template: YYYYMMDD_EventName_Channel_Partner_Webcast_On24_template
- This program uses the
FORM 3432: Channel Partner Webcastform. This form fills in fieldChannel Recordwithtruein order to appropriately route the registrants.
- This program uses the
- Webcast template: YYYYMMDD_EventName_Webcast_On24_template
- This is a standard webcast program with no bells and whistles, uses
FORM 1592 Webcast.
- This is a standard webcast program with no bells and whistles, uses
- Workshop templates:
- Each of the workshop program templates comes premade with content specific to the workshop topic. Topics are: CICD, DevOps Automation, Jenkins Migration, Project Management and Security.
Setting up Landing pages and email assets
Much of the landing page set up is controlled by program tokens, same as email assets.
- To see what tokens are used on the LP or email asset, create a draft of the landing page and take note of what tokens you see. Tokens are depicted as something similar to this when they are not plugging in information: {{my.ThisIsAtokenExample}}
- On landing pages, the LP preview,
elementsandvariablessections list all available sections of text - many of which have tokens already in place. - What the tokens plug in to the LP or email asset and other various assets can be changed at the program level, under the
tokenssection. Many tokens have definitions of what they are and what they plug in to the program assets. Take special care when changing tokens as they can affect buttons/links. - The
elementsandvariablessections on landing pages will help determine the look of the LP.Elementsis primarily for text editing whereasvariablesaffects page meta data and allows toggling of sections’ visibility. Feel free to toggle any section on/off to see what appears or disappears. Change the LP to your liking and or use case. - With
on-demandorgated contentLPs, there is also an option to toggle video/content previews, if the content host allows for the proper embed URL. In this example, the embed preview is a Vimeo feature, so mileage may vary on how often video previews can be used. It is video host dependent. To set this up:- Add text to describe the
valuearea under theValue Contentsection of the LPelements. This element acts as a header for thevalue contentsection - Place embed preview links and update wording in the
Value ExamplesLPelement. - Under LP variables, toggle
valueBox VisibilityandvalueBox Examplesto `visible to activate the sections on the LP
- Add text to describe the
Webcasts
After completing the creation of an On24 web event, the next step is to connect the webinar to Marketo. Something to note, only the workshop template has a difference in set up.
- From the previous event set up, please be sure to have the
Event ID,Audience URLandkeyhandy. Thekeyis a several character long alphanumeric snippet and can be found at the end of the Audience URL as seen here. - Navigate to the Marketo template folder
Templates - On24. Located in this folder are program templates Designed with triggers to work with On24’s Marketo cusom object. Make a copy of the needed program type template in the appropriate folder. - Next step will be to connect the Marketo program to the On24 webcast. In the Smart Campaigns folder of the newly cloned program, add the On24
Event IDto the following smart campaigns on theON24 Attendee is Updatedtrigger filter:- 04 On24 Processing - Attended
- 04 On24 Processing - Follow Up Requested
- 04 On24 Processing - On Demand - On24
- 04 On24 Processing - No Show
- This smart list filter uses
Has On24 Attendeeinstead ofOn24 Attendee is Updatedlike the others
- This smart list filter uses
- Next activate the following smart trigger campaigns:
- 01a Registration Flow - Form fill
- 01b Registration Flow (Multi-timeslot) - only use if a multiple time slotted event
- 04 On24 Processing - Attended
- 04 On24 Processing - Follow Up Requested
- 04 On24 Processing - On Demand - On24
ORPathfactory- Only activate this smart campaign if it is appropriate for the webinar, such as in the event the webinar will be left available for on-demand viewing via On24 or via Pathfactory. Select the one most appropriate or select both
- 04 On24 Processing - No Show.
- No Show will not be activated as a trigger, but as a batch campaign scheduled to run 6 hours after the event is scheduled to start. If event will go longer than 6 hours, make appropriate adjustments.
- Note that
Interesting Momentsafter September 2024 are handled by programs’ processing campaigns calling to a global executable campaign
- 01a Registration Flow - Form fill
- Unlike other tools, the On24 room and Marketo program do not need to be connected via the
Event Partnerfield on the Marketo program. All data transfer is done via theEvent IDand smart campaigns. - Before continuing on, activate asset expiration where appropriate. Appropriate items to set an expiration would be, for example, smart campaigns like the
04 On24 Processing - Attendedcampaign, which is no longer needed after the event ends. Set expirations on all landing pages depending on when they are no longer needed. - Update the program tokens as needed within the program. All email assets and landing pages are token dependent. Important tokens to review:
my.webcastDate,my.webcastTitleandmy.event locationare standard to update.my.eventidandmy.keyneed to be filled out to have seamless registration work correctly between Marketo and On24. Thekeyis a several character long alphanumeric snippet and can be found at the end of the Audience URL as seen here.- Please note that On24 made a change in the last half of 2024 on how to access the
audience URLand therefore eventkeys. Use the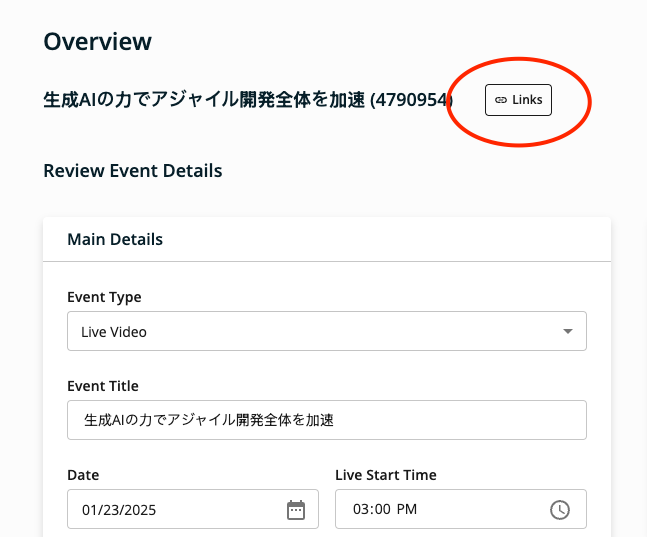 found to the right of the event title to open up the
 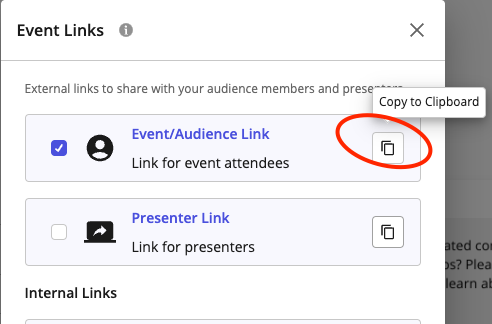 . From there two options exist to get the key: 1) Click the “copy to clipboard” button to the right of
 Event/Audience Link. You can then paste the URL wherever it’s most convenient to gain access to thekeyfound in the last portion of theaudience URL. 2) Or click on the link to follow the URL to the event landing page, where the key can also be grabbed from the URL and copied. To answer the two basic questions: Yes, this change is not intuitive. And no, there is not currently a better method. Sublime.
- Please note that On24 made a change in the last half of 2024 on how to access the
my.languageis set toenglishas a default, but if the presentation is localized be sure to change to the spoken languagemy.bullet1-my.bullet4appear on theregistration landing pageso be sure to update either the tokens or the templates to accommodate. The series of tokens formy.InviteEmailBody1,my.InviteEmailBody2,my.InviteEmailBody3andmy.bullet1-4also appear on theinvitationemail templates, with theInviteEmailBody#corresponding to which email in the series that text will appear on.- If speakers are to be shown on the landing page, be sure to update the series of
speakerstokens. If there is no need to display the speakers, deactivate thespeaker listson theregistration landing pagetemplate. my.introParagraphand in some placesmy.2ndparagraphare utilized to fill in landing pages.- Update others as needed, but be sure to preview each asset to understanding what needs to be updated and where.
Invitationemail campaigns are supplied within the template.- Utilize
Waitlistemail and smart campaigns as needed.
Attended On-Demand
After accomodations have been made to add the webcast recording in Pathfactory for Attended On-Demand purposes, some additional steps must be taken.
04 On24 Processing - On Demand - On24should already be activated and it will remain so as long as the webcast is available to registrants in On24. Only registrants who have signed up via the original webcast registration form should be able to view this in On24.- Add in additional tokens as needed to send out the
On-demand auto responderasset via the04 On24 Processing - On Demand - Pathfactorysmart campaign. The main token to fill in is {{my.ondemandURL}}, which is the link to the on-demand PF track. Also fill-in the filters present on the smart list for this program’s specifications. - Trade out the form on the landing page when switching to
Attended On-Demand. In most cases, this means tradeFORM 1592: WebcastforFORM 2076: On-demand Webcast. - Activate
04 On24 Processing - On Demand - Pathfactorywhen preparations are complete. This smart campaign will email a link to the Pathfactory track where viewers can watch the webcast.
Workshops
Much of the process to set up On24 and Marketo for Workshops is similar to the Webcast setup previously explained. A few differences to note:
- There are multple Marketo templates to accommodate different workshop types. Please select the template best suited for your workshop. Primary differences between these templates is the content found in the invitation emails and landing pages:
- CI/CD Workshop template: YYYYMMDD_EventName_CICD_Workshop_On24_template
- DevOps Automation template: YYYYMMDD_EventName_DevOps_Workshop_On24_template
- Jenkins Migration template: YYYYMMDD_EventName_Jenkins_Workshop_On24_template
- Project Management template: YYYYMMDD_EventName_ProjectManagement_Workshop_On24_template
- Security template: YYYYMMDD_EventName_Security_Workshop_On24_template
- Workshops utilize a few more program tokens, namely
my.agendaTimeandmy.agendaTopic.my.heroImagehas also been updated for each program to suit its topic. Feel free to update the tokens, as needed. Do not worry about updating themy.speaker...series of tokens. They are not used in workshops.- Please note the invite emails are mostly prewritten for workshops and do not utilize tokens quite as heavily as the webcast template. Review and change them, as desired.
- Workshops utilize the
Week prior - Code for registrants (operational)email campaign to distribute information vital for the user’s success during the upcoming workshop. These emails notify the user of workshop prerequisties: a) create a GitLab.com account b) create an Instrupt account. Schedule these emails to distribute one week prior to the event.
Contact Us widget form data collection
The contact us widget on the On24 console requires the use of email. In order to accommodate this and get contact us form fills to sales faster, we are utilizing the email address On24questions@gitlab.com. Once requests are received, Zapier is being utilized to append the email contents to the Last Event Notes field. The custom object trigger found on the Follow Up Requested smart campaign is being utilzied to change program status
Adding Event Notes to Marketo/SFDC
In order to get Q&A, poll and survey data into Marketo from On24, a list upload will be required. Because this is a manual process, before attempting to upload webinar notes into Marketo ask yourself: Will Sales or BDRs/SDRs use this data? If the answer to this question is No, do not proceed with adding notes to Marketo. If there is a mixture of useful and not useful notes taken from the webinar, only pull the useful data into the spreadsheet for upload. Use your best judgment when deciding what leads need notes added and which notes to leave out.
Steps to upload data (subject to change after introducing more automation)
- Export the data from the webinar into a spreadsheet. Access the report export feature by selecting the webinar’s
optionsbutton, found on the list of webinars page in the On24 interface (the 3 dots under theActionscolumn). The dropdown option is titledReport. - Once in the webinar
Reportarea, there is a spreadsheet download button next to theDashboardspage header. It looks like a downward arrow. - Here is the link to the On24 list upload template. Similar to the regular list upload spreadsheet,
do not make changes to the orignal spreadsheet. Make a duplicate of the spreadsheet to be used specifically for your upload. - Only upload the data shown in the spreadsheet column headers. Pick and choose from the exported On24 spreadsheet what notes you want uploaded and add them to their appropriate columns on the freshly duplicated
On24 Notes Upload Doc. It is okay if some of the columns are left blank.On24 Note Upload Activateshould be filled in withTrue.- The Marketo Program Name must match 1:1 with what is in Marketo.
- For every poll or survey answer uploaded, be sure to include the question asked.
- To start, these will be treated the same as manual list uploads to be completed by MktgOps. Please follow the regular process of sharing the spreadsheet with MktgOps to have them upload via a list upload issue. Soon this will be moved to more of a drag-and-drop process, similar to the self-service list import process. This page will be updated when that is ready.
Q&A Syncing into Salesforce
After an update from Q2 2024, Workato now automatically pulls Q&A data from On24 into Marketo, giving easier access for those interested in viewing conversations between GitLab staff and attendees from On24 events.
Field Matching Instructions for Marketing Ops (Outdated Upload Instructions)
The smart campaign being used to compile the notes is found here: Compile On24 fields into Last Event Notes. This flow can only be triggered once per hour. The field matching for the upload spreadsheet is as follows:
On24 Note Upload Activate=On24 Note Upload Activate- Please note that this triggers the smart campaign to compile notes into Last Event Notes
Marketo Program Name=Last Event Program Name- Used to label where the webinar notes came from
Email Address=Email AddressOn24 Q&A=On24 Q&APoll Question 1=On24 Poll Q1, etcPoll Answer 1=On24 Poll A1, etcSurvey Question 1=On24 Survey Q1, etcSurvey Answer 1=On24 Survey A1, etc
Reporting
The On24 Engagement Score is an aggregate of all of the activities that an attendee could do while viewing on of your events. It will give you an idea of how often the engagement tools you’ve added to the console of the event are being used. Each individual attendee will have their own engagement score, and there is an average engagement score for your entire webcast program that is available on the Analytics Dashboard in the platform. Read more about Engagement Scores here
ON24 FAQ
The campaigns team has started a FAQ document here. *Once it is completed, the text will be added to this page.
Fields That Sync Between On24 and Marketo
Fields we have set up to directly sync between On24 and Marketo are as follows:
- First Name
- Last Name
- Company
- Job Title
- Address
- City
- State
- Postal Code
- Country
- Work Phone
- more tbd
Data Removal Requests
If a user requests we remove their data from On24, email dsr@on24.com with the request and On24 will manage the removal.
c4c9b3d1)
